• Skip to primary navigation
  • Skip to main content
  • Skip to primary sidebar
  • Home
  • About
    • Publications & Press
    • Books
  • Nutrition
    • Women’s Health
      • Fertility
    • Ask the RDN
    • Simple Swap Tips
  • Recipes
  • Services
    • Shop
  • Contact
  • Navigation Menu: Social Icons

    • Facebook
    • Instagram
    • Pinterest
    • Twitter
    • YouTube

Shaw Simple Swaps logo

menu icon
go to homepage
search icon
Homepage link
  • Home
  • About
    • Publications & Press
    • Books
  • Nutrition
    • Women’s Health
      • Fertility
    • Ask the RDN
    • Simple Swap Tips
  • Recipes
  • Services
    • Shop
  • Contact
  • Navigation Menu: Social Icons

    • Facebook
    • Instagram
    • Pinterest
    • Twitter
    • YouTube
    • Facebook
    • Instagram
    • Pinterest
    • Twitter
    • YouTube
  • ×

    Blog

    No Bake S’mores Chocolate Pretzel Bark

    September 10, 2021

    Stack of 3 chocolate pretzel bark thins.

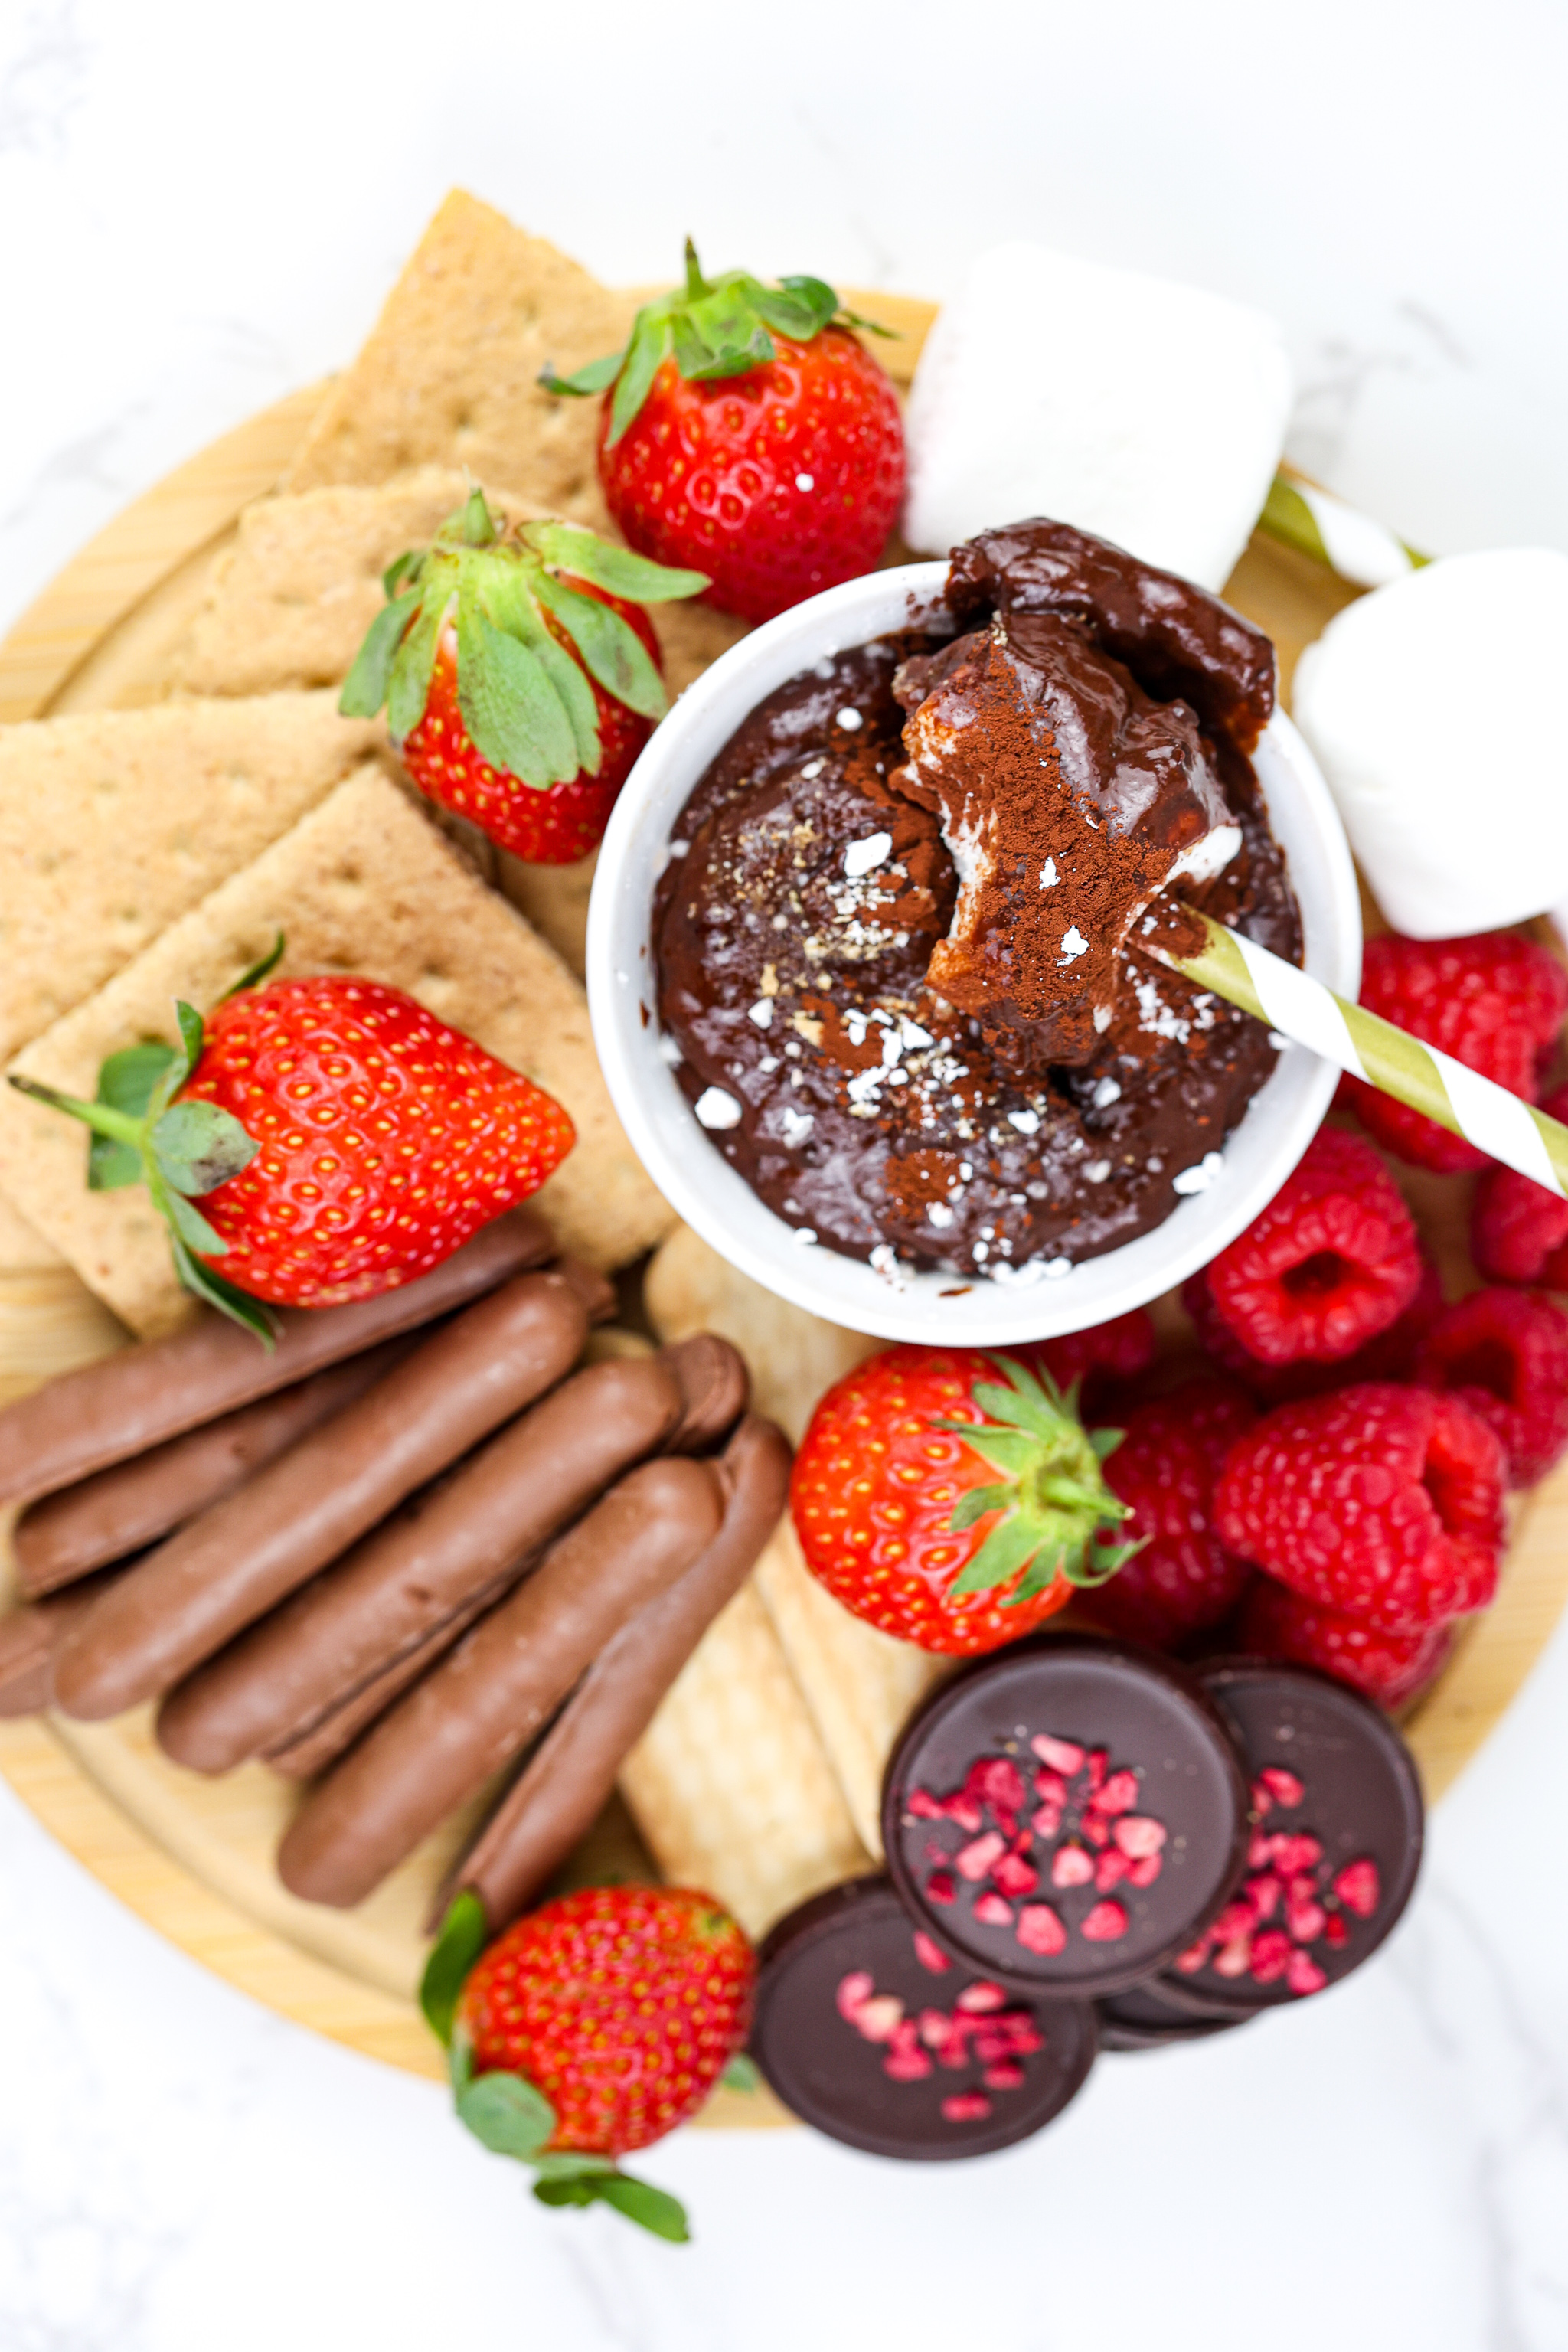
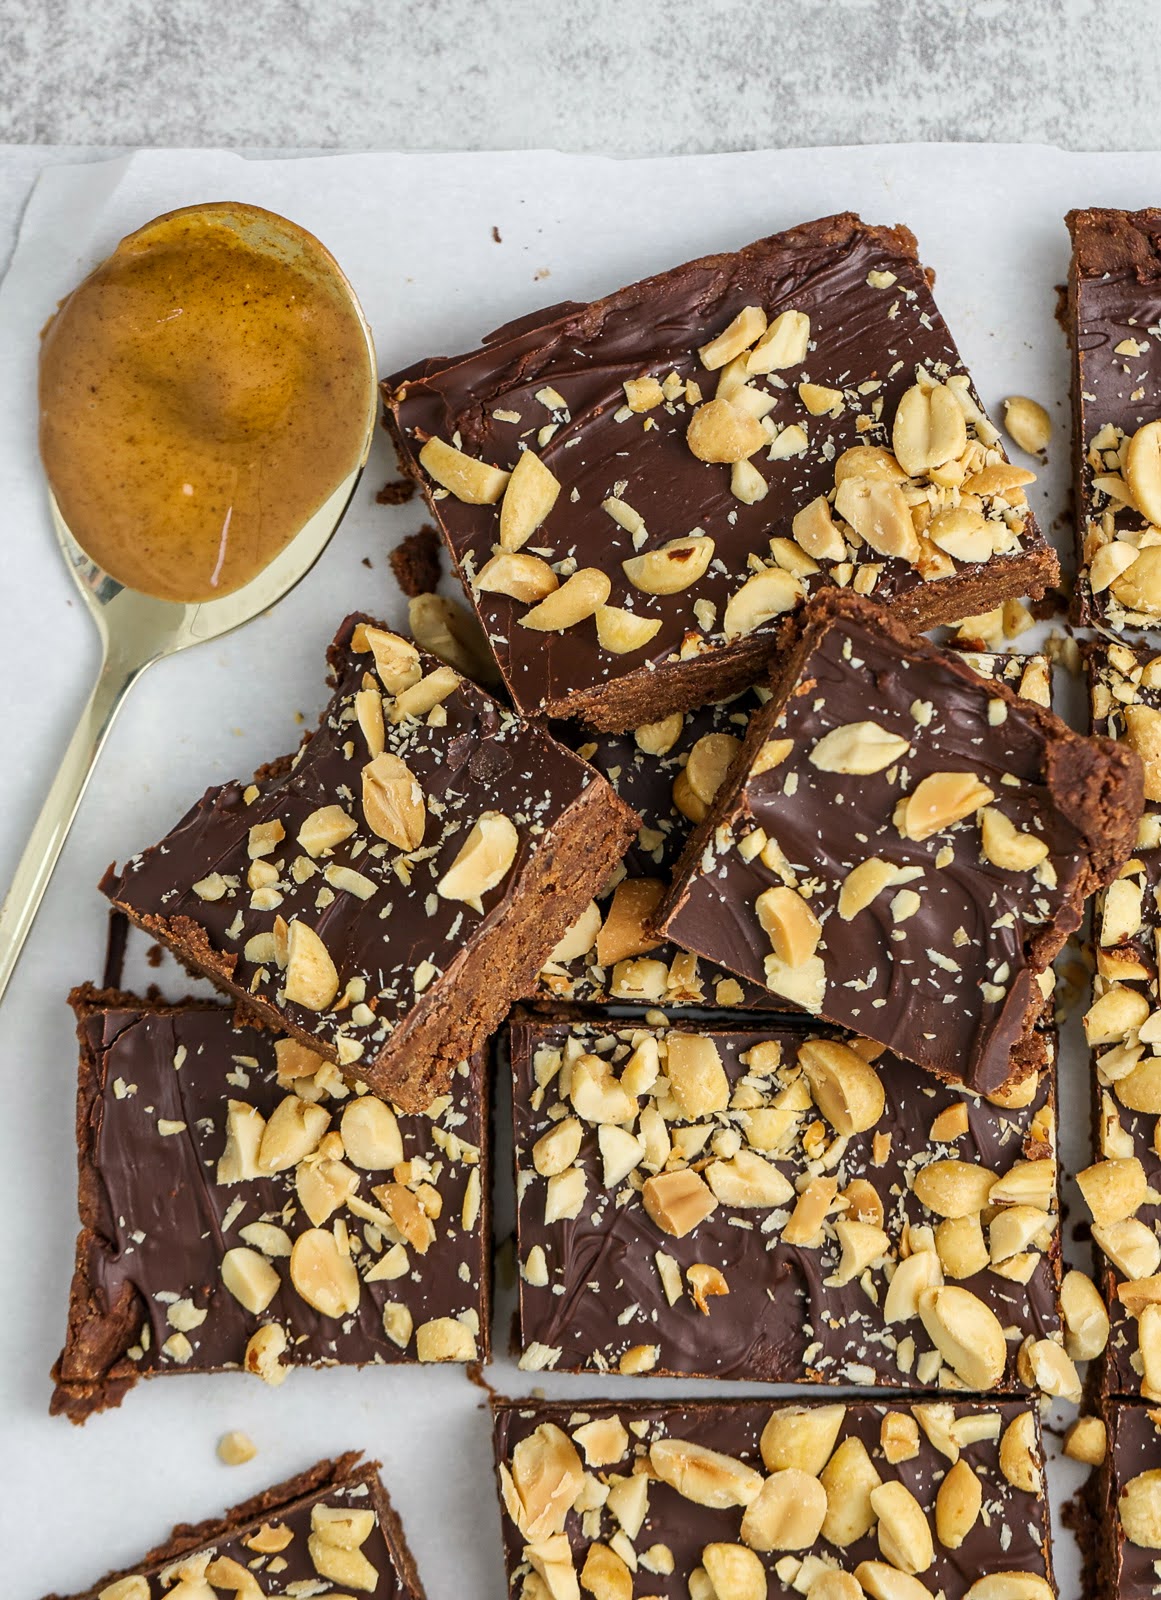
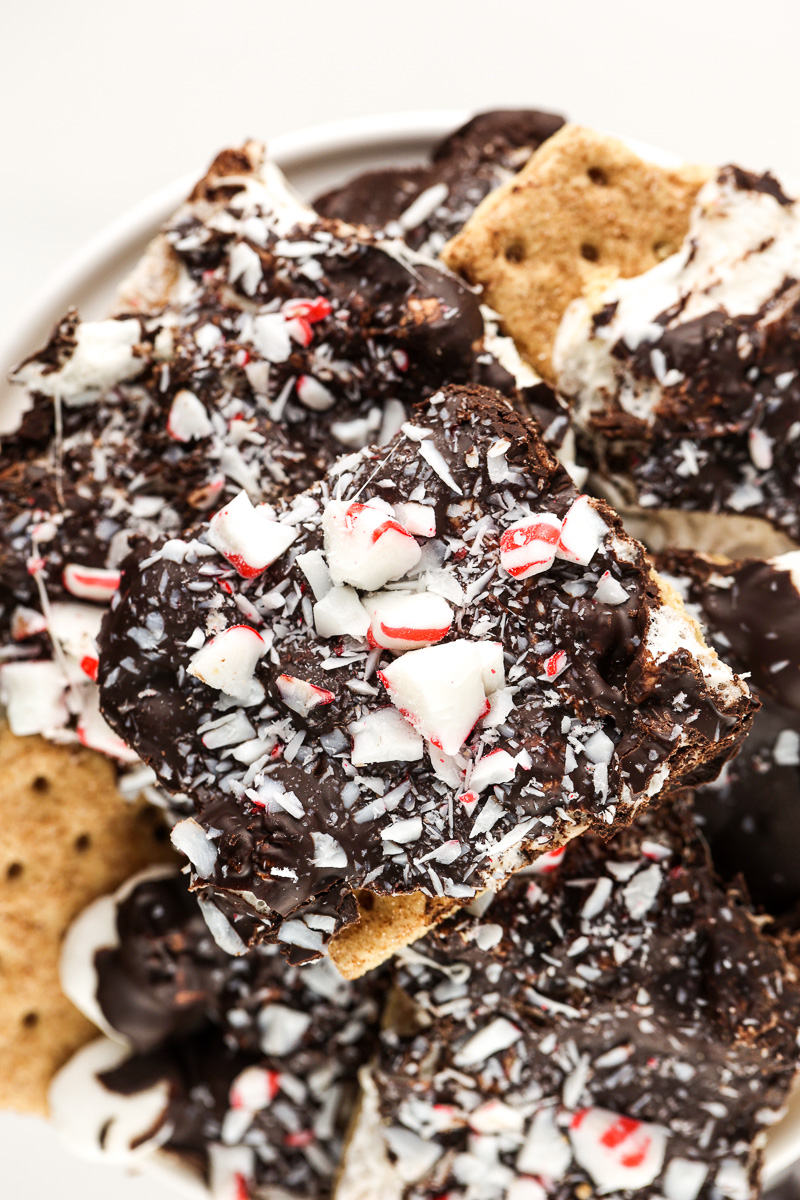
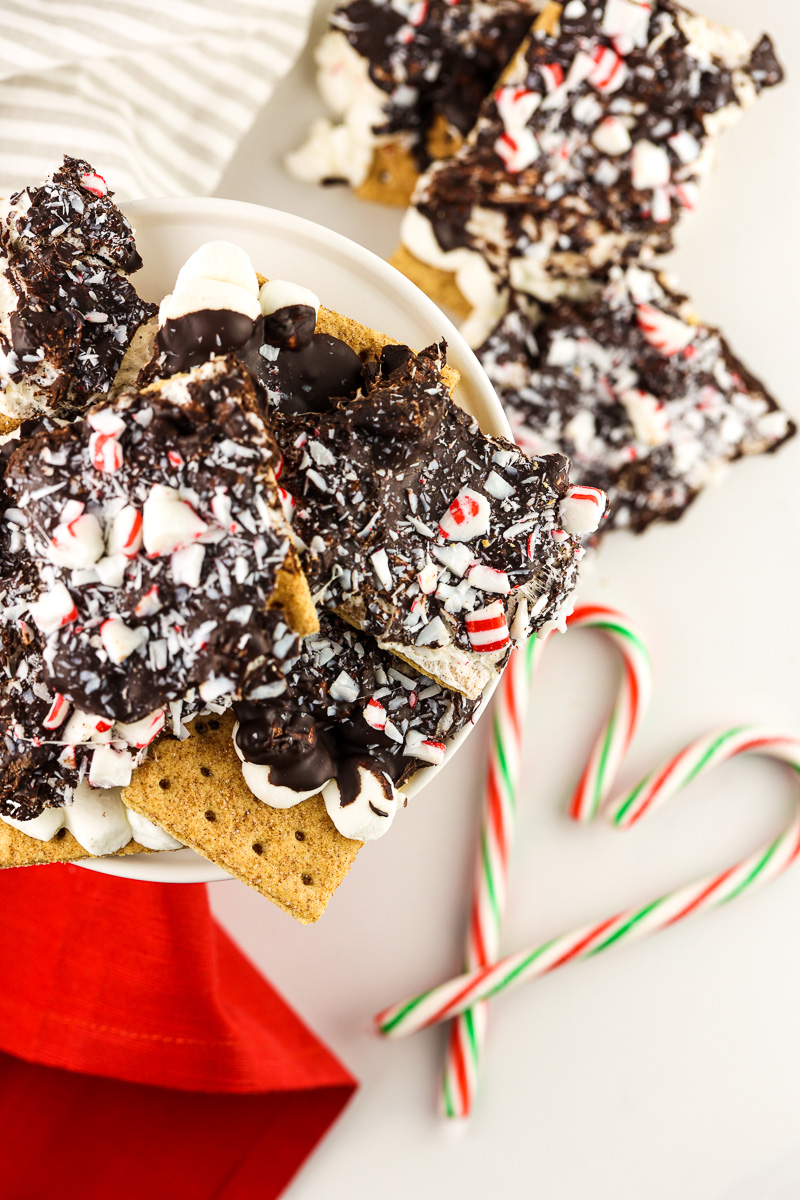
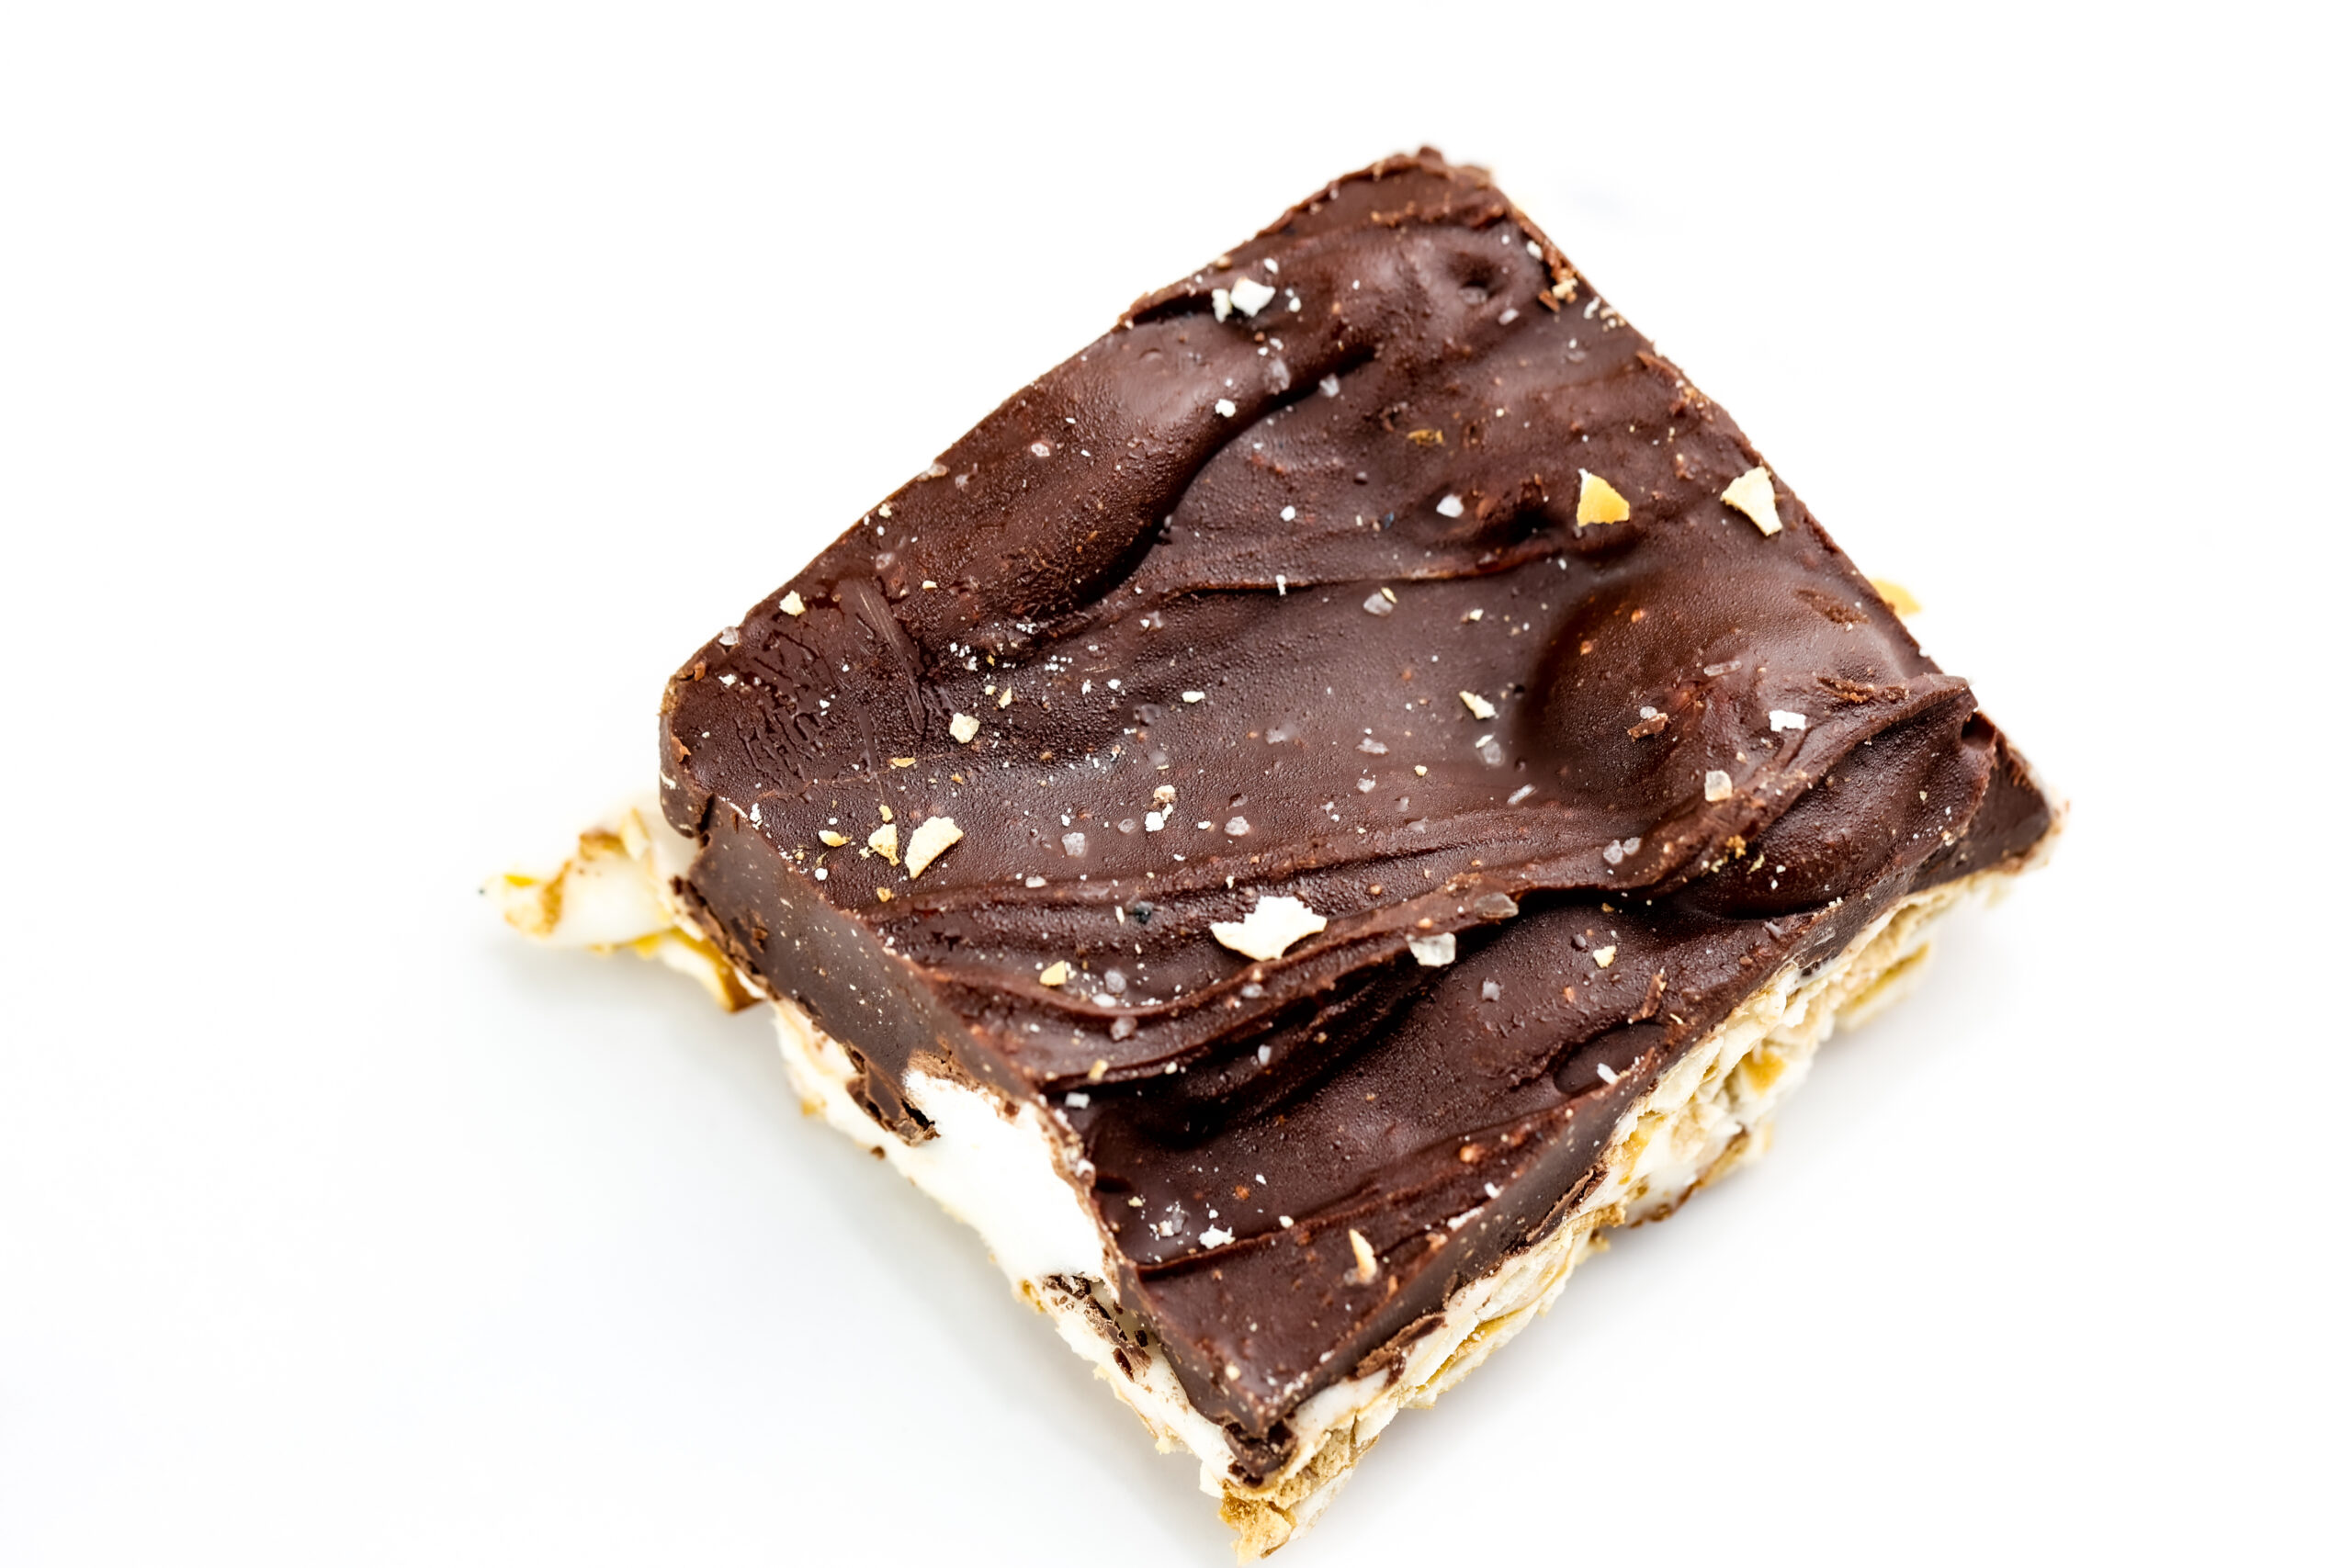
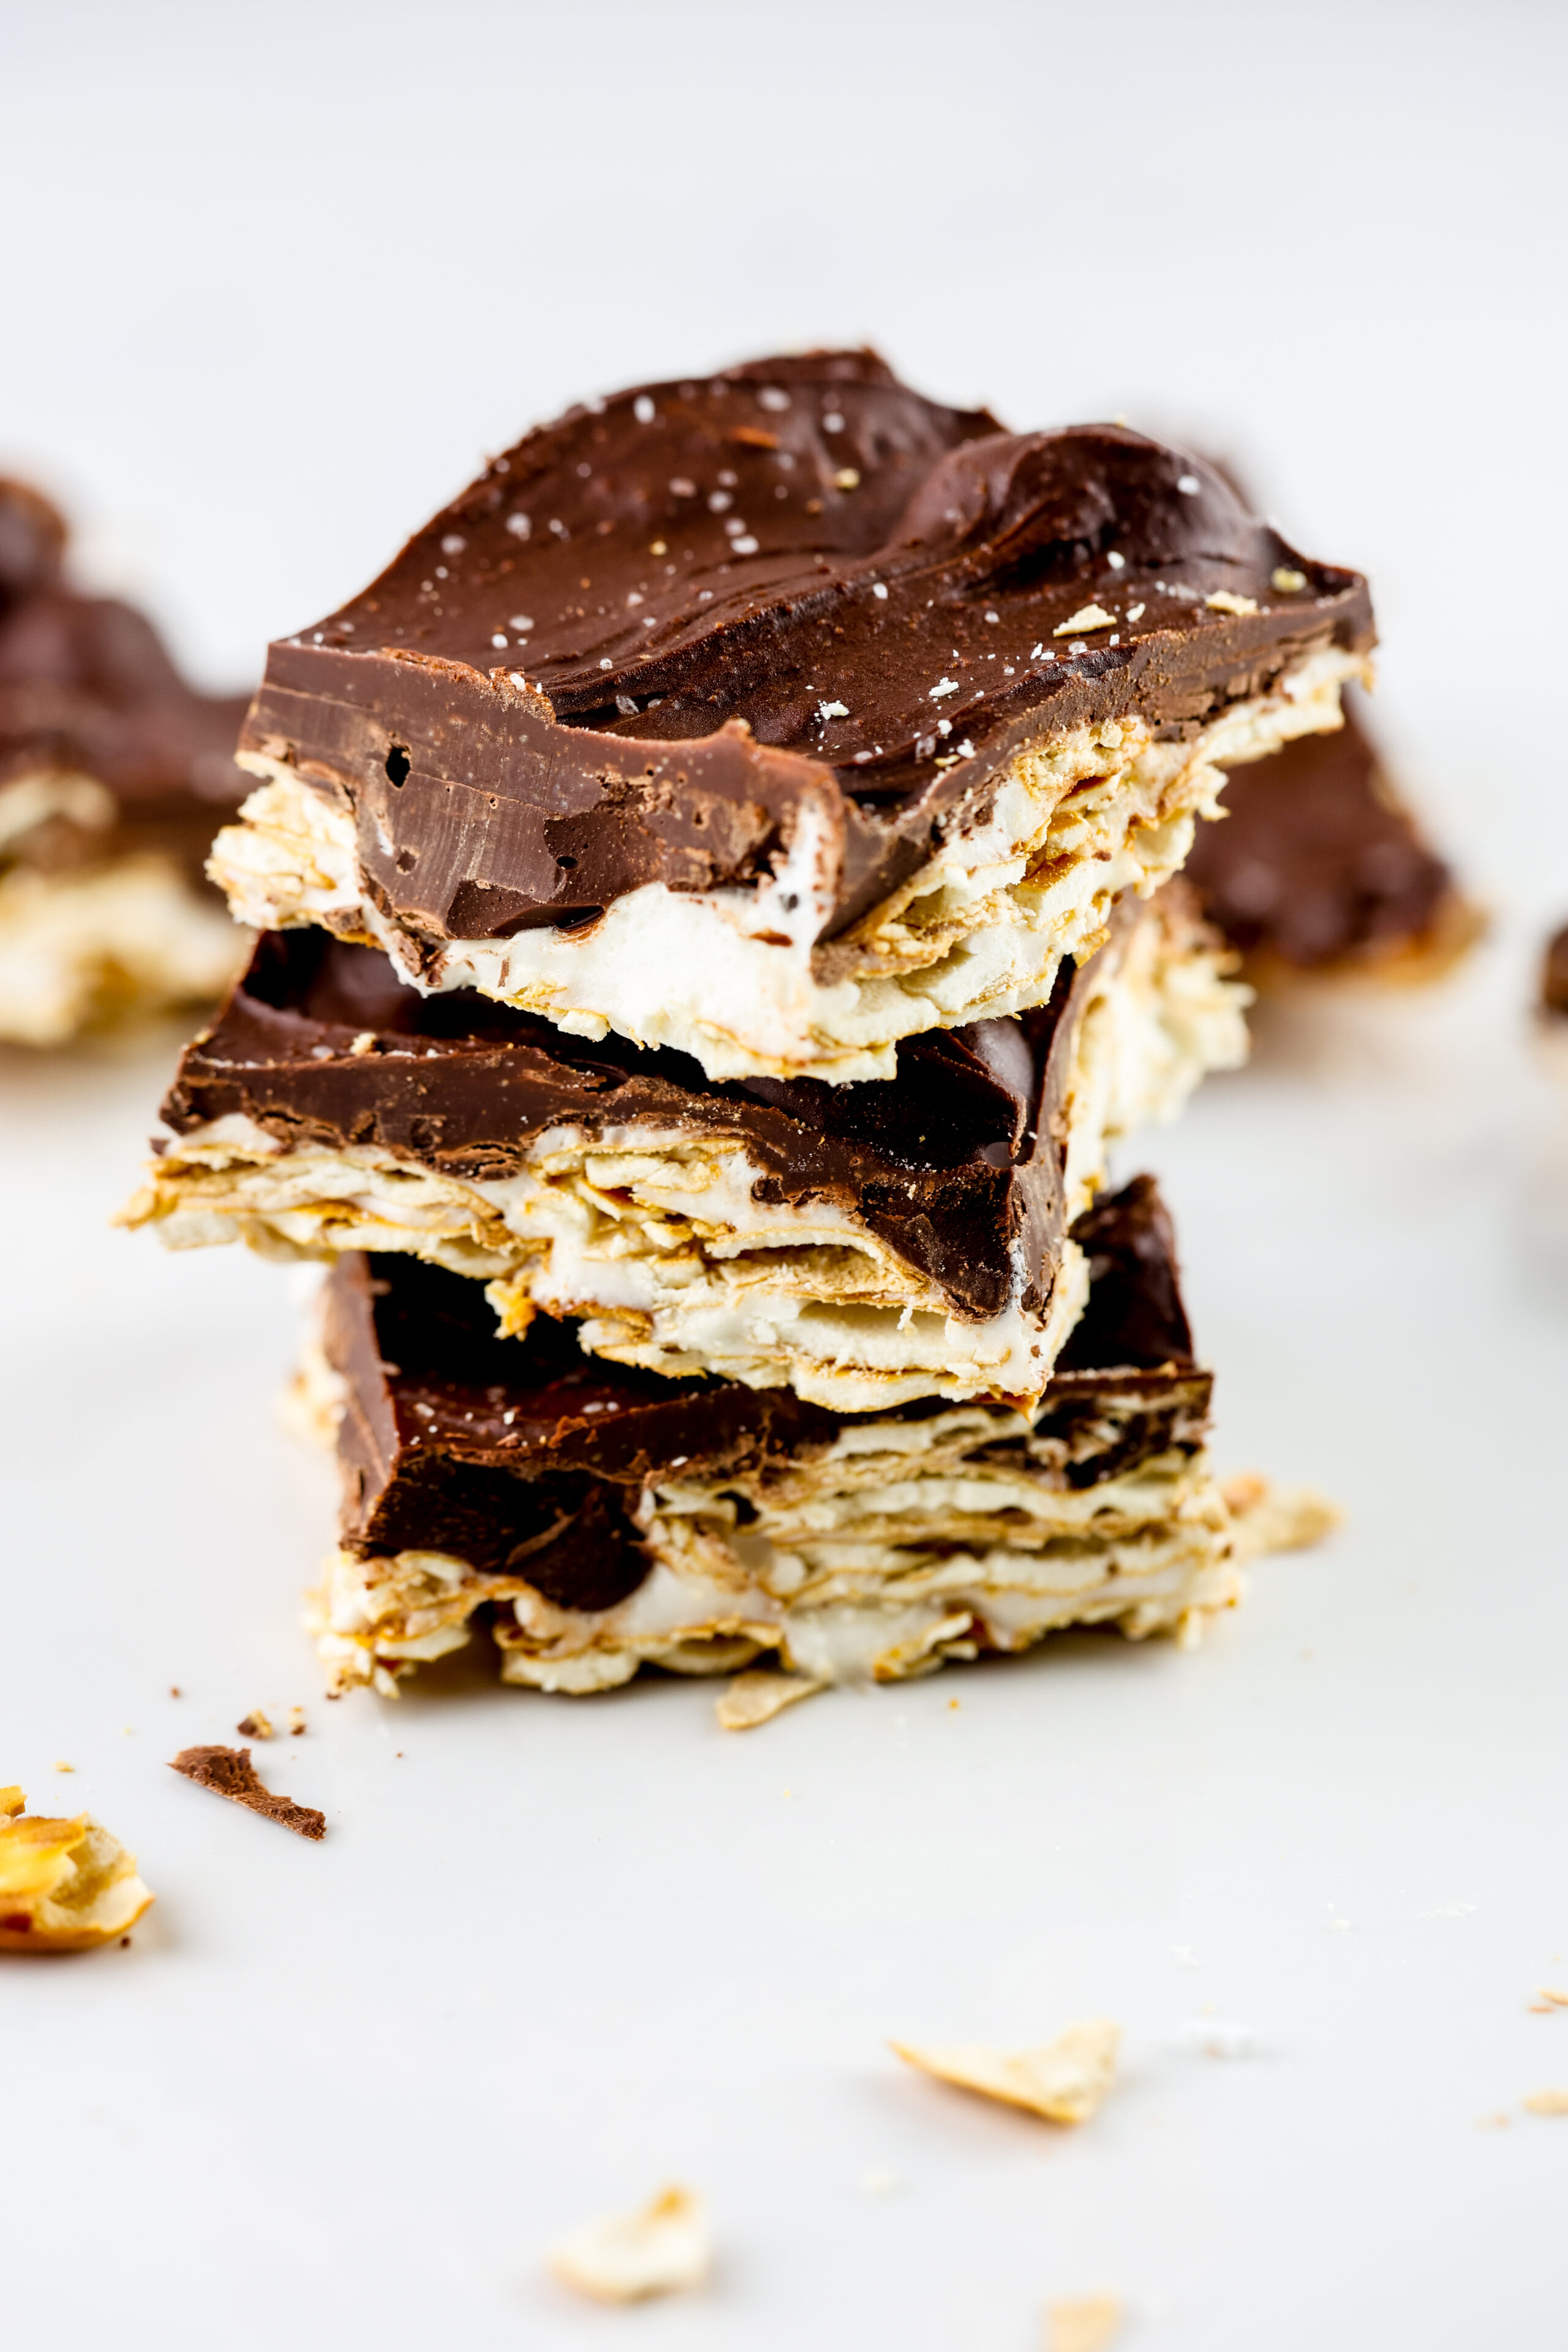
    No campfire? No problem! This No Bake S’mores Chocolate Pretzel Bark is the perfect year round pick-me-up that requires a few simple ingredients. If you’re craving the ultimate sweet and salty combo that takes just minutes to make, then you’ve come to the right place.

    White tile backdrop with chocolate pretzel bark on top.

    While I’m ready to say goodbye to the heat of summer, I’m not ready to say goodbye to the classic summer treat… s’mores.

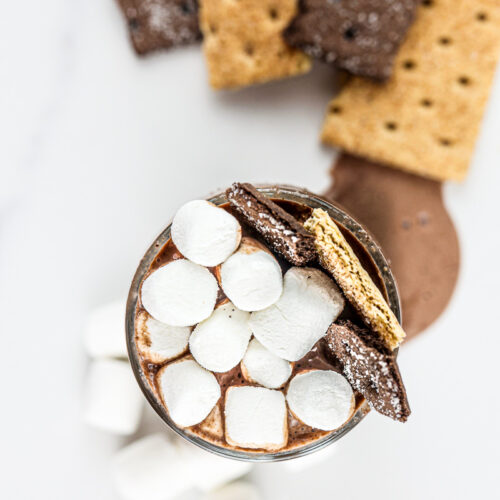
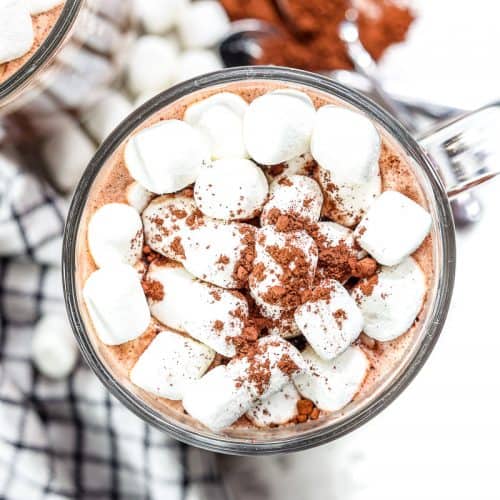
    There’s something about the chocolate and marshmallow flavor I can’t get enough of (which is probably why I’m obsessed with my S’mores Milkshake and Hot Chocolate Bars!)

    Thankfully, I’ve spent the entire summer perfecting this No Bake S’mores Chocolate Pretzel Bark so we could enjoy it year round. You’re welcome.

    Why You Will Love This No Bake S’mores Bark

    • It Is literally the easiest thing to make. Ever. No need to turn on your oven. No need to leave the butter on the counter to soften. No need to do anything but melt, swirl, freeze, then enjoy!
    • It’s a crowd pleaser. Yes, even the pickiest of picky will enjoy this. I’ve made this over a dozen times this summer and not ONE person has complained. It’s the first thing to go at every party. I swear, it’s that good.
    • You can customize with what you have on hand. No pretzels? No problem! Sub saltines, graham crackers or Ritz crackers for the pretzels.
    Stack of 3 chocolate pretzel bark thins.

    What You Need to Make Pretzel Bark

    Ingredients to make pretzel bark.
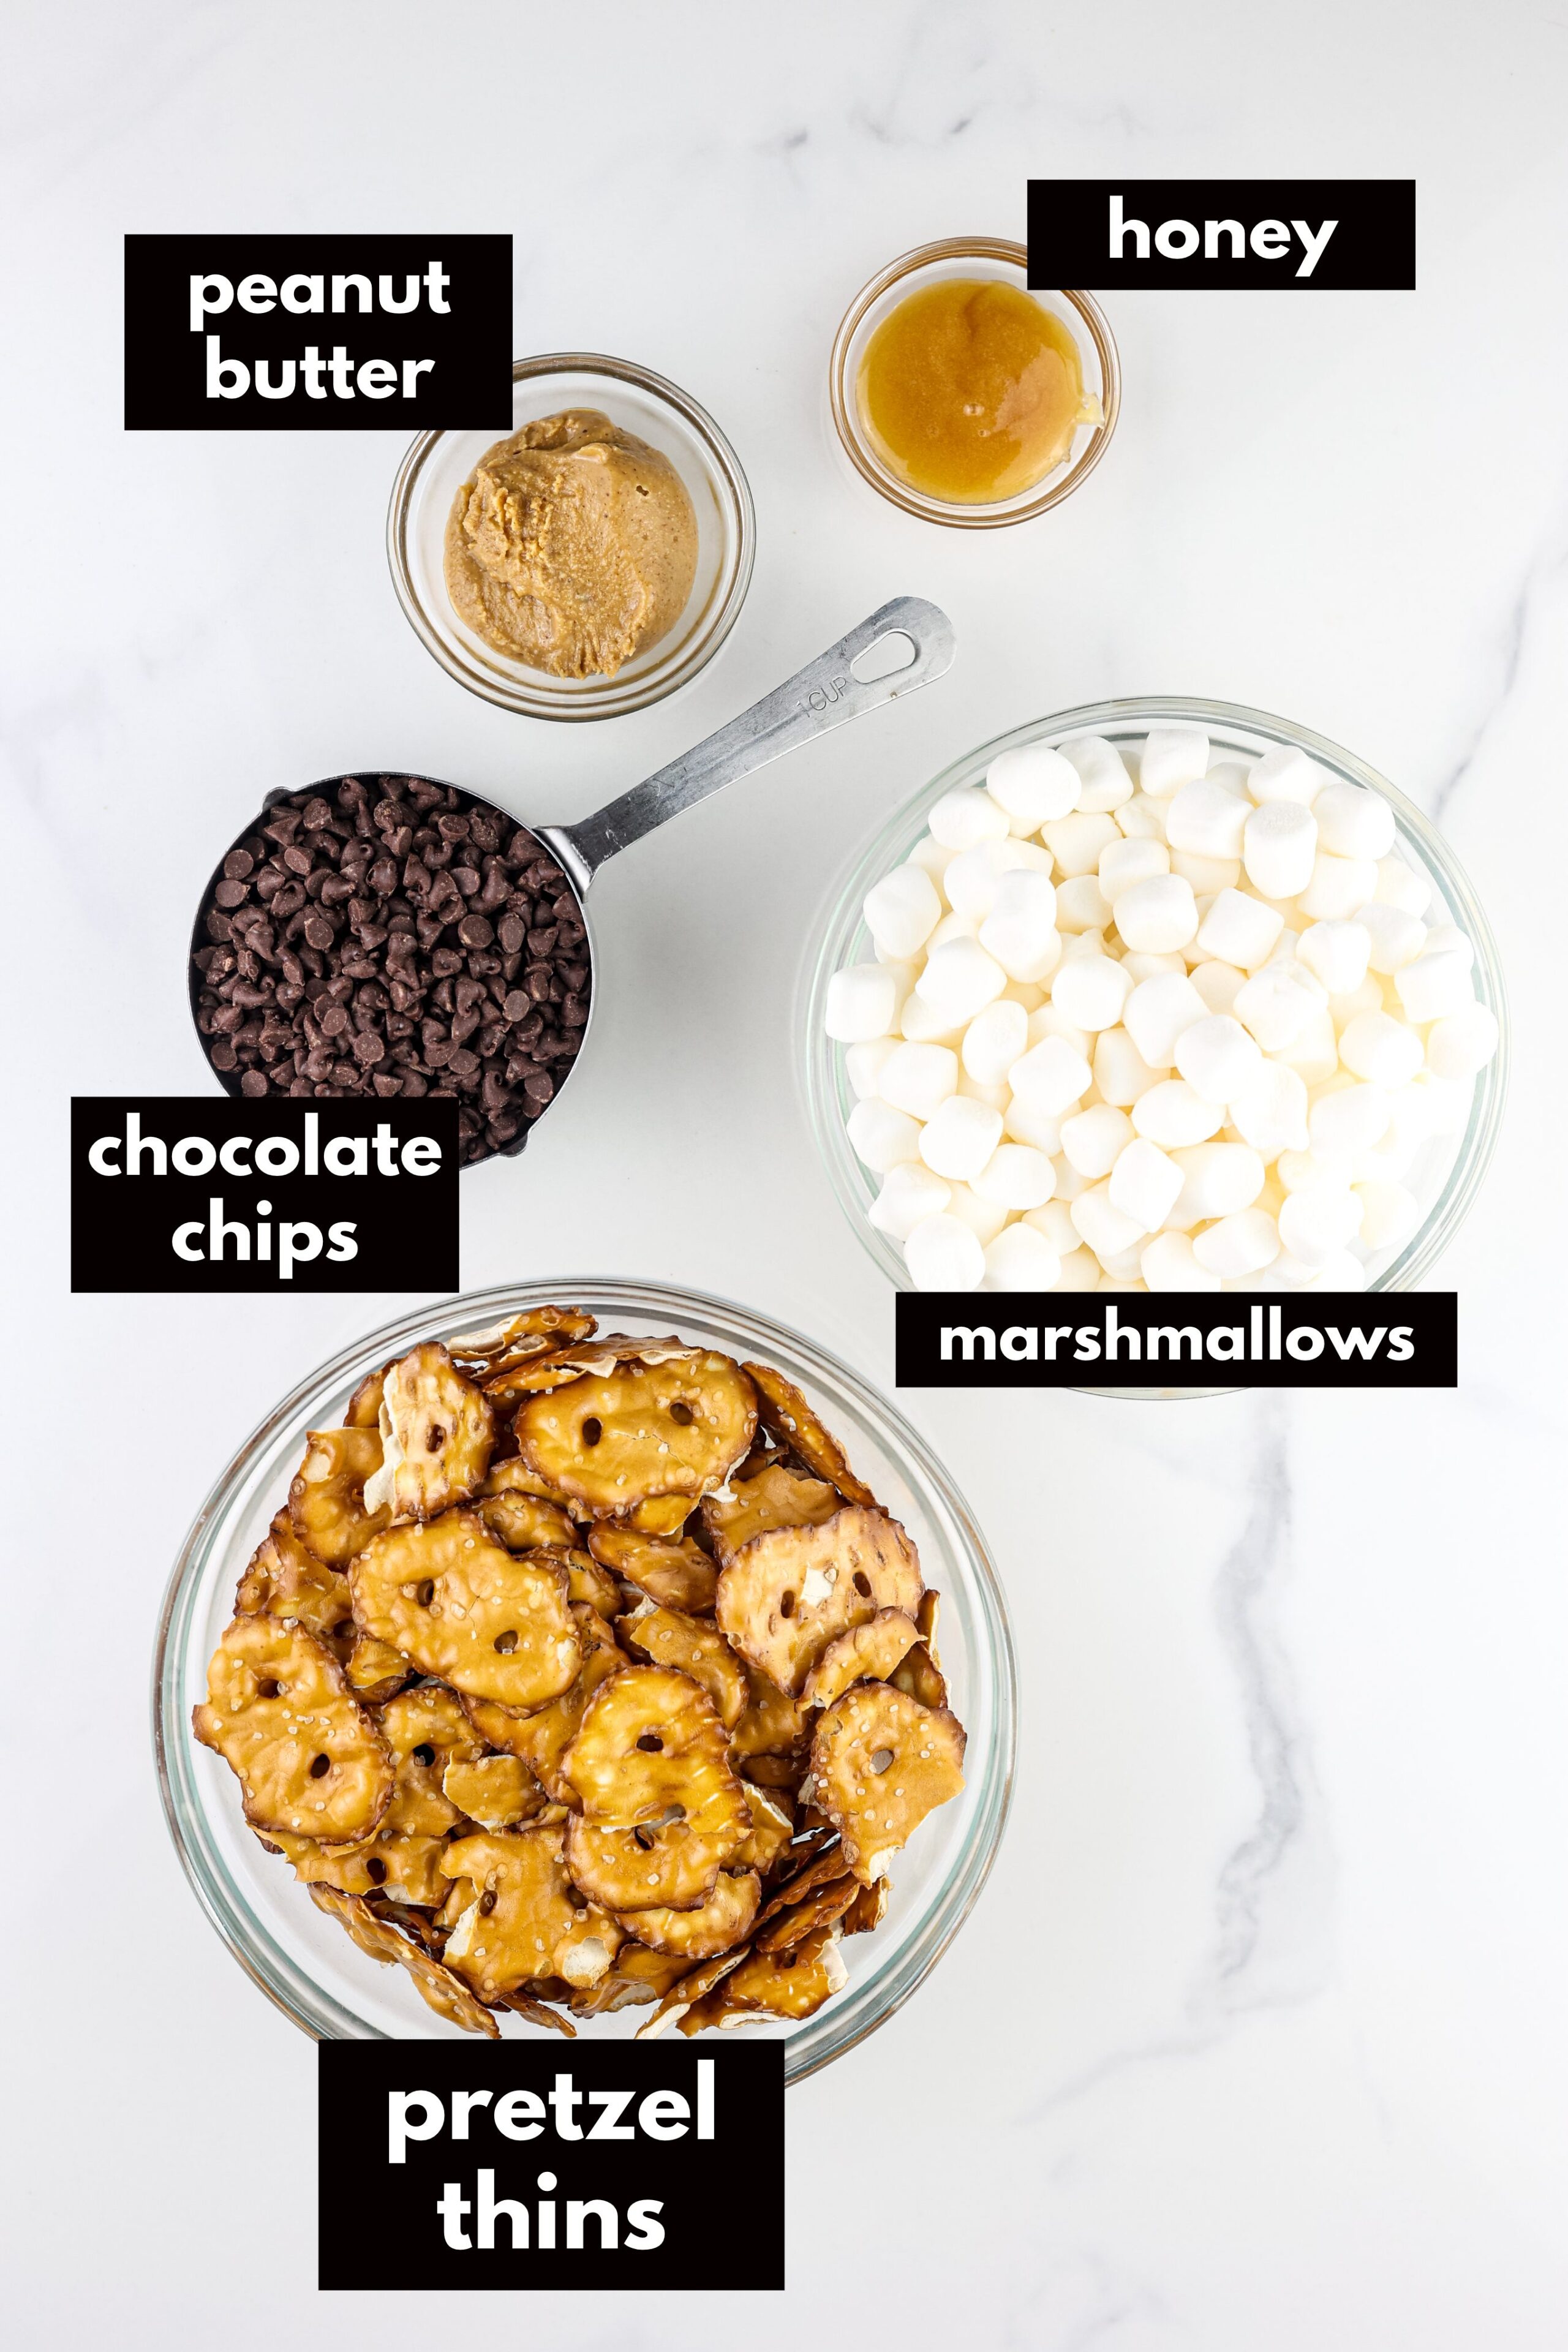
    • Pretzel Thins: I prefer to use this over a traditional pretzel twist. The thin shape really adds to the crunch while allowing the marshmallow and chocolate layers to perfectly coat them!
    • Marshmallows: I like the mini’s as I find them easier to melt with the honey, but you can use whatever you prefer (or buy!) Just note if you buy the XL marshmallows they may require a few more seconds in the microwave to fully melt.
    • Honey: I like raw, unfiltered honey for the added nutrient benefits, but to be honest, you’re using such a small amount and this is a dessert, so don’t lose sleep over it! Use what you have on hand.
    • Chocolate Chips: The mini semi-sweet chocolate chips are what I like to use in this recipe. They melt evenly and add just the right amount of chocolately flavor!
    • Peanut Butter: Smooth or chunky works well in this recipe!
    Chocolate being smoothed out with spatula over pretzels and marshmallows.

    Ingredient Swaps

    • To make this gluten-free: Use a gluten-free pretzel. If you can’t find the thins, use the regular sticks or twists. You can gently break them apart into smaller pieces as well to create a similar texture to the thins.
    • To make this vegan: Swap regular marshmallows made with gelatin for a vegan option found at most health food stores or markets like Target. Opt for maple syrup in place of honey, and pick up a dairy free chocolate to melt!
    • To make this nut or peanut free: Swap sunflower seed butter for the peanut butter. Or, for a peanut free option only, use almond butter or alternative seed and nut butter in place of the peanut butter.
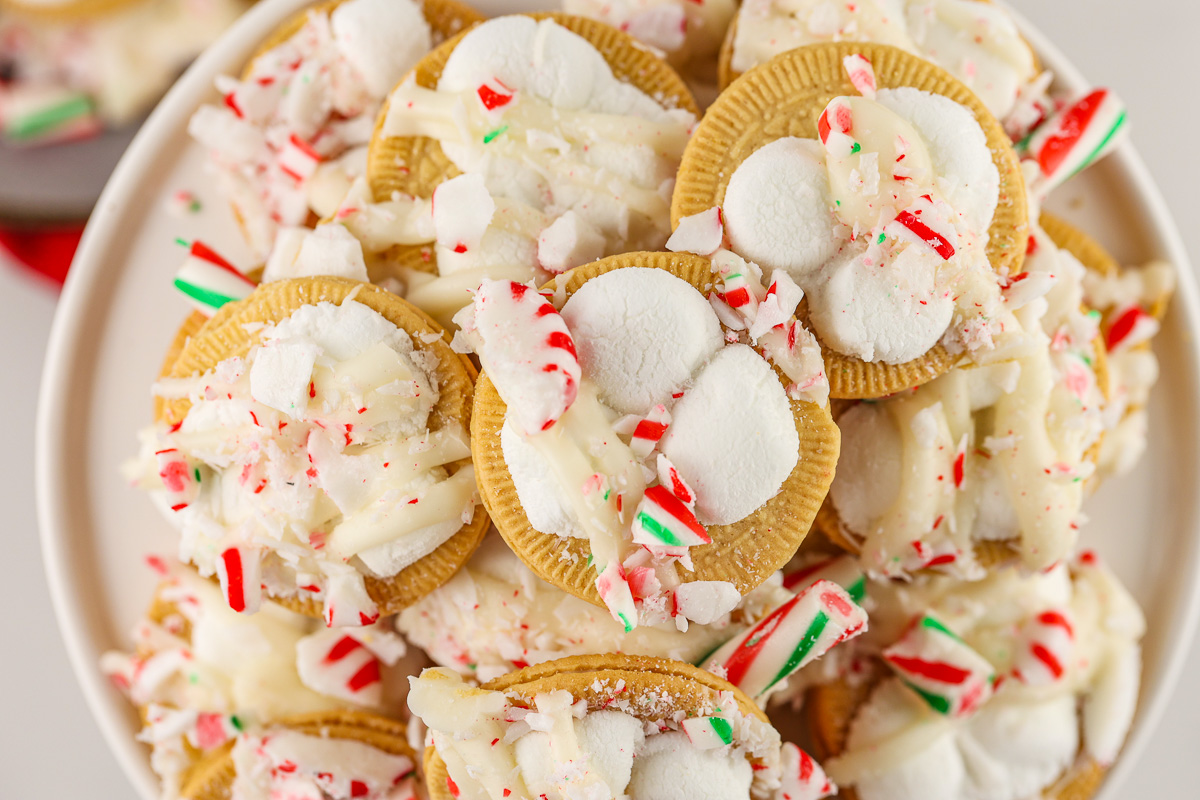
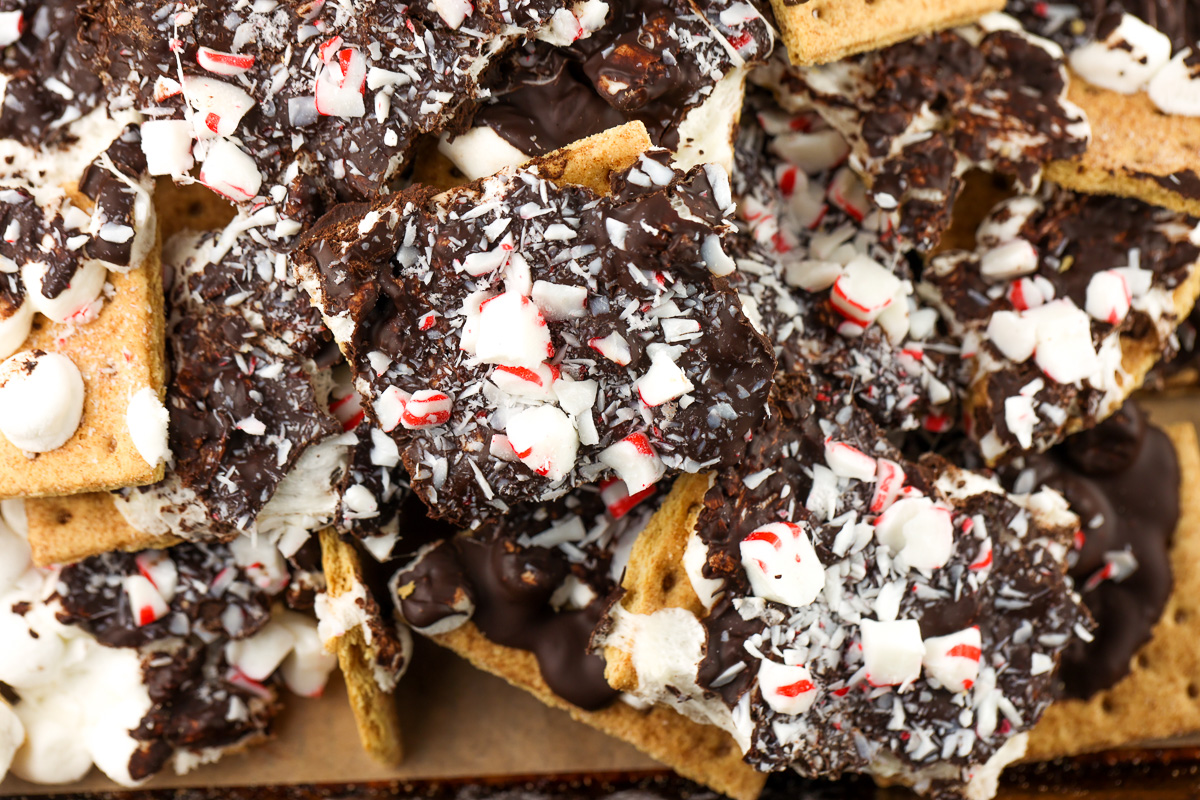
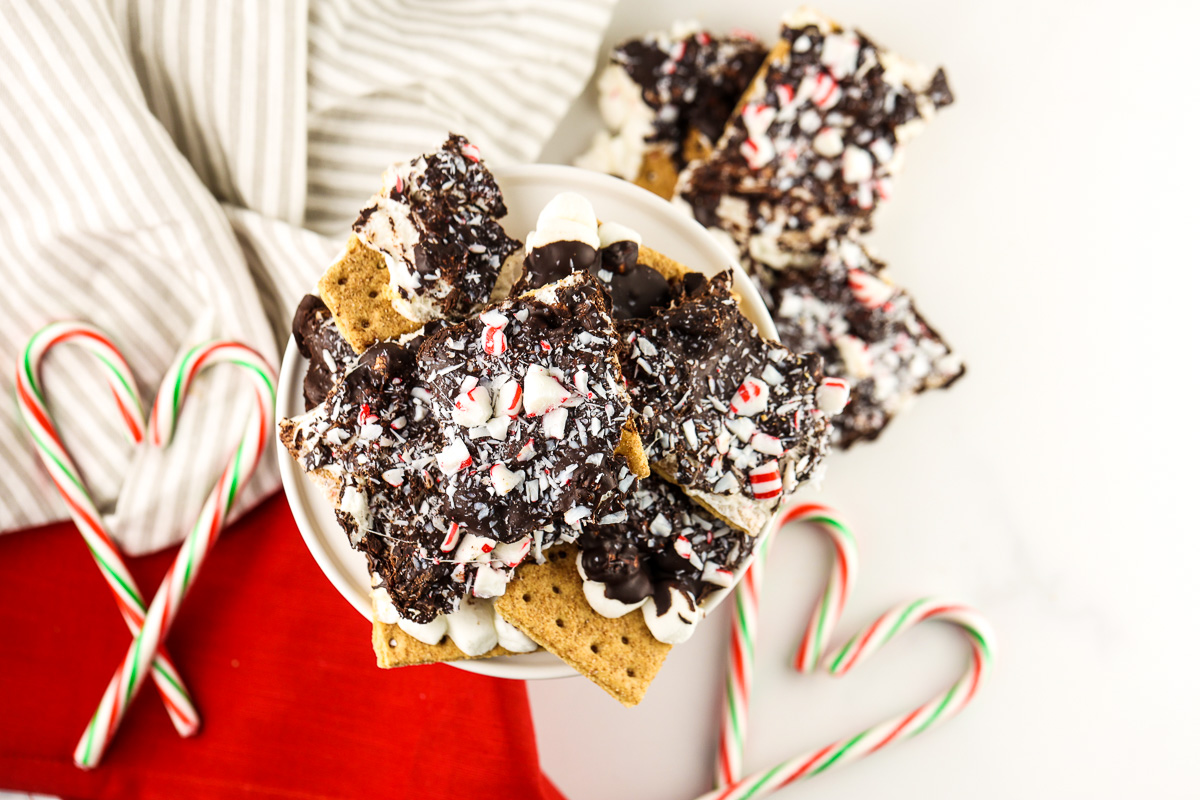
    • To make this more “s’more” like: Nix the pretzels all together and use graham crackers. I recommend breaking them into smaller pieces when lining the baking dish before coating with the layers so it’s easier to cut and more even all around.

    Step-By-Step Directions to Make This S’more Bark

    Before you begin:

    Make sure you line a large baking dish (8×13-inch is perfect) with parchment paper.

    You’ll also want to make sure you have a few spatulas ready (2-3) because things are about to get sticky as you make this chocolate pretzel bark!
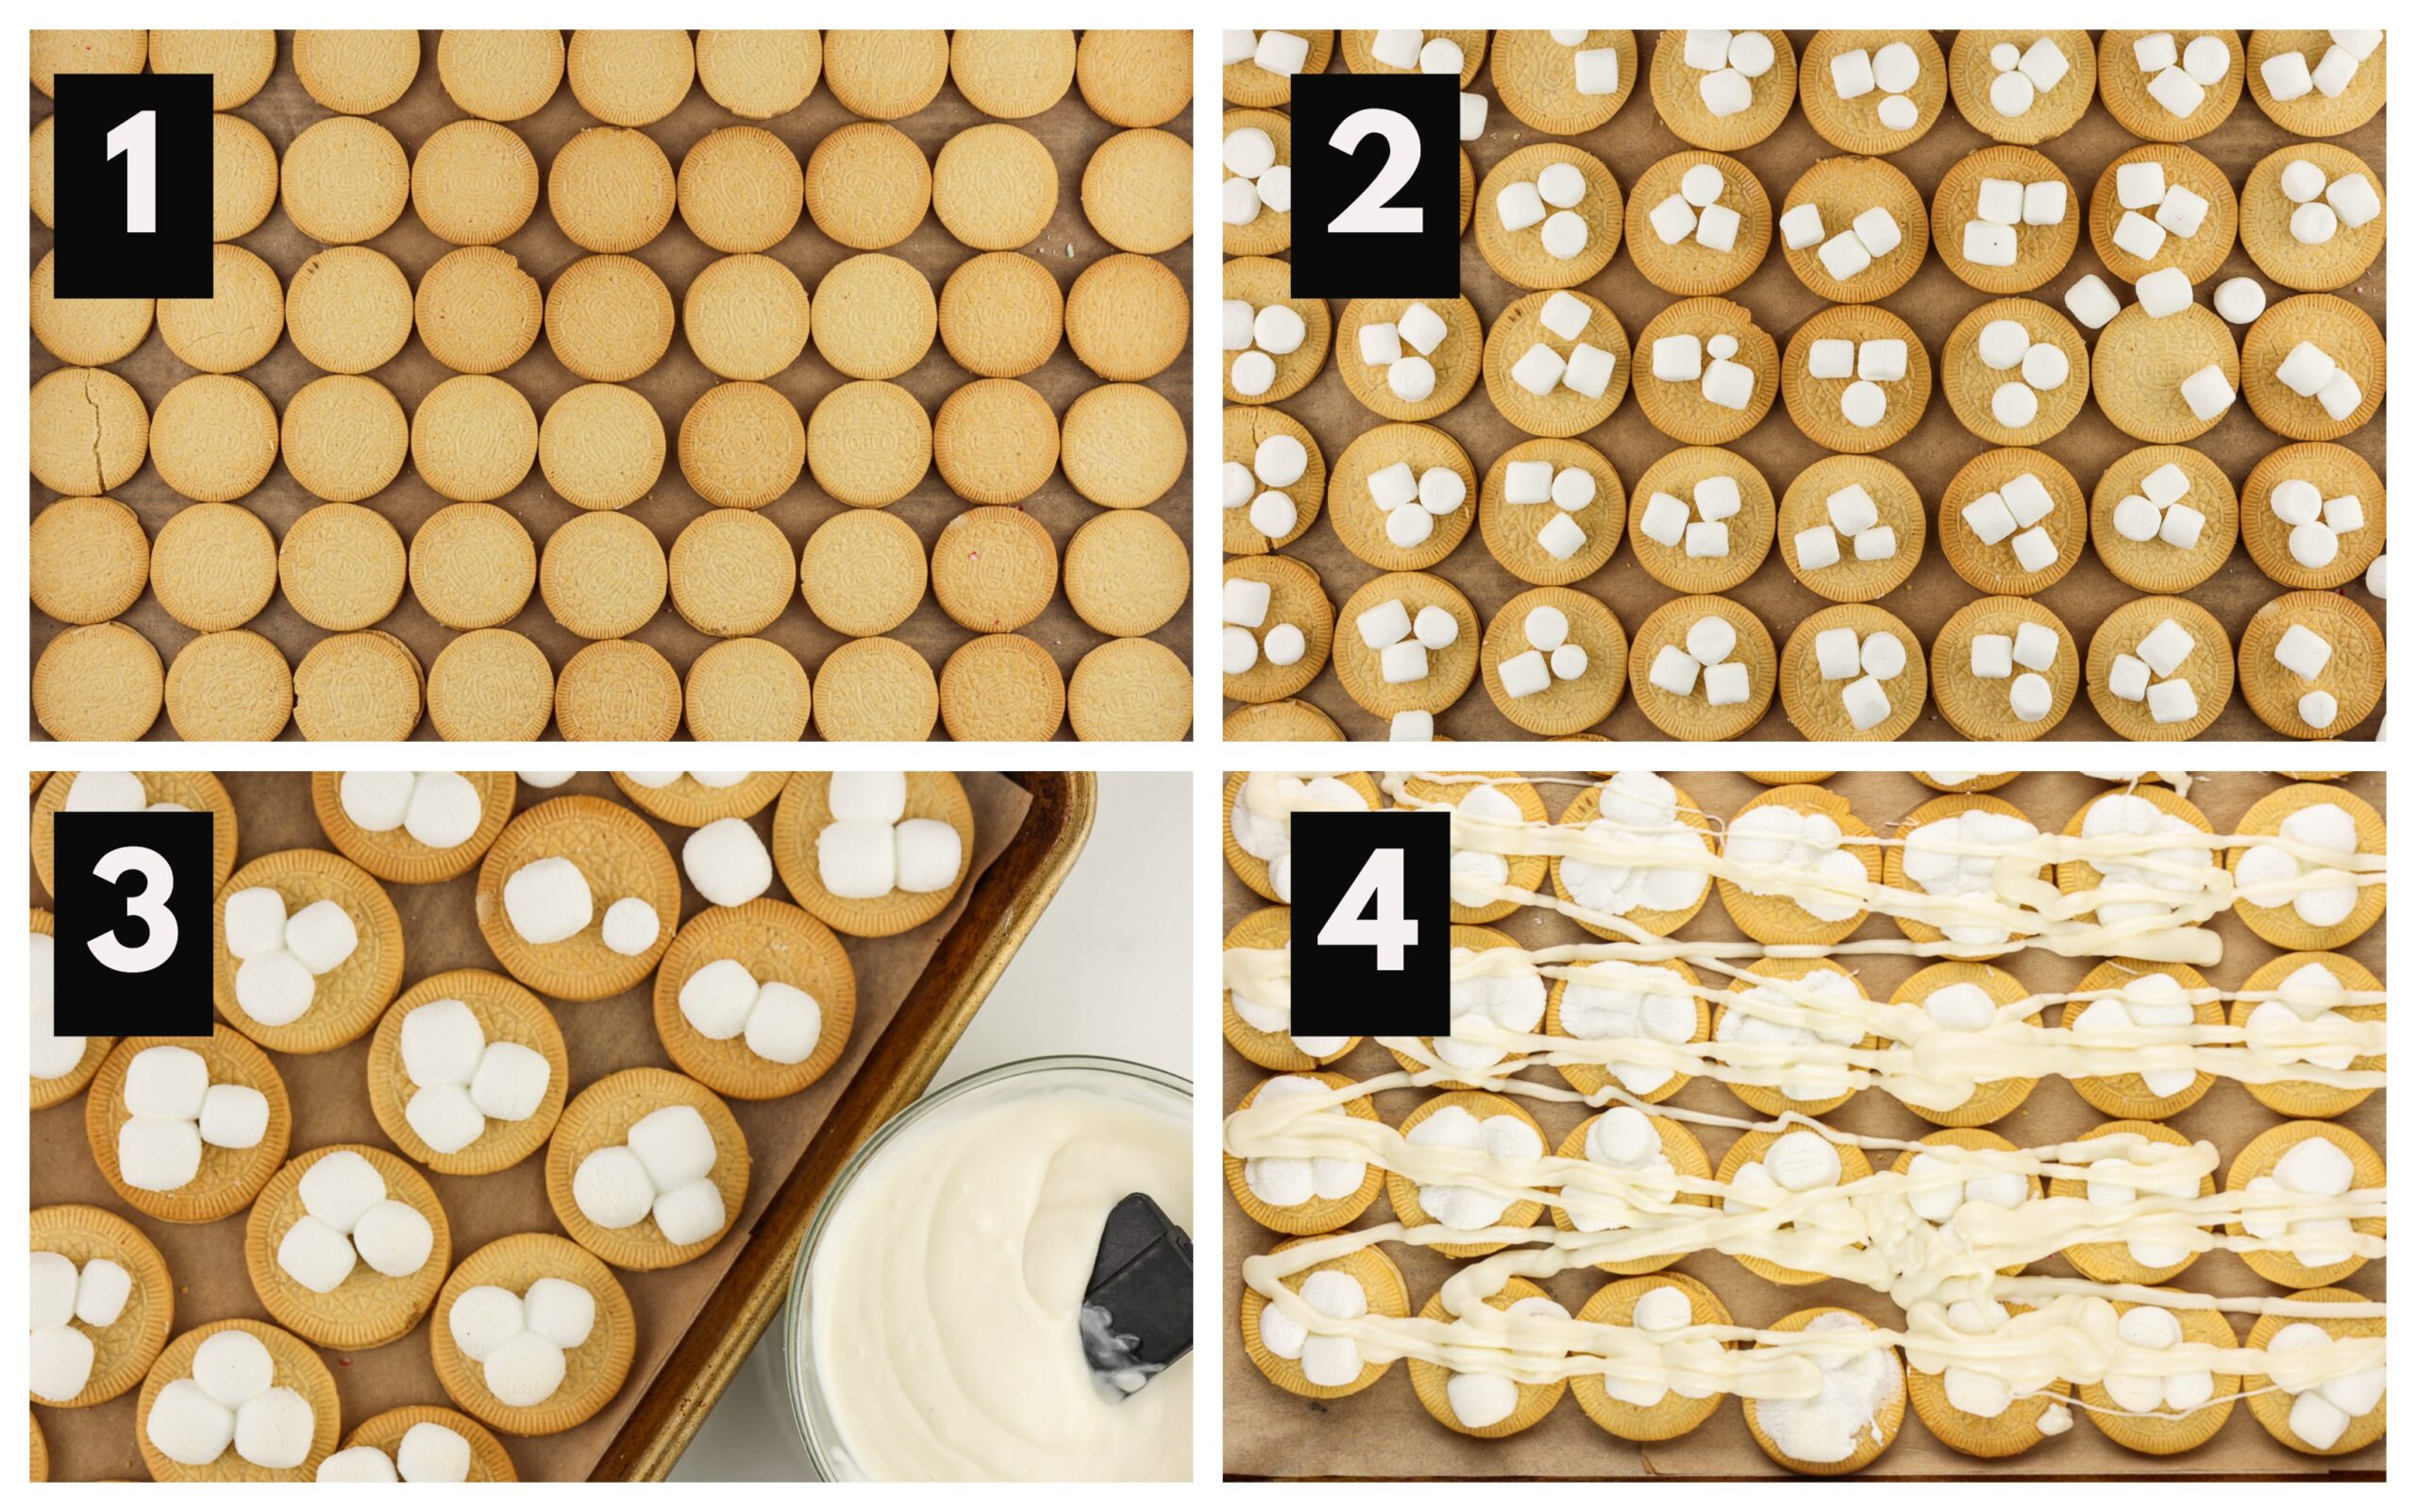
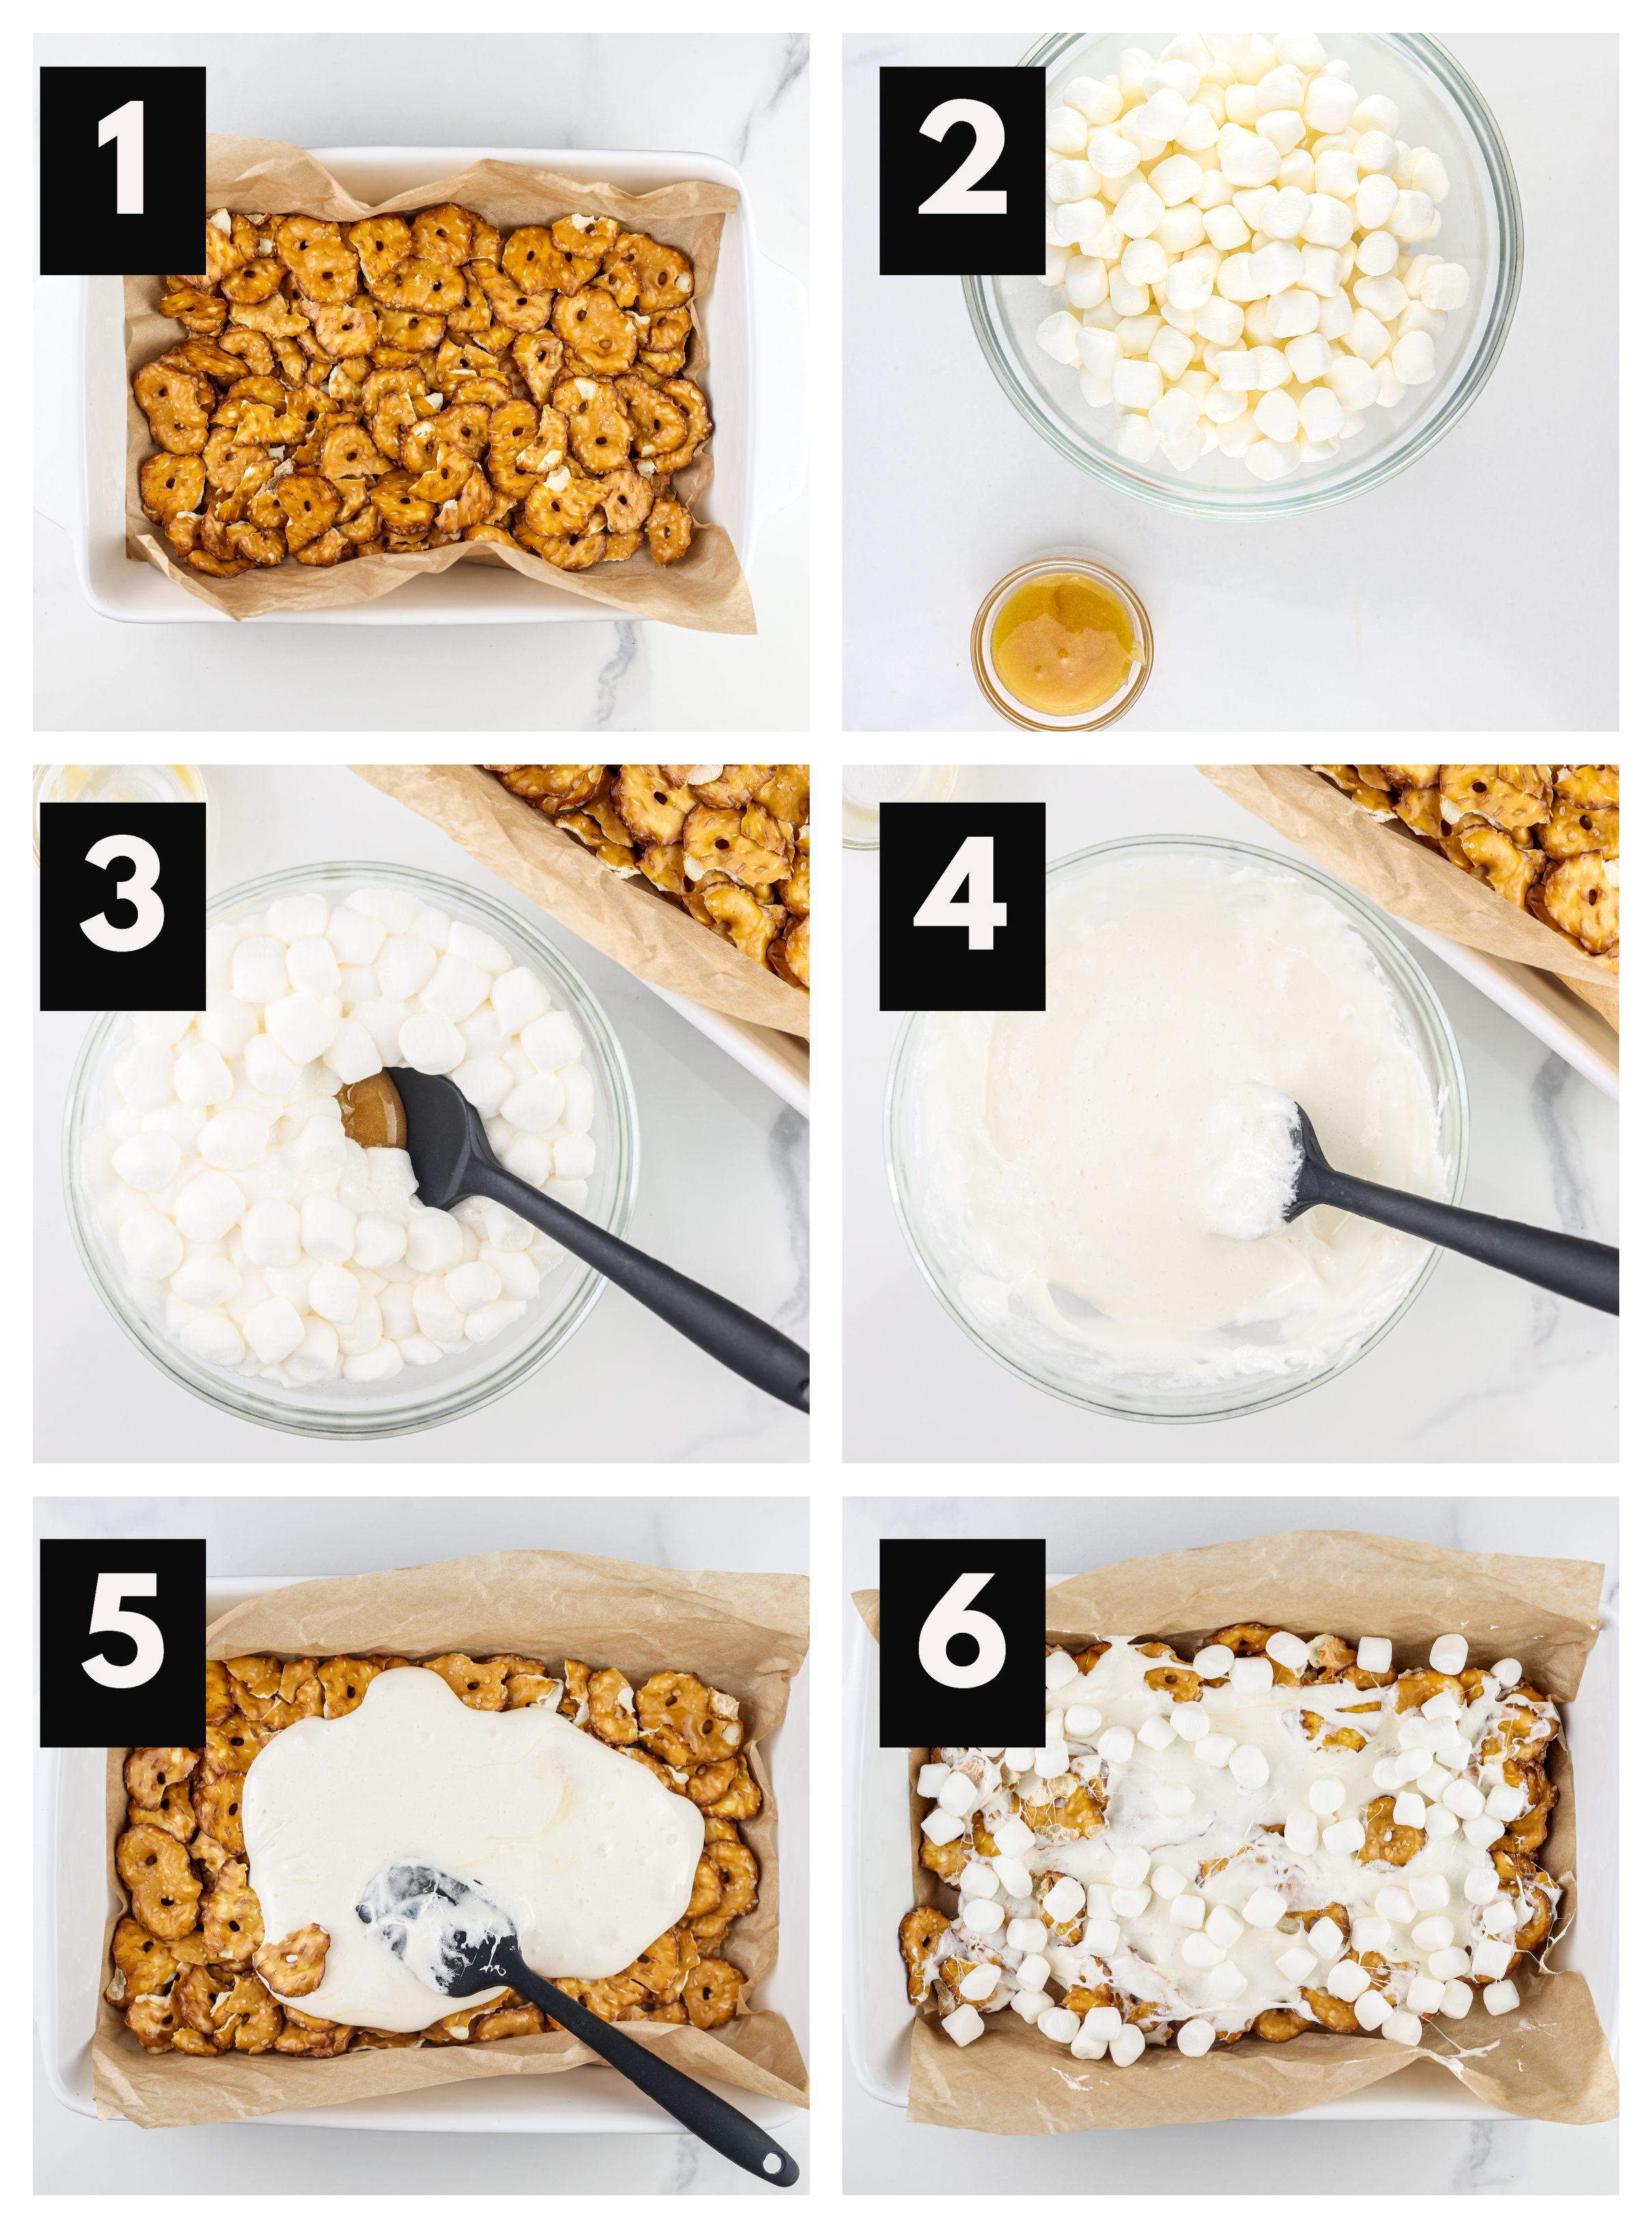
    Steps 1 – 2- 3- 4

    You’ll line the parchment paper with your pretzel thins, then begin making your own marshmallow fluff!

    The amount of time you heat the marshmallows will vary if you are using a larger marshmallow or increasing the recipe yield, so be sure to checkout my tips below for more details on heating!

    Then, mix the honey into the marshmallows until uniformly combined (like a sticky yet speadable paste!)

    Steps 5 – 6

    Once you’ve got the fluff perfectly melted, evenly slather it over the pretzels. If you have extra marshmallows, feel free to throw a few that are not melted on top for fun texture and to add a little wow to its appearance!

    Process shots to melt marshmallows and slather on bark.

    Next up, it’s time to get the chocolate peanut butter layer ready!
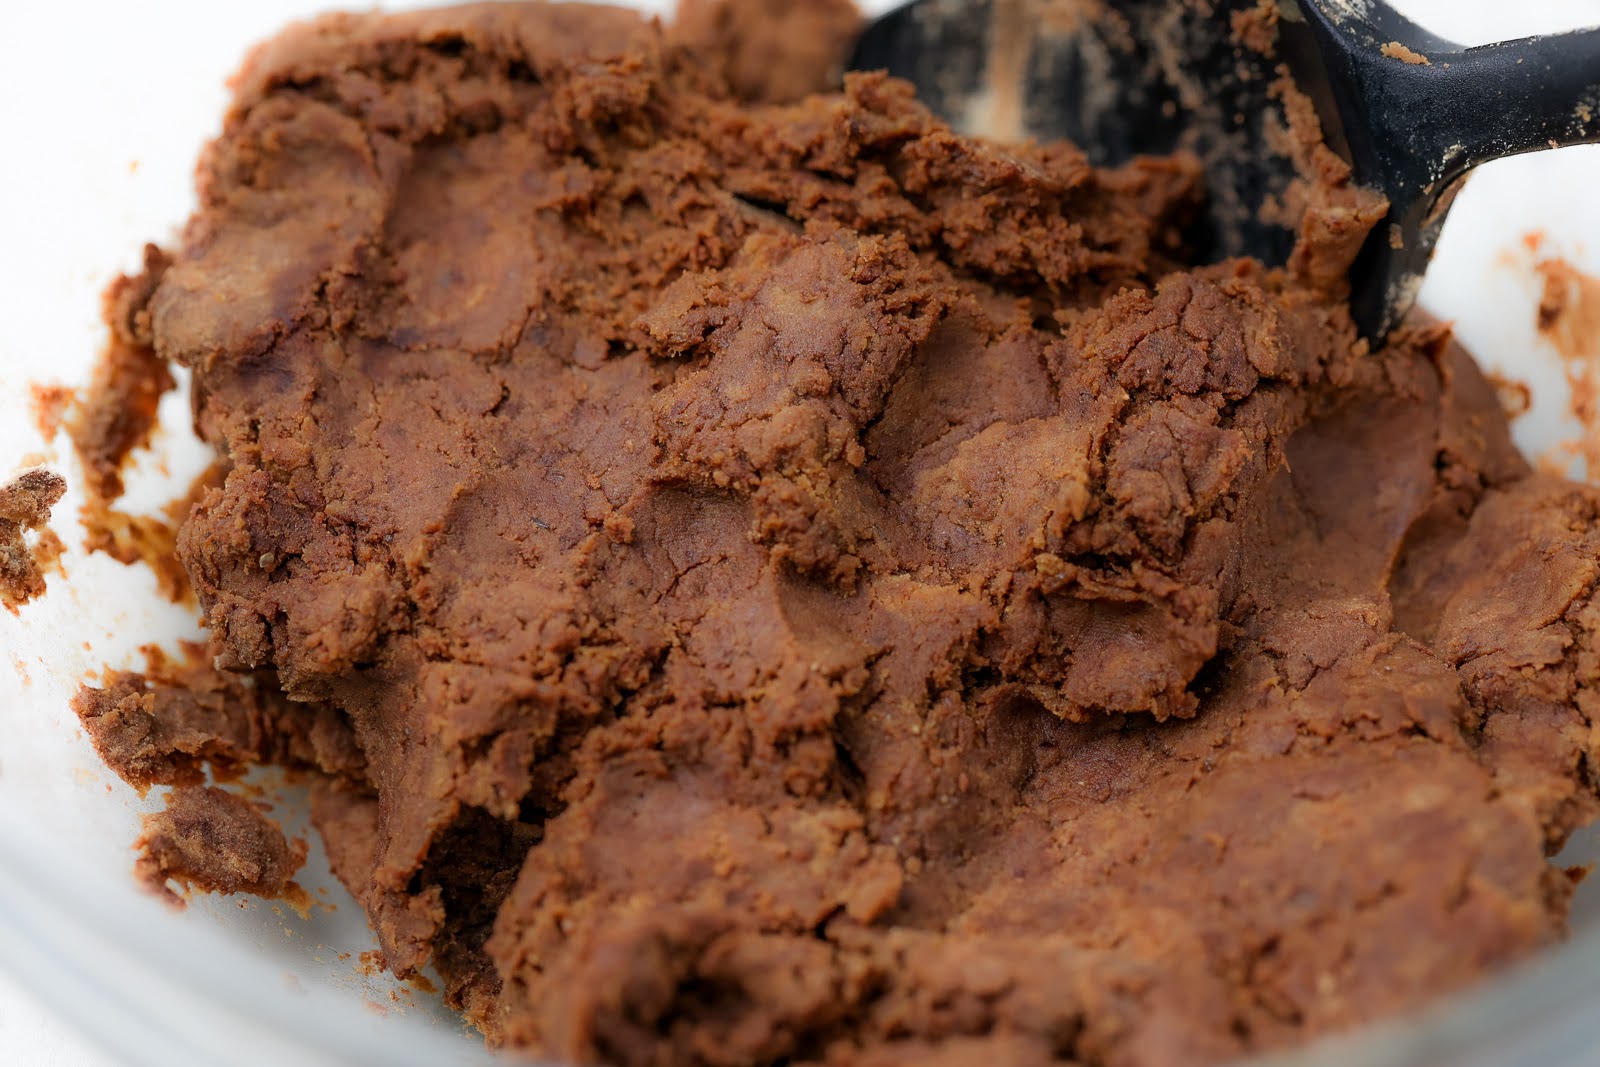
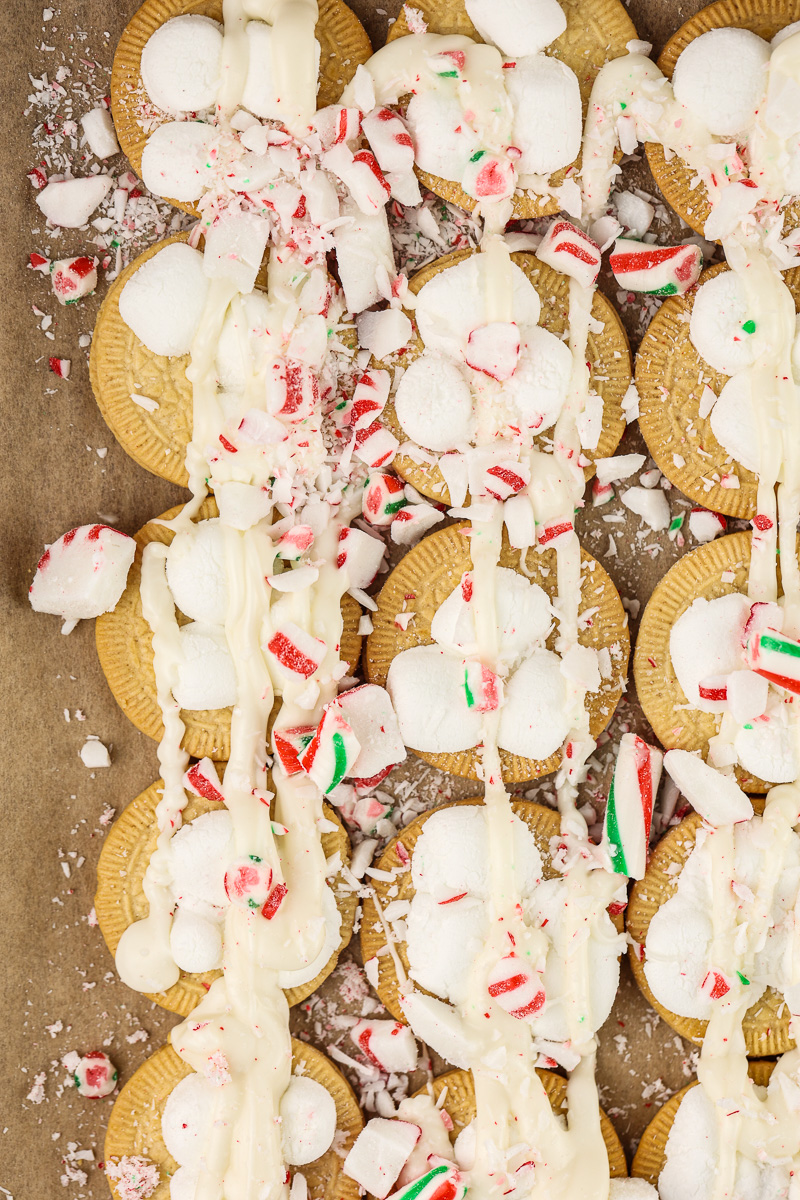
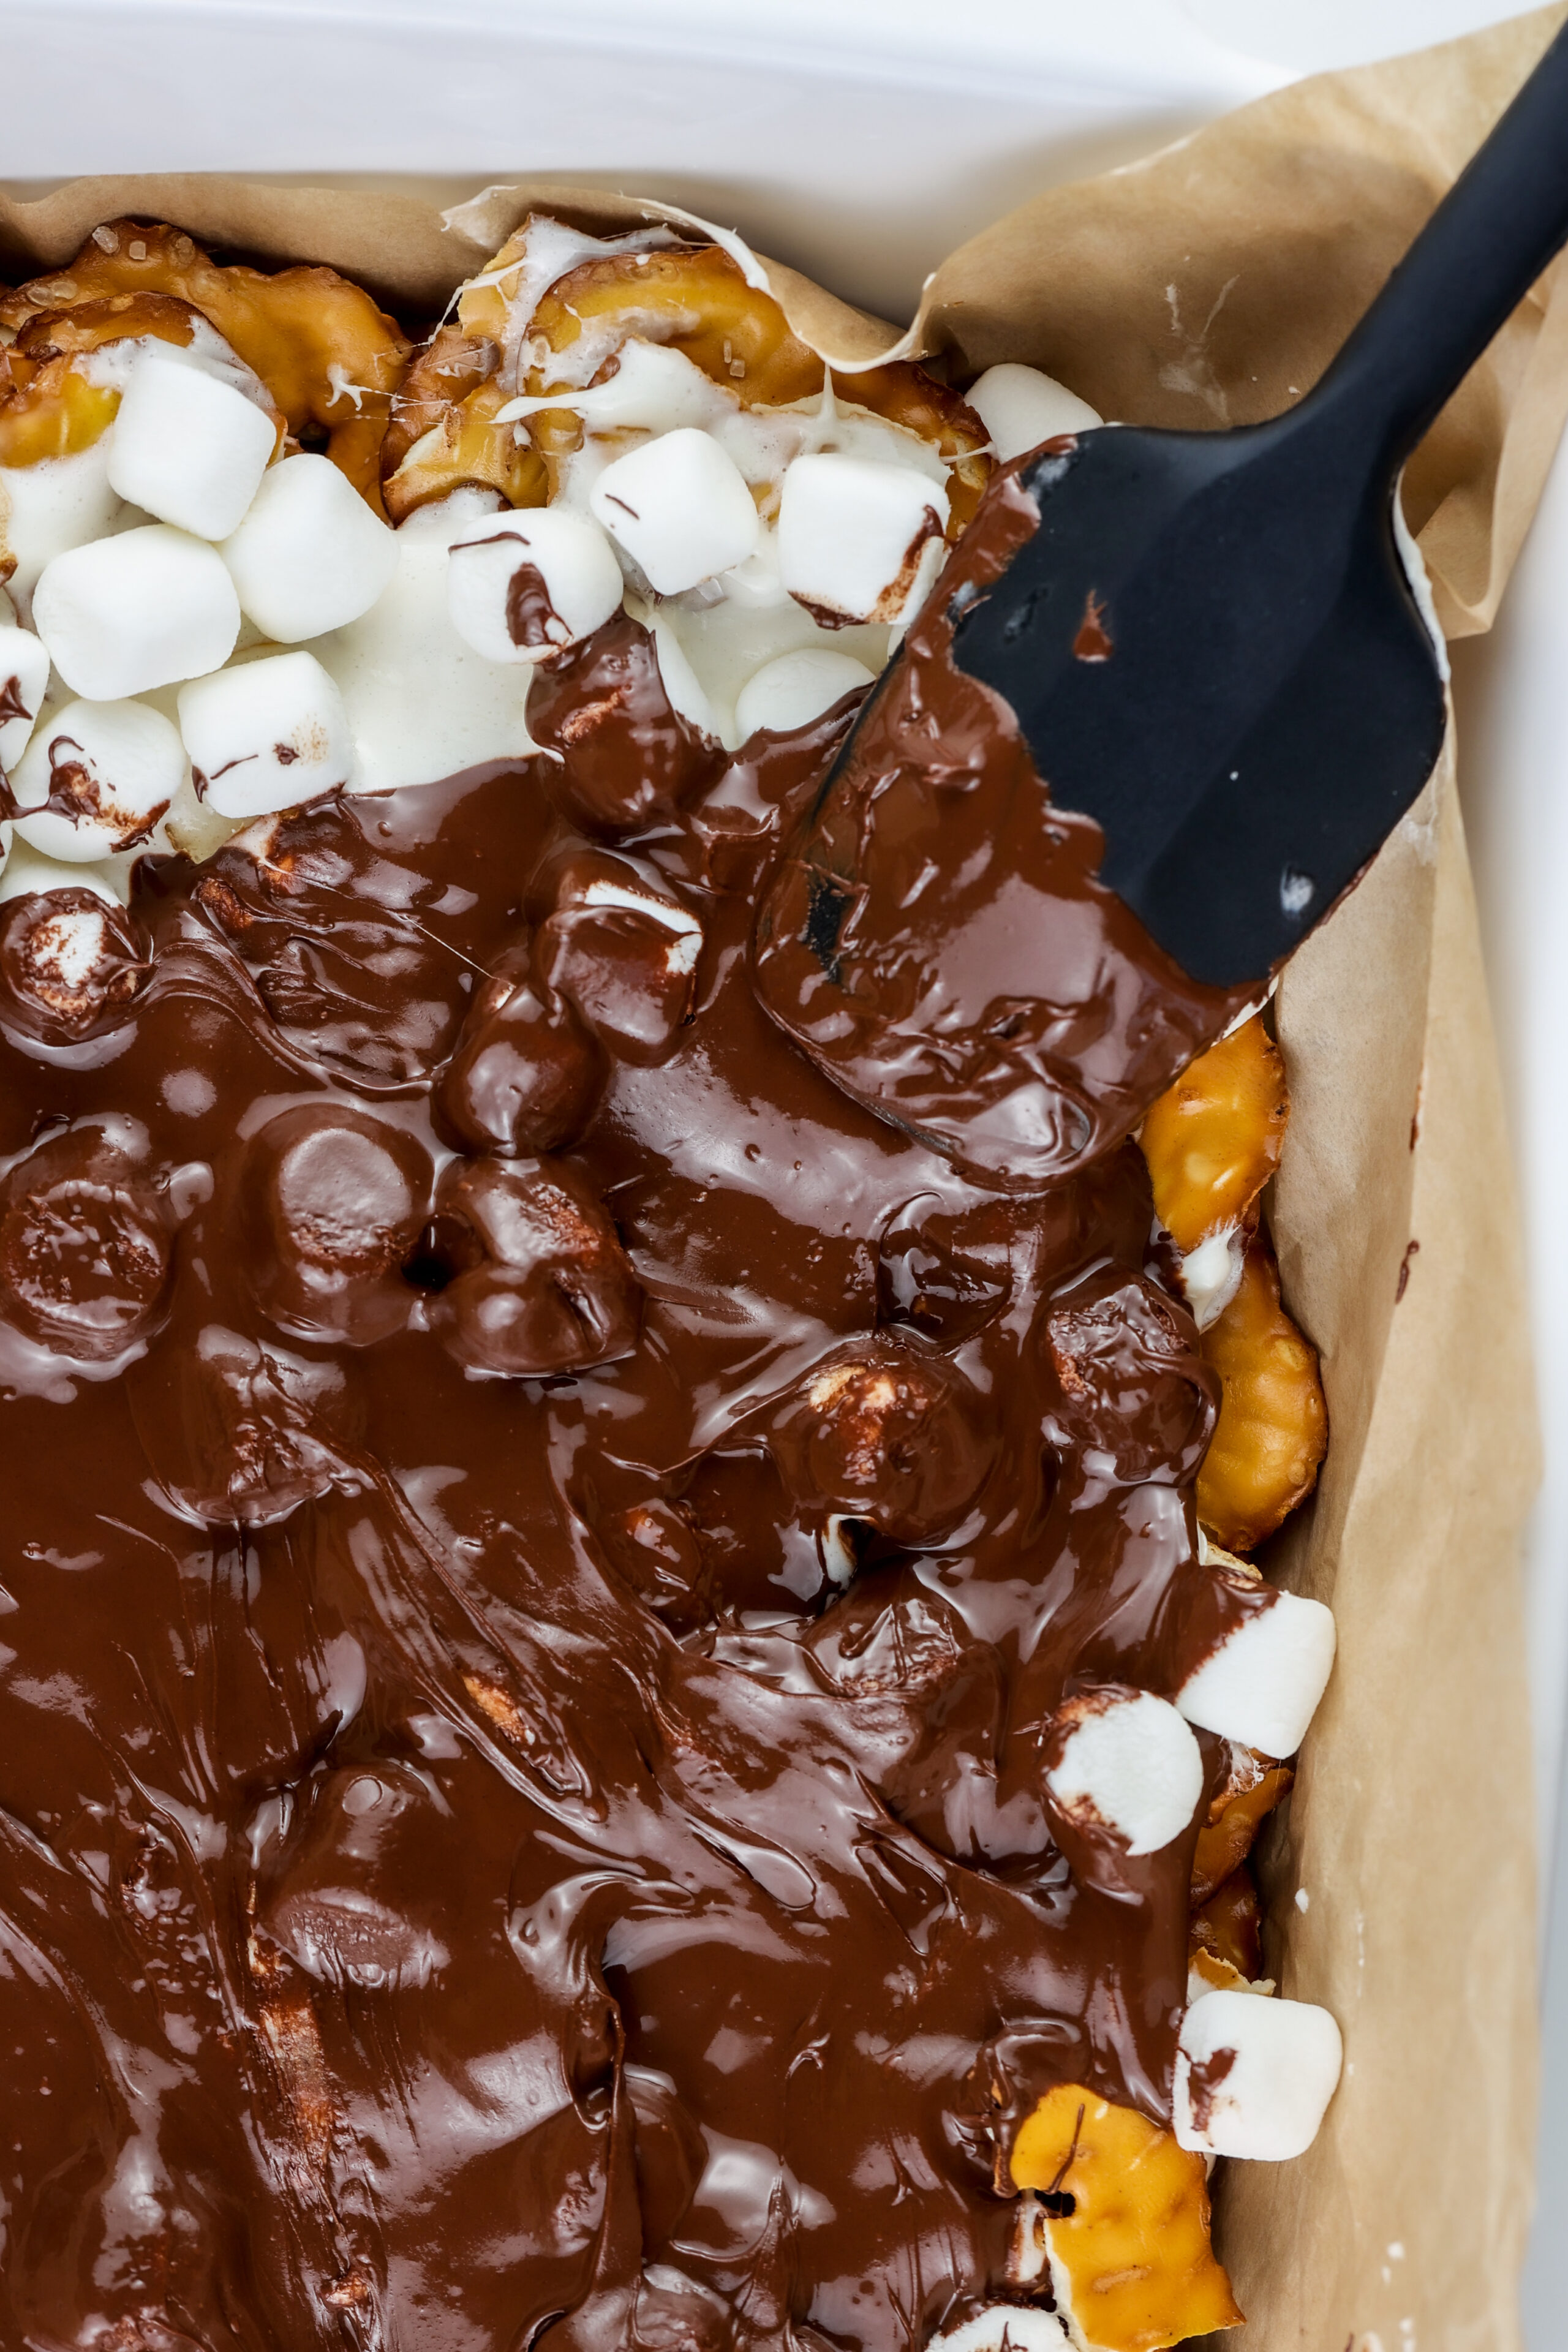
    Steps 7 – 8 – 9 -10

    Melt the chocolate in a microwave safe dish, then swirl in the peanut butter.

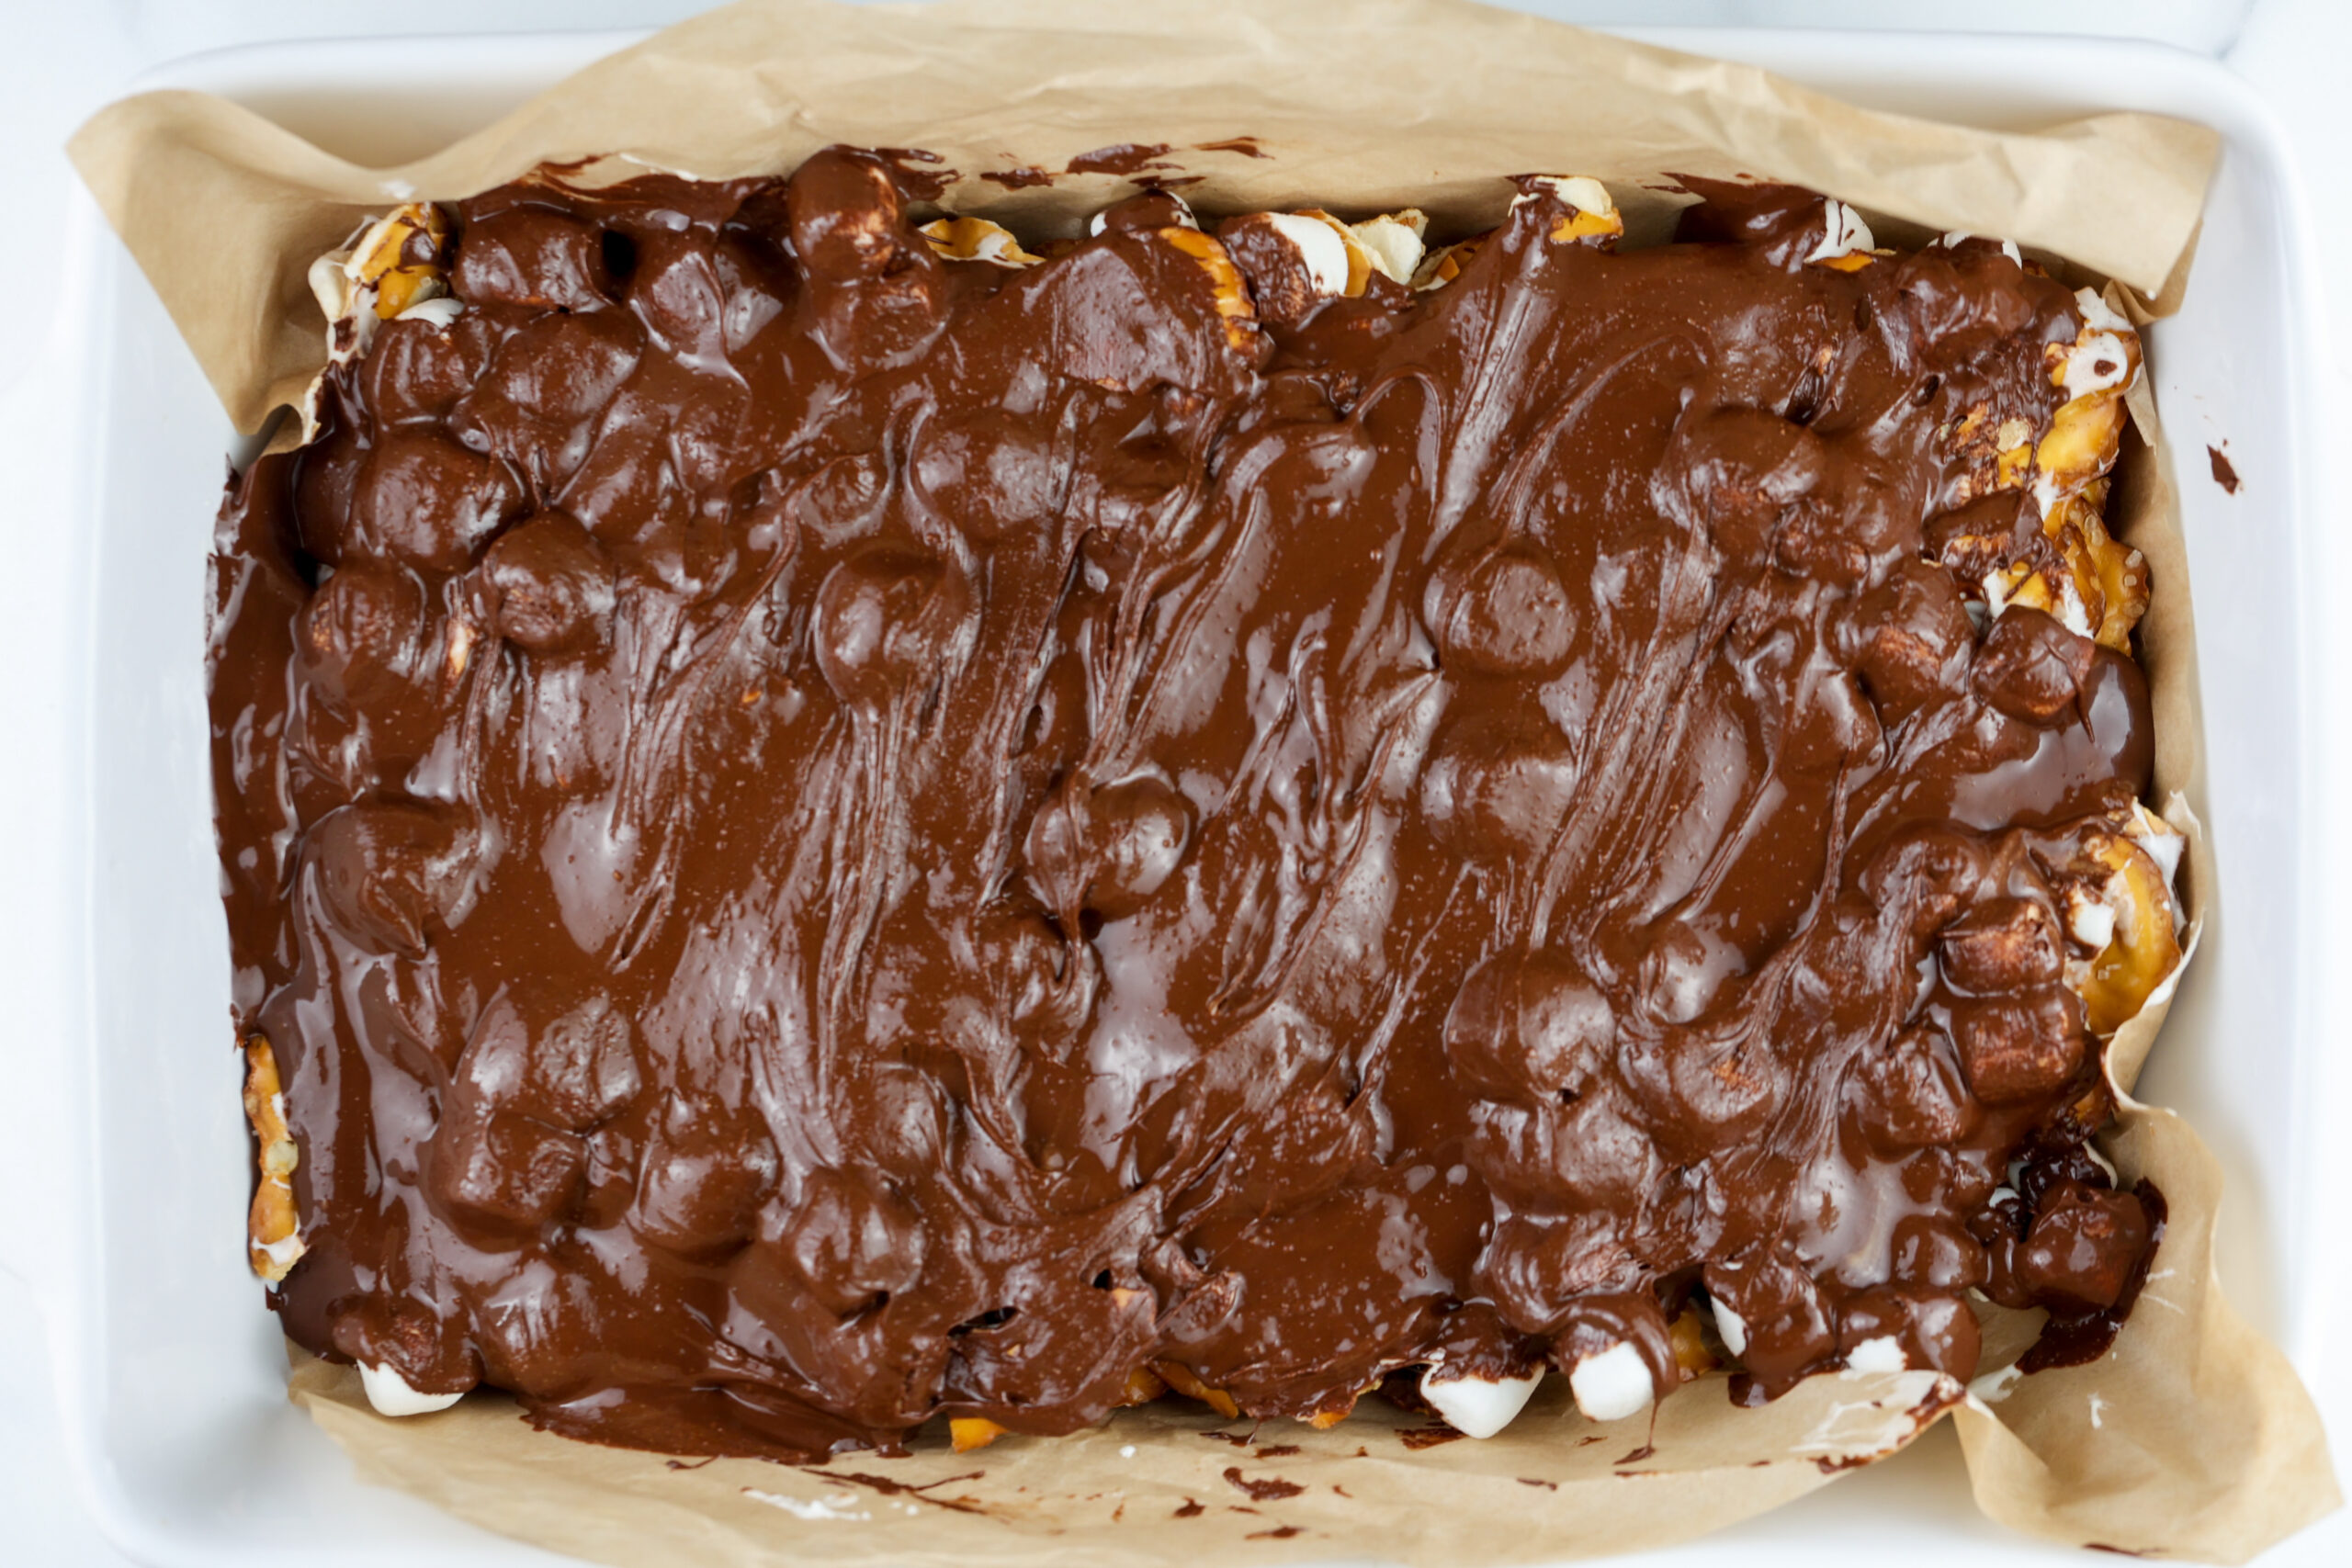
    Slather the chocolate peanut butter mixture evenly over the top of the marshmallow layer. Then sprinkle with salt!

    Process shots to melt chocolate and add to pretzel bark.

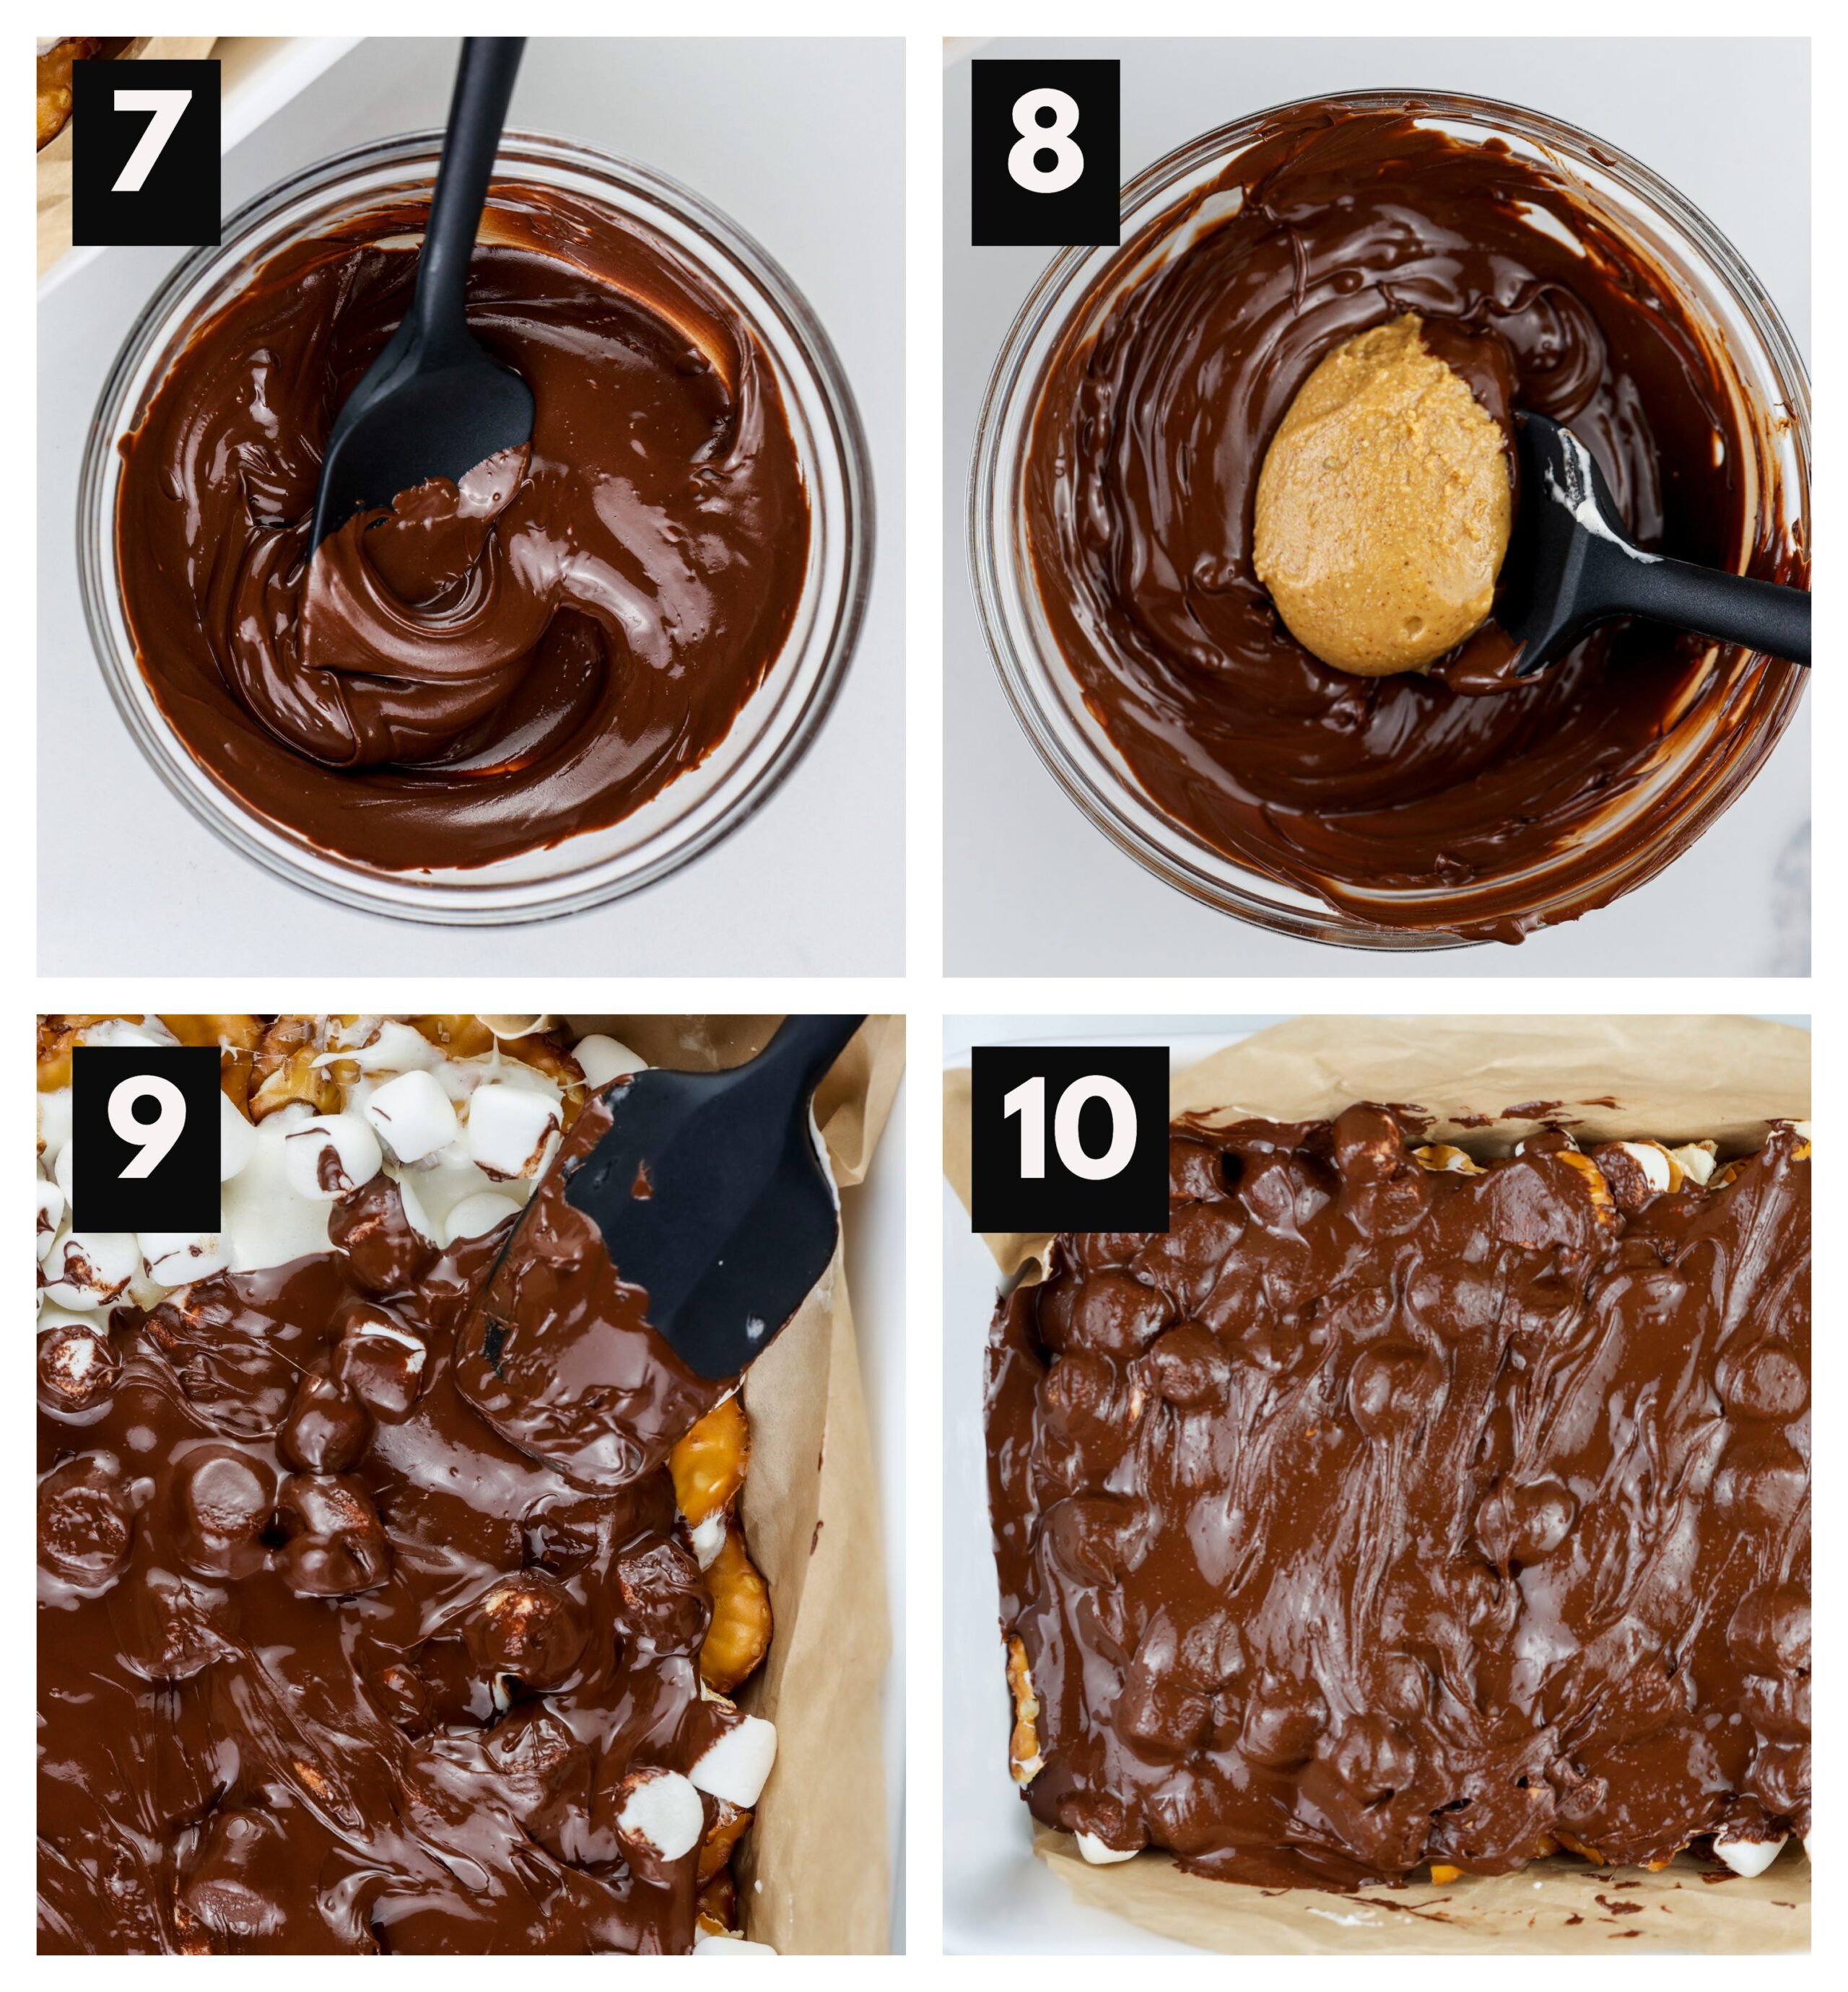
    Place in the freezer for at least 20 minutes to harden before cutting. It’s best to wait a minimum of one hour if you can hold out though!

    White baking dish with brown parchment paper and chocolate bark inside.

    Recipe Notes

    It’s pretty hard to mess up this Chocolate Pretzel Bark! I swear, that’s probably why I make it so often. But, keep these notes in mind as you jump into this recipe!

    • Evenly line the parchment paper with the pretzels. Having too much in one area will make it harder for the thins to stick together.
    • Using the microwave is the fastest (and creates the least amount of dishes) to heat the marshmallows and chocolate. However, if you don’t own one or prefer to limit its use, you can create a double broiler using two pots on the stovetop or your Instant Pot.
    • Start heating in 15 to 25 second intervals as you microwave the marshmallows and chocolate to prevent the marshmallows from exploding and the chocolate from burning.
    • It’s best to freeze this for at least an hour before cutting into it, however if you’re jonsing for a slice wait at least 20 minutes before cutting.
    • Store the leftover S’mores Bark in the freezer in an airtight container. Do not store on the counter or in the fridge, it will become very sticky and does not taste as good.
    Finger pulling smores bark apart.

    Expert Tips to Help Make it Your Own

    Here’s the deal: This is a no-recipe recipe, meaning you can (and I want you to!) make this your own.

    If you choose to do so, you’ll want to keep a few things in mind to make the swaps still needed to yield a bark that is delicious and that holds well!

    • If using an alternative base, make sure you use at least 6 ounces by weight of the ingredient. One pack of graham crackers is usually about 5 ounces, so be sure to break into another pack or know you will have a bit more of a mallow coating!
    • Don’t skimp on the marshmallows.You need them to help whatever base you choose stick together!

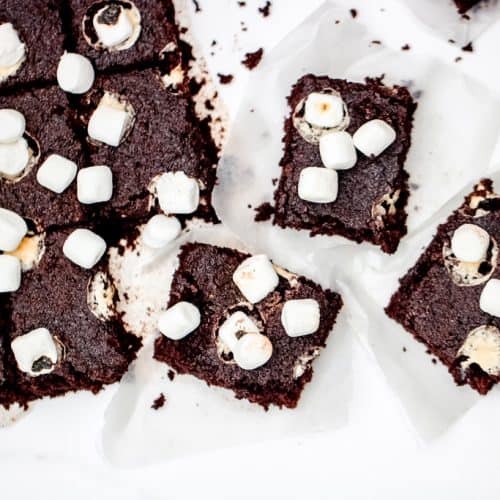
    Other Delicious S’mores Inspired Chocolate and Marshmallow Treats You May Enjoy

    • Chocolate S'mores Milkshake with ice cream melting over cup onto white background.
      Creamy S’mores Milkshake
    • Hot Chocolate Cake Bars - A gluten free holiday or anytime treat the entire crowd will enjoy! Lightened up with half the sugar of a traditional cake bar, this recipe is sure to satisfy a sweet tooth, healthfully! #glutenfreetreats #hotchococolatebars #hotcocoabars #healthyholidaytreats #cookiesforsanta
      Hot Chocolate Cake Bars
    • Cup of hot chocolate with mini marshmallows.
      Instant Pot Hot Chocolate

    If you try this recipe, would you please do me a favor and leave a star rating in the recipe box and/or comment below! This helps immensely in Google to continue delivering high quality content to you. And please be sure to tag and share what you made with me on social, I love seeing your creations! You can find me here: Instagram – Facebook – Pinterest!

    White tile backdrop with chocolate pretzel bark on top.
    Print Recipe
    5 from 8 votes

    No Bake S’mores Chocolate Pretzel Bark

    No campfire? No problem! This No Bake S'mores Chocolate Pretzel Bark is the perfect year round pick-me-up that requires a few simple ingredients to come to life in a matter of no time. If you're craving the ultimate sweet and salty combo that takes just minutes to make, then this bark is for you1
    Prep Time5 minutes mins
    Cook Time0 minutes mins
    20 minutes mins
    Total Time25 minutes mins
    Course: Desserts
    Cuisine: American
    Diet: Vegan, Vegetarian
    Servings: 18 servings
    Calories: 157kcal
    Author: Liz Shaw

    Ingredients

    • 6 oz pretzel thins
    • 2 1/2 cups mini marshmallows
    • 4 teaspoons honey
    • 1 1/2 cups mini chocolate chips
    • 1/4 cup natural peanut butter optional

    Instructions

    • Start by lining an 8×13-inch baking dish with parchment paper. Then, evenly layer the pretzel thins on top.
    • Melt marshmallows in a glass bowl in the microwave in 15 second intervals until they begin to puff (usually after 30 to 45 seconds total.) Remove and use a spatula to mix in the honey and create a thin paste. Quickly pour the mallow paste over the pretzel thins until pretzels are evenly coated. Your hands may get sticky here, so this is where I suggest using a second spatula to help! Immediately soak the bowl in hot water so it's easier to clean.
    • Next, heat the chocolate in the microwave in 15 second intervals about 3 times (45 seconds). Remove and use a spatula to mix the chocolate and stir in the peanut butter (if using).
      Immediately soak chocolate bowl as well in sink so it's easier to clean!
      Quickly spread evenly on top of the marshmallow layer, then place in the freezer for an hour (or at least 20 minutes, but the longer the better to really get the best consistency to cut!)
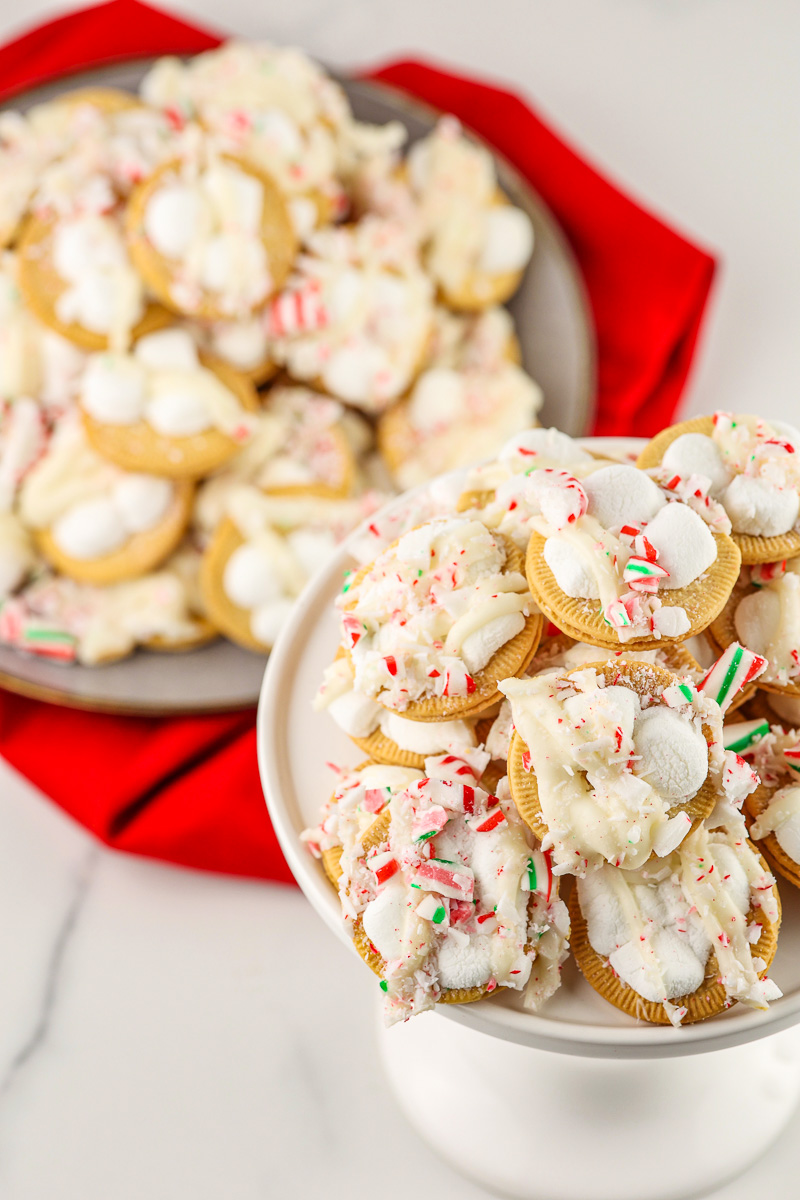
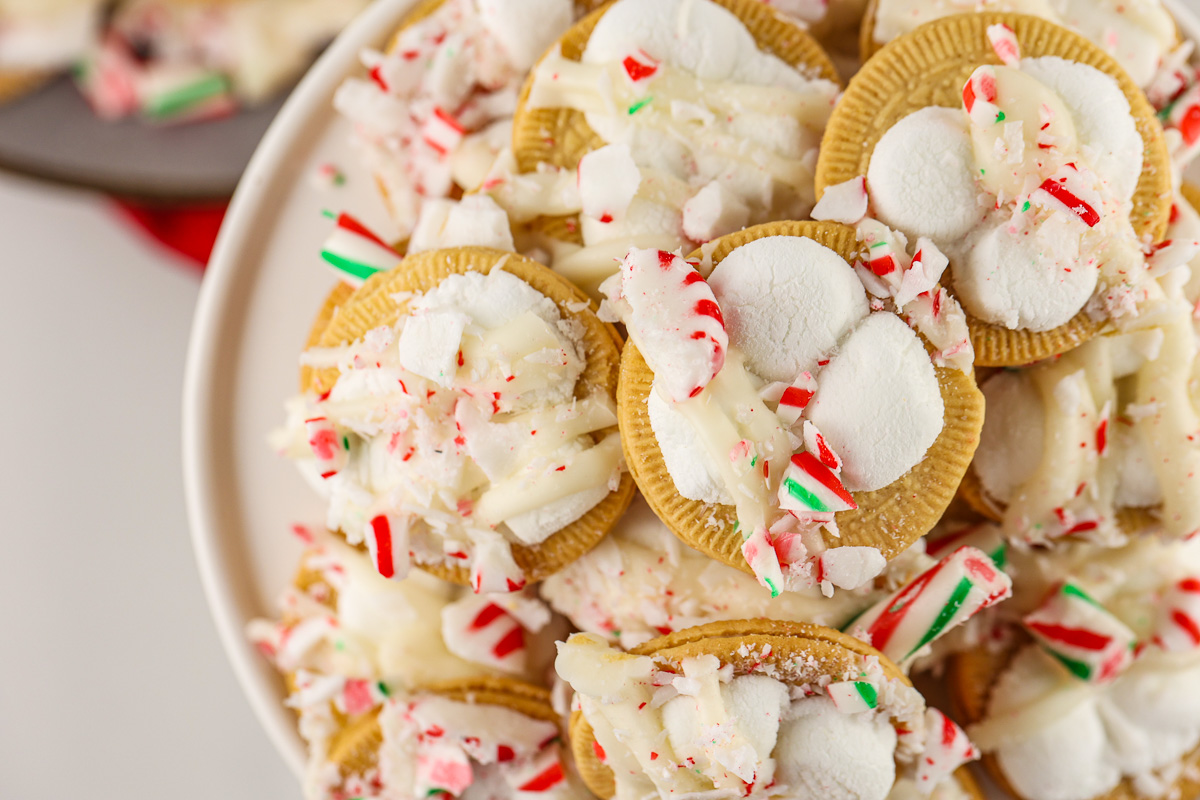
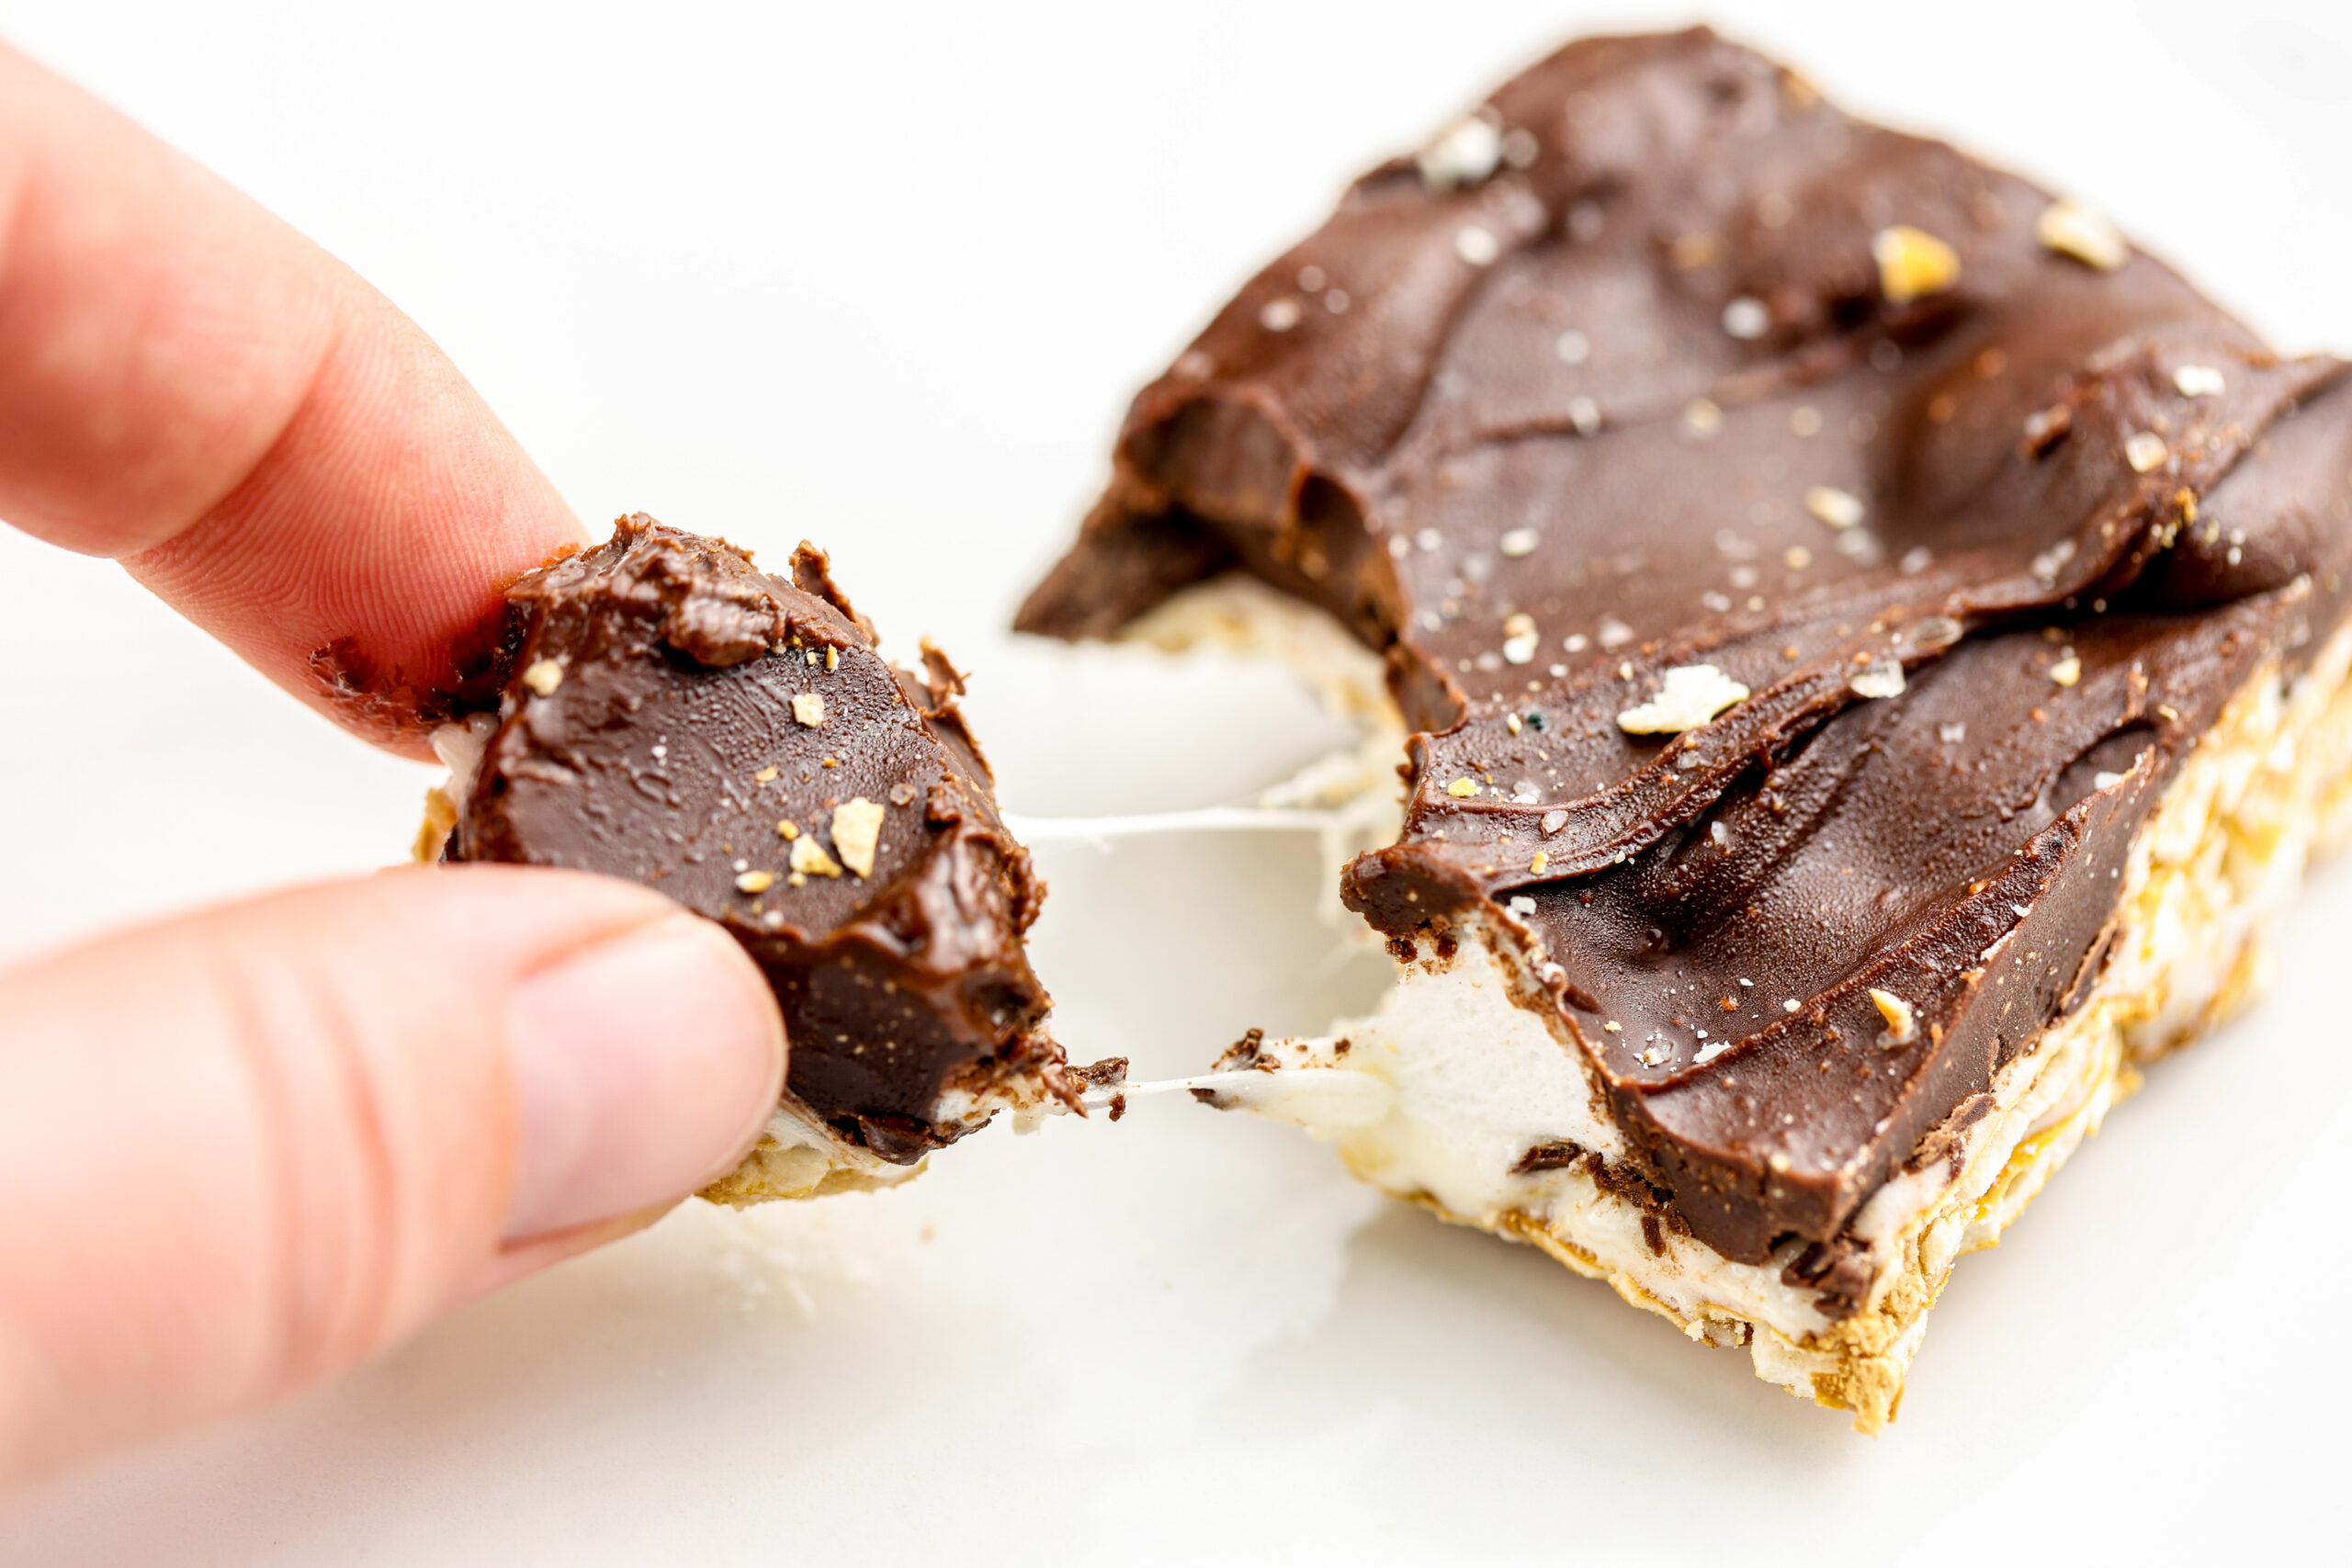
    • When ready to serve, cut and enjoy straight from the freezer!

    Notes

    It’s pretty hard to mess up this Chocolate Pretzel Bark! I swear, that’s probably why I make it so often. But, keep these notes in mind as you jump into this recipe!
    • Evenly line the parchment paper with the pretzels. Having too much in one area will make it harder for the thins to stick together.
    • Using the microwave is the fastest (and creates the least amount of dishes) to heat the marshmallows and chocolate. However, if you don’t own one or prefer to limit its use, you can create a double broiler using two pots on the stovetop or your Instant Pot.
    • Start heating in 15 to 25 second intervals as you microwave the marshmallows and chocolate to prevent the marshmallows from exploding and the chocolate from burning.
    • It’s best to freeze this for at least an hour before cutting into it, however if you’re jonsing for a slice wait at least 20 minutes before cutting.
    • Store the leftover S’mores Bark in the freezer in an airtight container. Do not store on the counter or in the fridge, it will become very sticky and does not taste as good.

    Expert Tips to Help Make it Your Own

    Here’s the deal: This is a no-recipe recipe, meaning you can (and I want you to!) make this your own.
    If you choose to do so, you’ll want to keep a few things in mind to make the swaps still yield a bark that is delicious and that holds well!
    • If using an alternative base, make sure you use at least 6 ounces by weight of the ingredient. One pack of graham crackers is usually about 5 ounces, so be sure to break into another pack or know you will have a bit more of a mallow coating!
    • Don’t skimp on the marshmallows.You need them to help whatever base you choose stick together!

    Nutrition

    Calories: 157kcal | Carbohydrates: 26g | Protein: 3g | Fat: 6g | Saturated Fat: 3g | Polyunsaturated Fat: 1g | Monounsaturated Fat: 1g | Trans Fat: 1g | Cholesterol: 2mg | Sodium: 51mg | Potassium: 65mg | Fiber: 1g | Sugar: 15g | Vitamin A: 34IU | Vitamin C: 1mg | Calcium: 22mg | Iron: 1mg

    Want more Shaw Kitchen recipes? Then sign up here for my 5 Day Stress-Free Meal Plan delivered straight to your inbox!

    Valentine Treats for Kids

    February 8, 2021

    White tile backdrop with chocolate heart-shaped cake with slice out of it.

    Looking to bring a little love into your house this Valentine’s Day with the kiddos?! Then this post is for you! I’ve rounded up 10 of my favorite lower-sugar, heart-healthy Valentine Treats for Kids. Make them together or surprise them after nap-time, either way, they’ll think you’re the best!

    White marble backdrop with heart shaped chocolate cake topped with two berries.

    We’ve been living holiday to holiday since quarantine life started back in March.

    Valentine’s Day has been a hot topic since NYE ended, so naturally my toddler and I have been making and baking up a storm!

    These lower sugar, heart-healthy Valentine Treats for Kids are a win-win for the entire crew, but especially those little helpers!

    Plus, they’re so easy to make and get your kiddos in the kitchen with you (more on how to get kids cooking here!)

    How to Make Healthy Treats Kids Will Enjoy

    I get it! Kids are picky and if they’re used to an Oreo, it may be challenging to get them interested in a banana!

    But, I promise, if you make healthy foods that are filled with natural sugars fun, they won’t ever tell the difference. Pinky promise!

    Here are my go to simple-swaps to make healthy treats you kids will enjoy (and you will too!)

    • Experiment with dates, date paste, and date syrup! This is a naturally sweet fruit that adds the perfect sweetness to baked goods without any added sugar.
    • Add cocoa powder! This natural antioxidant will boos the nutrition and create that chocolate look that kids (ok and moms) go crazy for! Just be sure to add the sweetener too (aka, those dates!)
    • Consider using a nut or seed butter to add the healthy fats over traditional butter. This adds quality nutrition that your kiddos need!
    • Add some fun! Sprinkles that coincide with the holiday are an excellent addition to cakes, cookies, and date pops! I’m not a stickler if you buy ones with the food dyes, but some markets sell natural dye sprinkles for a very cost-effective price too!

    Simple Kid Friendly Valentine’s Day Recipes

    White marble backdrop with cereal cake pop and two hearts on the side.

    While these are a big win for Valentine’s Day, you can certainly make these treats year round! Change out the sprinkles with the season and you’ve got yourself a festive Fourth of July cake too!

    1. Cereal Cake Pops

    The best recipe because literally you don’t have to freak out when your kids eat this raw from the bowl! (For an adult, slightly higher sugar version, checkout my GF Chocolate Cake Pops!)

    Cereal Cake Pops
    The perfect simple snack to incorporate for dessert or just because! These Healthy Cereal Cake Pops will satisfy that sweet tooth without all the sugar!
    Make This Recipe!
    White square cake pan with one ounce brown cereal cake pops.

    2. Strawberry Nice Cream

    Again, love a recipe with a low mess clean up and that can be eaten raw (aka, avoiding the meltdown from a hangry toddler!)

    Strawberry Nice Cream
    This Strawberry Nice Cream is everything you're craving and more! Creamy, cold, satisfying and satiating, you never knew good for you "ice cream" could taste so good! Made from wholesome, natural ingredients without any added sugar, it's a treat you can feel good about feeding everyone in your family!
    Make This Recipe!
    Picture of white pan with strawberry nice cream inside with crushed golden cake cones and a brown and silver ice cream scoop peaking out the side.

    3. Death by Chocolate Cake (aka Chocolate Zucchini Cake)

    A fun way to sneak in a veggie (and fruit, hello avocado frosting!)

    Death By Chocolate Cake Recipe
    A rich, chocolatey treat filled with love (and a few veggies, too!)
    Make This Recipe!
    White tile background with chocolate cake slice coming out of a round cake with two gold forks.

    4. Chocolate Peanut Butter Cookies

    Better than a Reece’s. Toss them in the freezer… you won’t regret this!

    Chocolate Peanut Butter Cookies
    The perfect combination of chocolate and peanut butter are in these Chocolate Peanut Butter Cookies. An all time classic cookie lightened up with all the delicious flavor!
    Make This Recipe!
    Baked cookies on silver baking sheet with chocolate glaze over the top.

    5. 3 Ingredient Cookie Cake

    While not totally homemade, this swap is for my busy moms who want something fun! You can also use small cookie cutters and cut them out for a unique cake mix cookie!

    Chocolate Cake Mix Cookie Cake
    This 3-ingredient Chocolate Cake Mix Cookie Cake is the perfect time saving hack for a busy mom!
    Make This Recipe!
    Chocolate Cake Mix Cookie Cake - Reese's Copycat @shawsimpleswaps #simpledesserts #valentinesday #chocolatepeanutbutter #cookiecake #cakemixcookie

    6. Homemade Chocolate Pudding

    Put those dates to the test with this DIY pudding!

    No Added Sugar Chocolate Puddding
    This no added sugar chocolate pudding is the perfect way to satisfy your chocolate craving in a healthy way!
    Make This Recipe!
    No Added Sugar Chocolate Pudding - a simple recipe to satisfy a sweet tooth with no added sugar! #noaddedsugardessert #sugarfreedessert #healthypudding #chocolatepuddingrecipe
    Food styled shot of hot cocoa dip charcuterie boards.

    7. Hot Cocoa Dip

    A better-for-you dip delight that will satisfy both adults and kids alike!

    Hot Cocoa Dip Recipe
    A fun food twist on a comfort classic beverage, this Hot Cocoa Dip Recipe is sure to be a crowd favorite in no time! Not only is it easy to prepare, it’s also a healthier sweet treat that’s naturally sweetened with California Prunes (a good-for-you food!)
    Make This Recipe!
    Food styled shot of hot cocoa dip charcuterie boards.

    8. Sugar Free Chocolate Dip

    They will never know what they don’t know… it’s that good!

    Sugar Free Chocolate Spread
    This no added sugar dessert dip is perfect to enjoy morning, noon or night! It's great on its own with a spoon, or perfect dipped with fresh berries, apples or graham crackers!
    Make This Recipe!
    Sugar Free Chocolate Spread

    9. Chickpea Cookie Dough

    Again, a recipe that can be eaten raw! Plus, it makes an excellent freezer treat to reward during potty training too!

    Chickpea Cookie Dough
    This Chickpea Cookie Dough is a healthy, low sugar but totally delicious sweet treat adults and kids will go crazy for!
    Make This Recipe!
    White marble backdrop with single glass jar filled with chocolate cookie dough and mini chocolate chips on top with a tiny spoon sticking out.

    10. Sweet Chocolate Hummus

    Hands down, make this! And then serve it with your favorite fruits.

    Sweet Hummus Recipe
    A rich, creamy chocolate dessert dip made with the essential ingredients you likely have on hand! This Sweet Hummus Recipe is the perfect snack or party dip!
    Make This Recipe!
    A rich, creamy chocolate dessert dip made with the essential ingredients you likely have on hand! This Sweet Hummus Recipe is the perfect snack or party dip! The beauty of this baby is you can make it all in the blender, aka, no mess clean up! #desserthummus #desserthummusrecipe #healthydesserthummus #desserthummushealthyrecipe #desserthummuschocolate

    Looking for more kid-friendly recipes? Then checkout some of my reader favorites below!

    • Green Smoothie Popsicles for Kids
    • Baby Meatballs
    • Sloppy Joes
    • Cheeseburger Tater Tot Casserole
    • Applesauce Muffins

    I’d love to hear what you think about this roundup! Comment below and tag me (@shawsimpleswaps) on Facebook, Instagram, or Pinterest if you make something. I’d love to reshare!

    What’s New In Global Health? Takeaways from the International Congress of Nutrition 2025

    September 8, 2025

    Image of globe with hands for a title page of a blog post about the International Congress of Nutrition Recap.

    From global health to food systems and beyond, the 2025 International Congress of Nutrition in Paris revealed the ideas shaping how we’ll eat—and thrive—in the years ahead. Here are my key takeaways.

    Image of globe with hands for a title page of a blog post about the International Congress of Nutrition Recap.

    A true “pinch-me” moment: last month, I had the incredible opportunity to attend the International Congress of Nutrition (IUNS) in Paris as press. Held every four years, this conference brings together leading researchers from around the globe to explore the latest in health and nutrition. This year’s theme, “Sustainable Food for Global Health,” drew nearly 4,000 attendees from 117 countries—an inspiring mix of perspectives all focused on advancing nutrition science.

    Over five days, scientists shared groundbreaking research on topics ranging from ultra-processed foods and regenerative farming to protein digestibility, obesity, chronic disease, maternal health, and more. With over 150 educational sessions, it was impossible to see everything—but during the three days I attended, I donned my student hat and absorbed as much as possible. Here are the key takeaways from the sessions I was able to attend:

    1. Ultra-Processed Foods and Their Impact On Health

    One of the most polarizing—and widely debated—topics at the congress was ultra-processed foods (UPF). A central theme was the urgent need for a globally standardized definition, something many leading nutrition scientists now support. The Nova, previously known as NOVA, classification system, which categorizes foods by their degree of processing, was both scrutinized and praised depending on the session.

    Key discussion points included:

    • UPF aren’t black and white. In low-resource settings where malnutrition is still prevalent, certain UPFs—like ready-to-use therapeutic foods—are literally lifesaving. A single global definition risks oversimplifying foods that, in context, deliver vital nutrition.
    • UPFs contribute to chronic disease. In industrialized nations, however, diets heavy in UPFs high in added sugars, fats, and sodium are strongly linked to obesity and other chronic conditions.
    • Policies may help, but only within a broader strategy. Taxes on sugar-sweetened beverages or UPFs were highlighted as potential levers for public health improvement. Yet, as several speakers noted, removing processed foods without offering accessible, healthier replacements is ineffective. True impact depends on pairing policy with education, empowerment, and access.
    • UPFs and biodiversity. A newer concern is how diets dominated by UPFs reduce agricultural biodiversity, as they rely on a narrow range of ingredients. Scientists called for a return to whole-food diversity to strengthen both human and planetary health.

    My Key Takeaway

    In 2025, UPFs will undeniably be part of our food environment. The real challenge isn’t eliminating them but finding ways to ensure they don’t undermine public health or sustainable food systems. That requires collaboration between food companies, policymakers, and scientists—not building walls between sectors, but building bridges that prioritize health over profit.

    2. Food Marketing, Packaging & Processing 

    A recurring theme at the conference centered on how food marketing, packaging, and processing influence chronic disease—particularly the rising rates of obesity worldwide. Across sessions, one point of agreement emerged between policymakers and scientists: empowering consumers requires strategies to quietly reduce the energy density of what’s consumed—sometimes called “stealth health.” Here are two key discussions that stood out:

    • Should governments regulate portion size—directly or indirectly?

    One proposal suggested stricter regulations around the nutrient density of meals and snacks, which would indirectly limit portion sizes. For instance, if a hamburger were capped at 500 calories, restaurants could no longer offer oversized versions that exceed this threshold. While such an approach may not be globally feasible, another researcher offered a more practical idea: a three-tiered menu system that highlights “right-sized” portions at more accessible price points. Considering the U.S. foodservice landscape, this struck me as a creative step toward making balanced portions the easy, affordable choice.

    • Do nutrient claims help—or confuse—consumers?

    Regulations around nutrient and health claims differ widely across the globe, often leaving consumers unsure of what to believe. A striking example is the long-standing soy protein heart health claim. Despite robust evidence supporting soy as a heart-healthy food, the FDA has proposed revoking its 1999 claim, while the European Food Safety Authority has already rejected it. Since the FDA’s 2017 proposal, no final direction has been made. This lack of alignment between regulations and evolving science fuels consumer confusion and mistrust—especially when viewed through a global lens.

    My Key Takeaway

    In today’s food environment, marketing messages and health claims can feel overwhelming—and often misleading. Nutrition communicators grounded in science play a critical role in helping consumers sort fact from fiction and make confident choices for themselves and their families. Take yogurt, for example: while some front-of-pack labeling systems might flag it with a low grade, the evidence shows it can support better blood sugar control and overall health. Registered dietitians, in particular, are uniquely positioned to reframe the conversation, guiding people toward foods that align with their personal health needs rather than letting marketing determine what ends up on their plates.

    3. Protein and Amino Acids: Does Quality Trump Quantity 

    Protein and amino acids were another hot topic of discussion, with researchers debating whether quality matters more than quantity when assessing total amino acid intake. One presentation highlighted country-specific data suggesting that animal protein may be more cost-effective than plant protein once amino acid content is factored in—a conclusion that, admittedly, left me a bit perplexed. From both a nutrition and sustainability perspective, much of the evidence continues to favor plant proteins, with the caveat that ultra-processed plant-based options (like imitation burgers) can be more costly. 

    Some researchers proposed using linear programming models to evaluate the true cost of protein production, factoring in efficiency, nutrient completeness, and sustainability. Such tools may help clarify whether certain plant proteins are indeed more cost-prohibitive than animal sources once all externalities are accounted for.

    My Key Takeaway

    This conversation is only just beginning, especially when viewed through a global and culturally inclusive lens. What’s clear is that encouraging more dietary diversity—particularly through fiber- and nutrient-rich plant foods—remains essential. At the same time, we must keep an open mind and work collaboratively across sectors to ensure our future food systems provide protein that is both sustainable and nutritionally adequate.

    4. Rising Food Costs Globally Are Impacting Worldwide Hunger & Food Insecurity 

    Food insecurity clearly isn’t just a US problem – it’s happening all over the world. With food inflation rates skyrocketing, The State of Food Security & Nutrition in the World 2025 has indicated that global hunger and food insecurity remain above pre-pandemic levels, putting the world off track from meeting the 2030 Sustainable Development Goal for erradicating global hunger and food insecurity. Persistent food price inflation reduces purchasing power and limits access to healthy diets, especially for low-income populations.

    While this can’t be solved overnight, scientists encouraged greater innovation in agriculture productivity and ago-industrilization to see the impact needed to help end worldwide hunger… for good. 

    My Key Takeaway 

    This FAO report was referenced in numerous sessions, underscoring the global focus researchers are placing on ending hunger and food insecurity. Coming from one of the wealthiest nations in the world—where 13.5% of households still experience food insecurity—this really hits home and motivates me to take action. With ongoing policy changes affecting families’ access to the nutrition they need to thrive, now is the time to explore how agriculture, sustainable eating, and food policy can work together to address this urgent issue.

    Would I recommend attending ICN in the future?

    Absolutely—for dietitians and food and health leaders working in policy, food processing, or healthcare, this conference is well worth considering. Held every four years, it’s an incredible opportunity to expand your knowledge, step outside your usual silo, and see what’s happening on the global stage in nutrition and health.

    Mark your calendar for 2029 (it’s slated for Canada!) and join the conversation. It’s a chance to connect with scientists and thought leaders tackling some of the world’s most pressing nutrition challenges—even in first-world countries.

    High Protein Chia Seed Pudding

    May 19, 2025

    This high-protein, high-fiber chia seed pudding is the perfect make-ahead breakfast to fuel your busy mornings.

    Banana Bread Muffins with Chocolate

    March 16, 2023

    Muffins in muffin tin with grey background for food photography styling.

    The perfect pick-me-up that packs protein, fiber, and good-for-you grains! With just the right amount of antioxidant filled chocolate, it’s a better-for-you treat you can enjoy morning, noon, and night! Try these Banana Bread Muffins with Chocolate Chips today!

    Muffins in muffin tin with grey background for food photography styling.

    There are few things I love more than fresh banana bread out of the oven and that’s banana bread with chocolate! These Chocolate Chip Banana Bread Muffins are filled with the banana flavor you crave and a few simple swaps to increase the nutrition so they’ll carry you over until your next meal.

    Plus, they’re portion controlled thanks to the individual muffin hack! Toss one or two in your bag on your way out the door and you’ve got a better-for-you sweet treat thats got 70% less sugar than coffee shop varities!

    Why I Love These Banana Bread Muffins

    • My entire family loves it! Seriously, there’s nothing better than a recipe your pickiest of eaters will enjoy too (and truthfully, provide a bit of nutrition too!)
    • It packs a bit more nutrition in every bite. I enlist the simple swap of adding dry milk powder into the batter to boost the protein and calcium content of the final muffin recipe. In an effort to get my kids to feel satiated and satisfied after their snacks, I know the added protein and fiber from the dry milk powder, fruit, and whole grains will make this happen!
    • It’s affordable. Dry Milk Powder is just under $9.00 for a large container, making it much more affordable than other protein powders on the market.
    • It’s nut free, making it perfect for school snacks!
    • It freezes well! Make a big ole’ batch and store some in the fridge and some in the freezer for when life happens and you have no time to meal prep one week!

    What You Need to Make This Recipe

    Muffins in muffin tin with grey background for food photography styling.

    Ingredients + Swaps To Consider in the Chocolate Chip Banana Muffins

    • Ripe Bananas
    • Brown Sugar
      • Date sugar also works well in this recipe and adds a little more fiber.
    • Vanilla Extract
    • Milk
      • For the highest protein option, add in a cow, soy, or pea milk. Almond, cashew, and oat also work but will not yield the same protein content of the final muffin.
    • Coconut Oil
      • Vegetable oil or melted butter also will work pending preference and what you have on hand.
    • Egg
    • White Whole Wheat Flour
      • This is a milled whole wheat flour that tastes more similar to all purpose yet has the added nutrition of whole wheat. If not available, you can sub with the wheat flour you have on hand.
    • Dry Milk Powder
      • Keep this on hand in your pantry, trust me, you won’t regret it! It’s an easy way to add more protein and calcium to your baked goods!
    • Old Fashioned Oats
      • I prefer the old fashioned, but instant will also work.
    • Baking Soda
    • Baking Powder
    • Ground Cinnamon
    • Salt
    • Chocolate
      • If you have larger pieces of chocolate, just be sure to chop them so it’s more evenly spread out in the muffins.
    Food photography styled image of chocolate chip banana bread muffins.

    How to Make Chocolate Chip Banana Bread Muffins

    • Step 1: Preheat oven to 350 degrees F. Using a pastry blender or the back of a fork, mash bananas in a large bowl.
    • Step 2: Whisk the sugar, vanilla extract, milk, coconut oil, and egg into the mashed banana mixture.
    • Step 3: Add the flour, dry milk powder, oats, baking soda, baking powder, cinnamon, and salt into the bowl, then whisk together all the ingredients.
    • Step 4: Fold in the chocolate and line a 12-cupcake tin with liners. Using a 3-ounce scoop or measuring cup, portion batter evenly into 12 tins.
    • Step 5: Bake for 20-22 minutes or until tops are golden brown.
    • Step 6: Remove muffins from oven and let cool on a wire rack (if possible). Store in an airtight container on the counter for 3 days, in the fridge for 7 days, or freeze for up to 3 months.
    Muffin with a bite out of it for food styling.

    Recipe Notes + Tips

    I am no Martha, but I will say, my muffin and baked good recipes are pretty forgiving for at-home cooks that want something tasty, nourishing, and fairly fool proof!

    Here are some tips to keep in mind as you whip up these Chocolate Chip Banana Bread Muffins!

    • Banana Size & Level Of Ripening
      • Aim for a banana that is at least 6-7-inches long! This will be the perfect size for optimum moistness.
      • Green bananas will not fly in here. Choose a ripe banana that has some brown spots. The sweetness you will want in these beauties!
    • Incorporating the Dry Ingredients
      • Classically trained chefs will insist you use a separate bowl to mix these, then fold them into the wet ingredients. If time (and minimal dishes) is of priority for you too, then nix this and simply add the dry ingredients into the wet together, then uniformly mix them in the order listed below.
    • Flours, Dry Milk Powder, and Oats
      • Here’s the deal: you don’t have to use the dry milk powder if you don’t have it on hand or simply aren’t quite sold. Simply swap that ingredient with the same amount of flour.
      • Oats help bring a little more flavor and texture to this recipe. Don’t skip these!

    Other Muffins You Will Enjoy

    Looking for more portable baked snacks to add to your meal prep routine? Then consider trying these other Shaw Kitchen muffin favorites!

    • Whole Wheat Chocolate Chip Muffins
    • Gluten Free Pumpkin Muffins
    • Sweet Potato Muffin Recipe
    • Blueberry Muffins – Gluten Free
    • Healthy Applesauce Muffins

    If you try this recipe, would you please do me a favor and leave a star rating in the recipe box and/or comment below! This helps immensely in Google to continue delivering high quality content to you. And please be sure to tag and share what you made with me on social, I love seeing your creations! You can find me here: Instagram – Facebook – Pinterest!

    Muffins in muffin tin with grey background for food photography styling.
    Print Recipe
    5 from 4 votes

    Chocolate Chip Banana Bread Muffins

    Looking for a sweet treat to kick off your day? Try these Banana Bread Muffins that are packed with wholesome goodness.
    Prep Time10 minutes mins
    Cook Time22 minutes mins
    Total Time32 minutes mins
    Course: Breakfast, Snack
    Cuisine: American
    Diet: Low Fat, Vegetarian
    Servings: 12 servings
    Calories: 141kcal
    Author: Liz Shaw

    Ingredients

    • 2 medium bananas mashed
    • 1/4 cup brown sugar
    • 1 1/2 teaspoons vanilla extract
    • 1 cup milk*
    • 2 tablespoons coconut oil*
    • 1 large egg
    • 3/4 cup white whole wheat flour*
    • 1/4 cup dry milk powder* nonfat
    • 1/2 cup old fashioned oats*
    • 1 teaspoon baking soda
    • 1/2 teaspoon baking powder
    • 1/2 teaspoon ground cinnamon
    • 1/8 teaspoon salt
    • 1/4 cup mini chocolate chips

    Instructions

    • Preheat oven to 350 degrees F. Using a pastry blender or the back of a fork, mash bananas in a large bowl.
    • Whisk the sugar, vanilla extract, milk, coconut oil, and egg into the mashed banana mixture.
    • Add the flour, dry milk powder, oats, baking soda, baking powder, cinnamon, and salt into the bowl, then whisk together all the ingredients.
    • Fold in the chocolate and line a 12-cupcake tin with liners. Using a 3-ounce scoop or measuring cup, portion batter evenly into 12 tins.
    • Bake for 20-22 minutes or until tops are golden brown.
    • Remove muffins from oven and let cool on a wire rack (if possible). Store in an airtight container on the counter for 3 days, in the fridge for 7 days, or freeze for up to 3 months.

    Notes

    Here are some tips to keep in mind as you whip up these Chocolate Chip Banana Bread Muffins!
    • Banana Size & Level Of Ripening
      • Aim for a banana that is at least 6-7-inches long! This will be the perfect size for optimum moistness.
      • Green bananas will not fly in here. Choose a ripe banana that has some brown spots. The sweetness you will want in these beauties!
    • Incorporating the Dry Ingredients
      • Classically trained chefs will insist you use a separate bowl to mix these, then fold them into the wet ingredients. If time (and minimal dishes) is of priority for you too, then nix this and simply add the dry ingredients into the wet together, then uniformly mix them in the order listed below.
    • Flours, Dry Milk Powder, and Oats
      • Here’s the deal: you don’t have to use the dry milk powder if you don’t have it on hand or simply aren’t quite sold. Simply swap that ingredient with the same amount of flour.
      • Oats help bring a little more flavor and texture to this recipe. Don’t skip these!

    Nutrition

    Serving: 1 | Calories: 141kcal | Carbohydrates: 23g | Protein: 4g | Fat: 4g | Saturated Fat: 3g | Polyunsaturated Fat: 0.2g | Monounsaturated Fat: 0.4g | Trans Fat: 0.01g | Cholesterol: 17mg | Sodium: 146mg | Potassium: 194mg | Fiber: 2g | Sugar: 11g | Vitamin A: 129IU | Vitamin C: 2mg | Calcium: 79mg | Iron: 1mg

    Want more Shaw Kitchen recipes? Then sign up here for my 5 Day Stress-Free Meal Plan delivered straight to your inbox!

    Hot Cocoa Dip

    January 18, 2023

    Food styled shot of hot cocoa dip charcuterie boards.

    Feel like you’re always craving something chocolatey? Then this Healthier Hot Cocoa Dip is the answer to your prayers! Sweetened with good-for-you California Prunes, it’s a healthier twist on a comfort classic in food form. Nestle this Hot Cocoa Dip inside your favorite berries, slather it on a graham cracker, or simply eat it with a marshmallow enveloped spoon, the possibilities are endless (and devilishly delicious!) 

    Food styled shot of hot cocoa dip charcuterie boards.

    Disclosure: This post is in partnership with California Prunes. As always, I only work with companies that align with my business and food philosophies. Thanks so much for supporting the work that keeps the Shaw Kitchen thriving! 

    Table of contents

    • Why You Need This Hot Cocoa Dip Recipe 
    • What You Need To Make It
    • How to Make This Cocoa Dip Recipe

    Why You Need This Hot Cocoa Dip Recipe 

    Find yourself always wanting something sweet to nosh on? Me too. Me too. That’s why this Hot Cocoa Dip came together if I’m being honest. I have two tiny humans who definitely inherited their mama’s sweet tooth and are constantly asking for something chocolatey with marshmallows (you may remember this S’mores Bark is one of their favorites!)

    So, to satisfy all of our cravings (and my desire to feed our bellies with nourishing foods, too) I took a few staple foods into the kitchen to see what I could come up with that didn’t require a jar of marshmallow cream like most other versions online! 

    California Prunes (a naturally sweet, high fiber food that helps keep you regular, promotes bone health, and more!) Marshmallows (a fun food that just so happens to be dairy free, too!) Heavy cream (because we want it to taste just right.) And dark cocoa powder (because those flavonoids really do pack a powerful punch!) 

    In less than 5-minutes I had this better-for-us (and you) Hot Cocoa Dip recipe that still satisfied and satiated everyone in my crew! Talk about a #momwin!

    Chocolate dip in center of board with charcuterie style dessert spread.

    What You Need To Make It

    Labeled photo of ingredients to make hot cocoa dip.

    California Prunes: Choose pitted, California grown prunes for best quality. To reap the full nutrition benefits of prunes, aim for 4 pitted prunes in your smoothie. 

    Marshmallows: I used 8-10 regular sized marshmallows for this recipe. You can use 1 cup of mini marshmallows or 4 of the mega marshmallows (though I do recommend cutting those larger ones in fourths.) 

    Heavy Cream: Since my son has a dairy allergy, we use a soy based heavy cream that is low in saturated fat and has no added sugar. Most cows based heavy creams are also added sugar free but do contain some saturated fat. So, if you are watching your fat intake you can also try a skim half and half in here. 

    Cocoa Powder: Dark cocoa powder is a staple over here and really makes the chocolate flavor shine in this recipe. Opt for the pure cocoa variety of your choice to help control added sugars and reap the benefits of the antioxidants that cocoa powder naturally contains! 

    Protein Powder: For adults or active teenagers, adding a scoop of chocolate protein powder into the mix will boost the total protein of this dip and help provide a little more nutritional bang for your caloric buck. I do not recommend adding this for younger eaters. 

    Yogurt: For kiddos, I love mixing ½ cup of a Greek yogurt into the dip to stretch it out while also providing a bit more protein to fill their tiny bellies!

    White marble backdrop with chocolate cocoa charcuterie tray and two small bowls.

    How to Make This Cocoa Dip Recipe

    I promise you, if you have an immersion blender, food processor, or high powered blender, you can easily make this beauty come to life!

    Food styled shot of a hot cocoa dip charcuterie board on white marble backdrop.

    Step 1: Add the heavy cream, pitted prunes, and marshmallows to a microwave safe dish. Heat on high in 30 second intervals until marshmallows begin to expand (usually about 1 minute max).

    Step 2: Remove from heat and use an immersion blender to mix ingredients together into a dip consistency. Alternatively, you can also pour the ingredients into a food processor or high speed blender to process as well.

    Step 3: Scrape down the sides as needed, add in the cocoa powder, then process one more time for a smooth, creamy consistency. 

    Step 4: Enjoy! Serve warm with fresh fruits, graham crackers, marshmallows, or simply on a spoon!

    Food styled shot of hot cocoa dip charcuterie boards.

    Step 5: Store leftover dip in an airtight container in the refrigerator and use within 2 to 3 days for best quality. 

    Here’s a short video to show you how quickly it truly does come together!

    Recipe Tips 

    The key thing you’ll want to pay attention to in this recipe is not over cooking the marshmallows with the prunes and heavy cream in the microwave before you combine them with the dark cocoa powder.

    Keep these tips in mind! 

    • If you have a high powered microwave, consider heating in 15 second intervals to avoid burning. 
    • You may also opt to cook the three ingredients together until boiling in a pot on the stove, then carefully transfer to your food processor or blender, or use the immersion blender in the pot (carefully of course!)
    Hot Cocoa Charcuterie Board Food Styled with Berries

    Also, you may need to swap the recipe slightly for those with dietary restrictions in your house!

    • For those with a dairy allergy or following a plant-based diet, use a plant-based heavy cream made from soy or coconut. 
    • For those on a low fat diet, opt for a skim half and half over heavy cream (or the plant based option.) 
    • For those who follow a vegan diet, select a vegan marshmallow. 
    • To increase the protein of this dip (and stretch the serving size), mix in vanilla Greek yogurt or a scoop of chocolate protein powder depending on your audience. Yogurt works great for kids, whereas protein powder or collagen is perfect for the adult crowd!
    Two small bowls with hot cocoa dip and strawberries in front of charcuterie dessert tray.

    And, of course, a few nutrition reminders! 

    • To reap the full benefits of California Prunes, aim to use 8 prunes per recipe. Remember, a serving of California Prunes (about 4 pitted prunes) is just 100 calories and contains no added sugar, fat, sodium, or cholesterol!  If you’re still adjusting to swapping with fruits, ease into this with 6.
    • For a less sweet (and less added sugar) result, start with 8 marshmallows.

    Other Simple Swap Recipes Using California Prunes 

    It’s safe to say we LOVE our California Prunes around the Shaw Kitchen! Here are a few of our other favorite recipes using our California favorite fruit!

    • No Bake Chocolate Brownie Bars
    • Sweet Balsamic Dressing
    • Charcuterie Salad 
    • PB&J California Prune Smoothie 

    For more delicious recipes and tips using California Prunes, visit their website here!

    Food styled shot of hot cocoa dip charcuterie boards.

    If you try this recipe, would you please do me a favor and leave a star rating in the recipe box and/or comment below! This helps immensely in Google to continue delivering high quality content to you. And please be sure to tag and share what you made with me on social, I love seeing your creations! You can find me here: Instagram – Facebook – Pinterest!

    Food styled shot of hot cocoa dip charcuterie boards.
    Print Recipe
    5 from 3 votes

    Hot Cocoa Dip Recipe

    A fun food twist on a comfort classic beverage, this Hot Cocoa Dip Recipe is sure to be a crowd favorite in no time! Not only is it easy to prepare, it’s also a healthier sweet treat that’s naturally sweetened with California Prunes (a good-for-you food!)
    Prep Time8 minutes mins
    Cook Time2 minutes mins
    0 minutes mins
    Total Time6 minutes mins
    Course: Sweet Treats
    Cuisine: American
    Diet: Gluten Free, Low Fat, Vegan
    Servings: 6 servings
    Calories: 103kcal
    Author: Liz Shaw

    Equipment

    • 1 Food Processor

    Ingredients

    • 2/3 cup heavy cream *
    • 8 each prunes *
    • 8 each marshmallows *
    • 3 tablespoons cocoa powder

    Optional Serving Ideas

    • 1/2 cup Greek yogurt
    • 1 scoop collagen powder
    • graham crackers
    • pretzels
    • fresh berries
    • marshmallows

    Instructions

    • Add the heavy cream, pitted prunes, and marshmallows to a microwave safe dish. Heat on high in 30 second intervals until marshmallows begin to expand (usually about 1 minute tops).
    • Remove from heat and use an immersion blender to mix ingredients together into a dip consistency. Alternatively, you can also pour the ingredients into a food processor or high speed blender to process as well.
    • Scrape down the sides as needed, add in the cocoa powder, then process one more time for a smooth, creamy consistency.
    • Serve warm with fresh fruits, graham crackers, marshmallows, or simply on a spoon!
    • Store leftover dip in an airtight container in the refrigerator and use within 2 to 3 days for best quality (if it even lasts that long!)

    Notes

    Recipe Notes:
    • For those with a dairy allergy or following a plant-based diet, use a plant-based heavy cream made from soy or coconut. 
    • To increase the protein of this dip (and stretch the serving size), mix in vanilla Greek yogurt or a scoop of chocolate protein powder depending on your audience. Yogurt works great for kids, whereas protein powder or collagen is perfect for the adult crowd!
     
    Nutrition Tips:
    • To reap the full benefits of California Prunes, aim to use 8 prunes per recipe. If you’re still adjusting to swapping with fruits, ease into this with 6.
    • For a less sweet (and less added sugar) result, start with 8 marshmallows.

    Nutrition

    Calories: 103kcal | Carbohydrates: 4g | Protein: 1g | Fat: 10g | Saturated Fat: 6g | Polyunsaturated Fat: 0.4g | Monounsaturated Fat: 3g | Cholesterol: 30mg | Sodium: 9mg | Potassium: 73mg | Fiber: 1g | Sugar: 2g | Vitamin A: 399IU | Vitamin C: 0.2mg | Calcium: 21mg | Iron: 0.4mg

    Want more Shaw Kitchen recipes? Then sign up here for my 5 Day Stress-Free Meal Plan delivered straight to your inbox!

    Prune Smoothie with PBJ Twist

    December 28, 2022

    Rich in that peanut buttery flavor that brings back memories of childhood and sweetened with natural fruits, this California Prune Smoothie with a PBJ Twist  is soon to be your favorite on rotation this year! Filled with good-for-you foods, like California Prunes, this drinkable delight not only promotes bone and gut health, but also is a win-win that the entire family will love! 

    PB Prune Smoothie overflowing in a large glass with prunes on the side.

    Disclosure: I’m thrilled to collaborate with California Prunes on this sponsored recipe. As always, all opinions are my own! Thanks for supporting the work that keeps the Shaw Kitchen running! 

    [feast_advanced_jump_to]

    There’s nothing like the possibilities of a fresh start, right? Endless opportunities that allow you to fill your cup (figuratively and literally speaking) with whatever brings you the most joy. If you’re like me, that includes focusing more on the positive lifestyle changes that will not only benefit the health of you and your crew, but also bring you MORE TIME … something we could all use more of!

    Why You Need This California Prune Smoothie In Your Diet

    Two pb smoothie glasses with honey comb stick in backdrop.

    Positive changes start with fueling your body right. Just like you can’t start a car when the tank is on empty, you can’t function at your prime when your body isn’t receiving the fuel it needs. 

    Here’s why you need to add this prune smoothie into your regular routine.

    Nutrition that fuels your lifestyle. California Prunes are a hidden gem when it comes to nutrition. Not only do they contain important vitamins and minerals, like Vitamin K, potassium and magnesium, that help support overall health and nutrition, but they also pack 3 grams of fiber per serving (a nutrient many Americans are falling short on.) Plus, they’re a low glycemic food that has zero added sugars and are good for your gut and bone health.

    Easily customizable. This smoothie fits with almost every diet! Plus, If you need more protein, you can certainly swap in cow’s milk or add a scoop of your preferred protein powder.

    It takes less than 5 minutes to make. Seriously, what person couldn’t use a little more time added back into their day? Prep this for breakfast with one of my crowd pleasing Banana Bread Muffins, serve it as a quick snack, or alongside an Egg Sandwich for dinner.

    Mess free clean up. Have you tried this blender cleaning trick? Simply add water and a spritz of dish soap in the blender, then run through one quick smoothie cycle. Rinse with running water and let air dry on your dish rack! Viola, it’s ready for use again tomorrow! 

    What You Will Need

    Ingredients labeled on large white backdrop for smoothie.

    Strawberries: Frozen strawberries are available year round at most major markets which make them an easy addition to this smoothie! But, you can also use frozen, pitted sweet cherries, blueberries, or your preferred berry of choice. If you have a ton of fresh berries that need to be used, simply wash, pat dry, then freeze for future use in the smoothie. 

    Banana: Before freezing your banana, slice it into ½-inch pieces so it’s easier to uniformly blend. 

    Cauliflower: For convenience, frozen riced cauliflower works the best in this recipe. Note, if you are of the belief that “CAULIFLOWER DOES NOT BELONG IN A SMOOTHIE,” you can skip this. But, don’t knock it until you try it (seriously, 9 out of 10 Americans still aren’t eating enough fruits and veggies!) 

    California Prunes: Choose pitted, California grown prunes for best quality. To reap the full nutrition benefits of prunes, aim for 4 pitted prunes in your smoothie. 

    Milk: Unsweetened oat or almond milk pairs nicely with this recipe, but feel free to use your preferred milk of choice. Soy and pea will add more plant based protein, while cow’s milk will do that as well (but will not be suitable for dairy allergies or those who follow a vegan diet.) 

    Peanut Butter: Unsweetened natural peanut butter is what we typically use, but feel free to use whatever your preferred peanut butter brand is! And, if you’re trying to lower the caloric value, you can also swap in two tablespoons of powdered peanut butter as well.

    Honey: Clover honey is usually the variety I use in smoothie and oatmeal recipes, but feel free to use your preferred honey on hand. If you’re vegan, swap this for maple or date syrup. 

    How to Make This Banana and Prune Smoothie  

    Yep, it’s a smoothie friends, but it doesn’t require a degree in rocket science to make! 

    But, here’s a quick tip for those adjusting to the prune consistency and taste. Try heating your prunes for 20 to 25 seconds in the microwave, covered with ¼ cup of milk. This will help soften them up and create more of a uniform consistency the first go around when you are blending the ingredients. And, yes, follow the steps below! Blending the California Prunes with the liquid and cauliflower first will help ensure the final consistency (and flavor) is just like the PB&J classic you crave! 

    Staged smoothie cup with granola on top and honeycomb stick on side.

    Keep These Notes In Mind to Make this Your Own 

    This smoothie is easily customizable to work with your own dietary needs! Keep these tips in mind to modify based on what you have on hand/prefer.

    • Milk: To make this vegan, I like using an unsweetened almond or oat for the creamy consistency. You can also use soy or cow’s milk for more protein. If you prefer a thinner consistency, increase milk volume to 1 ½ cups. 

    • Cauliflower: Frozen riced cauliflower is a great way to sneak in some veggies early in the day. If you don’t have riced, you can freeze a fresh floret and shave it with a knife to create your own “riced” version before tossing in the blender. Feel free to increase this to ⅓ cup as well if you, like me, can’t taste it!

    • Strawberries: Swap in your preferred berry or cherry of choice! Just make sure it’s frozen to help with the cold, creamy consistency. 

    • Honey: This smoothie is naturally free of added sugars, but if you are adjusting to the smoothie taste with various fruits and veggies, adding a teaspoon or two of honey, maple or date syrup is totally fine too! 
    Single smoothie cup with granola on top and straw sticking out.

    Prune Smoothie Benefits 

    California Prunes are a crowd pleaser that you certainly want to add to your healthy swap staples because they pair so perfectly with both sweet and savory dishes alike! 

    Here’s a quick 4-1-1 on prunes:

    • They contain important antioxidants (hello beautiful purple hue) that keep your immune system strong and your GI system running smoothly.
    • California Prunes also support bone health (something we should think about sooner than later as we age!) 
    • Yes, they really can help relieve constipation and keep you regular when consumed as part of your diet. 
    • They’re a natural fat free, sodium free, and low glycemic food that’s filled with natural sugar.
    • Plus, a serving of prunes (4 to 5) has less than 100 calories! 

    Other Prune Recipes You Will Love 

    Craving something savory? Checkout my Charcuterie Salad made with a Sweet Balsamic Dressing that gets its body and flavor from California Prunes.

    Want more chocolate in your life? Then you need to add my No Bake Brownie Protein Bar in your life.

    Looking for more ideas? Then checkout the collection of healthy recipes on California Prunes .org! 

    If you try this recipe, would you please do me a favor and leave a star rating in the recipe box and/or comment below! This helps immensely in Google to continue delivering high quality content to you. And please be sure to tag and share what you made with me on social, I love seeing your creations! You can find me here: Instagram – Facebook – Pinterest!

    Two smoothies styled for food photography.
    Two pb smoothie glasses with honey comb stick in backdrop.
    Print Recipe
    5 from 4 votes

    Prune Smoothie

    Rich in that fan favorite peanut buttery flavor, this California Prune Smoothie with a PBJ Twist is soon to be your favorite on rotation this year! Filled with good-for-you foods, like California Prunes, this drinkable delight not only promotes bone and gut health, but also is a win-win that the entire family will love!
    Prep Time5 minutes mins
    Cook Time0 minutes mins
    0 minutes mins
    Course: Breakfast, Smoothie, Snack
    Cuisine: American
    Diet: Diabetic, Gluten Free, Low Lactose, Vegan, Vegetarian
    Servings: 2 smoothies
    Calories: 200kcal
    Author: Liz Shaw

    Equipment

    • 1 blender

    Ingredients

    • 1 1/4 cups milk
    • 1/4 cup riced cauliflower frozen
    • 4 each California Prunes pitted
    • 1 each medium banana frozen and sliced
    • 1/3 cup strawberries frozen
    • 2 tablespoons natural peanut butter
    • 1 teaspoon honey optional
    • 2 tablespoons granola optional

    Instructions

    • To a blender, add milk, riced cauliflower, and California Prunes. Process on high speed for 30 seconds to 1 minute (or until uniformly combined.)
    • Toss in the frozen banana slices, strawberries, peanut butter, and honey (if using.) Process on high speed until smoothie is uniformly combined.
    • Pour into a glass (or glasses) and serve immediately. If desired, top with granola.

    Notes

    This smoothie is easily customizable to work with your own dietary needs! Keep these tips in mind to modify based on what you have on hand/prefer.
    • Milk: To make this vegan, I like using an unsweetened almond or oat for the creamy consistency. You can also use soy or cow’s milk for more protein. If you prefer a thinner consistency, increase milk volume to 1 ½ cups. 
    • Cauliflower: Frozen riced cauliflower is a great way to sneak in some veggies early in the day. If you don’t have riced, you can freeze a fresh floret and shave it with a knife to create your own “riced” version before tossing in the blender. Feel free to increase this to ⅓ cup as well if you, like me, can’t taste it!
    • Strawberries: Swap in your preferred berry or cherry of choice! Just make sure it’s frozen to help with the cold, creamy consistency. 
    • Honey: This smoothie is naturally free of added sugars, but if you’re adjusting to the smoothie taste with various fruits and veggies, adding a teaspoon or two of honey, maple or date syrup is totally fine too! 

    Nutrition

    Calories: 200kcal | Carbohydrates: 25g | Protein: 11g | Fat: 10g | Saturated Fat: 2g | Polyunsaturated Fat: 2g | Monounsaturated Fat: 5g | Cholesterol: 5mg | Sodium: 141mg | Potassium: 500mg | Fiber: 4g | Vitamin A: 331IU | Vitamin C: 24mg | Calcium: 228mg | Iron: 1mg

    Want more Shaw Kitchen recipes? Then sign up here for my 5 Day Stress-Free Meal Plan delivered straight to your inbox!

    Tomato Orzotto with Ground Beef

    August 23, 2022

    Styled shot of orzotto with grey towel holding saute pan and bread sliced on the pasta.

    A fun twist on a family favorite! Orzotto comes to life in 30 minutes using fresh tomatoes, orzo pasta, garden veggies, and nutrient-dense lean Ground Beef. It’s the perfect meal to welcome the kids home from school and fill their bellies with the important nutrients they need for growth and development!

    Ground beef orzo pasta with tomatoes and fresh basil.

    Disclosure: This post is a collaboration with Beef. It’s What’s for Dinner. on behalf of the Beef Checkoff. I received compensation, but all opinions are my own. Thanks for supporting the brands that keep the Shaw Kitchen running!

    Why You Need to Try Orzotto In Your Kitchen 

    If you love a good food trend that’s simple and easy to prepare, then you need to meet Orzotto! A play on a classic risotto, it’s a home cooked version that’s every bit as delicious (and dare I say a bit more nutritious) than its restaurant counterpart. 

    Using available year-round produce, like onions, mushrooms, and tomatoes, with a nutrient-dense protein like lean Ground Beef, you can upgrade this pasta dish and make it something that will satiate and satisfy even the pickiest eater in your crew. 

    The 2020-2025 Dietary Guidelines for Americans highlights how many children and adolescents aren’t getting enough high-quality protein, iron, zinc, choline and vitamins B6 and B12, important nutrients essential for growth, development, and immune health.

    Orzotto is a great way to help focus on increasing those nutrients while also keeping your budget in mind! Ground Beef is a less expensive cut of meat making it a great staple to stock up on, especially when your local market has it on sale. Plus, this recipe comes together in under a half hour, making it realistic for a busy weeknight.

    White bowl with tomato orzo pasta and ground beef inside.

    If you have extras, then relish in the beauty of having lunch prepared for yourself the next day (or leftovers for dinner later in the week!) 

    What You Need to Make Orzotto with Ground Beef

    White backdrop with ingredients laid out and labeled for making orzotto with ground beef.

    Ingredient Notes & Swaps

    Lean Ground Beef: 93% lean/ 7% fat works well in this recipe as it is difficult to drain the fat out. However, if you find that an 80-85% lean/ 20-15% fat variety is on sale, then you can omit the olive oil in the recipe and simply sauté the garlic and onion with the beef. 

    Extra Virgin Olive Oil: Avocado oil will also work in a bind; however, it does not give the same exact flavor profile.

    Garlic Cloves: Fresh garlic works best, but if you have a jar of minced garlic, add about 1 1/2 tablespoons to the sauté pan.

    Mushrooms: White button mushrooms are budget friendly and work well in this recipe, but you can also swap in portobello or another favorite if preferred. 

    Orzo: Orzo is made with wheat flour and packs 7 grams of protein and 2 grams of dietary fiber in one serving. If you require a gluten-free diet, you can purchase specialty brands that are gluten-free and swap it in!

    Tomatoes: Fresh grape or cherry tomatoes work really well in this recipe and are available year-round. However, if you find yourself with canned only, you can swap them in. Use a 14.5 oz can of diced tomatoes (no added salt, preferred) and be sure to lower the total amount of vegetable broth added to 1 ⅔ cups to account for extra liquid. 

    Low-Sodium Vegetable Broth: You can sub in low-sodium beef broth as well, or preferred bone broth to further increase the protein. 

    Cream Cheese: You can use your preferred choice of cream cheese, however if you use a light variety, it will lower the total fat and calories of the final dish. If you have a dairy-allergy in the house like my son, then a vegan variety, like the one from Trader Joe’s, works well too! 

    Lemon: Fresh lemon really brings that vibrant, bold taste; however, you can sub lemon juice if you don’t have fresh. Use approximately 2 tablespoons of refrigerated lemon juice.

    Basil: If you prefer parsley or another fresh herb, go for it! Just be sure you have something fresh to go on top; it will really bring out the flavors of this dish.

    Parmesan Cheese: Use preferred cheese, noting that the vegan Parmesan also works well in this dish for those with dairy-allergies.

    Styled shot of orzotto with grey towel holding saute pan and bread sliced on the pasta.

    How to Make Tomato Orzotto with Beef

    In a heavy, large sauté pan fitted with a lid, heat the olive oil over medium high heat. Add in the onions and garlic, sauté until translucent, about 3 minutes. Add in the Ground Beef, mushrooms, zucchini, and seasonings. Sauté until beef begins to brown, or about 5 minutes.

    Process shots side by side of onion sauting in a pan then with ground beef browned and vegetables added.

    Add the orzo pasta in, toast for a few minutes by moving it around the sauté pan with a spatula, then gradually add in the vegetable broth. Stir in the cream cheese and halved tomatoes, then bring to a simmer, turn down the heat to low, and cover.

    Side by side image of a saute pan with ground beef and pasta added with broth and cream cheese to make orzotto.

    Cook covered for about 10 minutes, or until the liquid is absorbed and the orzo is tender. Ensure the ground beef is cooked to an internal temperature of 160 degrees F prior to removing from heat. 

    Remove from heat, stir, then squeeze fresh lemon juice on top, and garnish with fresh basil and parmesan cheese.

    Wooden spoon sticking out of saute pan with orzo cooked pasta and ground beef with veggies.

    Serve in bowls or your favorite dish and enjoy! 

    White bowl with orzotto and fresh tomatoes with bread sliced on the side.

    Recipe Notes

    Choosing Your Ground Beef:

    • There are 3 types of Ground Beef on the market: 70% lean, 80/85% lean, and 93% lean. Before you select your choice of leanness of the Ground Beef, you need to consider what you are going to prepare with it. I like to use 93% lean in dishes where it will be combined with other fat sources, like the olive oil and cream cheese.
    • Look for a product with a bright, cherry-red color and firm to the touch. Note though Ground Beef in a vacuum-sealed bag typically has a darker purplish-red color; when exposed to the air, it will turn bright red.
    • Make sure the package is cold with no holes or tears and no excessive liquid. Always purchase it on or before the sell-by date.
    Styled shot of orzo pasta on white backdrop.

    Preparing the Recipe:

    • Pay close attention to the stovetop temperature! You do not want to burn the orzo on the pan. Use a spatula to constantly stir the dish while combining the ingredients. If concerned, lift the lid halfway during the cooking phase to lift pasta from the bottom to avoid this. 
    • Know your audience! If someone in your crew really dislikes mushrooms, then finely dice them or omit them and add a veggie they love. There is no set rule on what you can or can’t add to this dish when it comes to the rainbow of produce available. 
    • Save the other half pound of Lean Ground Beef and shredded zucchini for an easy meal another day! Remember to label it, and add a paper towel in the shredded zucchini to help absorb extra water. 
    Side by side image of ground beef labeled in bag and zucchini labeled in bag for food storage.

    Serving Tips 

    This recipe is great on its own, but also pairs great with a side salad, fruit, or roasted vegetables!

    Depending on the age of your kids, you may need to modify how you serve it. For instance, waiting to add the tomatoes until you’ve portioned out a serving for that picky eater who suddenly does not eat them.

    While I thought my picky toddler was going to be apprehensive with the combination food, she was actually in love with this recipe! However, I will say removing the skin from the cucumber and finely chopping the onions and mushrooms played a role in that.

    This recipe is great for early eaters to adults, however consult with your pediatrician if you have questions or concerns with starting solids.

    Close up shot of orzo pasta in white bowl with bread and tomatoes.

    Dietitian Tips for Fueling Kids Back-At-School

    • Cook meals together. Schedule time with your children to plan, purchase, prepare and cook meals together throughout the week. [45]
    • Remember, burgers, like my Burger Board, is a great opportunity to pair beef with delicious fruits and vegetables! Challenge your kids to see how many colors of the rainbow can fit onto their beef burger!
    • If your kids are new to beef, encourage acceptance of new foods by pairing them with favorite foods! Try out this Cheeseburger Tater Tot Casserole, for example!
    • Pack fun lunchables for your older kids, like those with beef jerky as a protein! This is a grown up version of their classic favorite lunchable!

    If you try this recipe, would you please do me a favor and leave a star rating in the recipe box and/or comment below! This helps immensely in Google to continue delivering high quality content to you. And please be sure to tag and share what you made with me on social, I love seeing your creations! You can find me here: Instagram – Facebook – Pinterest!

    Styled shot of orzotto with grey towel holding saute pan and bread sliced on the pasta.
    Print Recipe
    4.91 from 11 votes

    Tomato Orzotto with Ground Beef

    A fun twist on a family favorite! Risotto comes to life in 30 minutes using fresh summer tomatoes, orzo pasta, garden veggies, and nutrient-rich lean Ground Beef.
    Prep Time10 minutes mins
    Cook Time20 minutes mins
    Total Time30 minutes mins
    Course: Dinner
    Cuisine: American
    Diet: Diabetic
    Servings: 6 servings
    Calories: 293kcal
    Author: Liz Shaw

    Equipment

    • 1 saute pan

    Ingredients

    • 1 tablespoon extra-virgin olive oil
    • 1/4 medium onion chopped
    • 2 cloves garlic minced
    • 1 tablespoon Italian seasoning
    • 8 ounces 93% lean/ 7 % fat Ground Beef
    • 3 ounces white button mushrooms (about 1 cup), thinly sliced
    • 1/2 medium zucchini grated
    • 1 1/4 cups whole wheat orzo pasta dry
    • 2 cups low sodium vegetable broth
    • 6 tablespoons cream cheese* (about 3 ounces), dairy-free available
    • 8 ounces grape tomatoes halved
    • 2 tablespoons fresh lemon juice
    • 1/2 cup fresh basil chopped
    • 1/4 cup parmesan cheese* optional, dairy-free available

    Instructions

    • In a sauté medium pan fitted with a lid, heat the olive oil over medium high heat. Add in the onions and garlic; sauté until translucent, about 3 minutes. Add in the Ground Beef, mushrooms, zucchini, and seasonings. Sauté until beef begins to brown, or about 5 minutes.
    • Add the orzo pasta in, toast for a few minutes by moving it around the sauté pan with a spatula, then gradually add in the vegetable broth. Stir in the cream cheese and halved tomatoes, then bring to a simmer, turn down the heat to low, and cover.
    • Cook for about 10 minutes, or until the liquid is absorbed and the orzo is tender. Remove from heat, stir, then squeeze fresh lemon juice on top, and garnish with fresh basil and parmesan cheese. Serve immediately.

    Notes

    Storage Tips:
    • Store leftovers in an airtight container once cooled and refrigerate for up to 5 days. You can also freeze for up to 3 months.
    • Reheat leftovers in 20 second intervals in the microwave to ensure you do not overheat!
    Choosing Your Ground Beef:
    • There are 3 types of Ground Beef on the market: 70% lean, 80/85% lean, and 93% lean. Before you select your choice of leanness of the Ground Beef, you need to consider what you are going to prepare with it. I like to use 93% lean in dishes where it will be combined with other fat sources, like the olive oil and cream cheese.
    Preparing the Recipe:
    • Pay close attention to the stovetop temperature! You do not want to burn the orzo on the pan. Use a spatula to constantly stir the dish while combining the ingredients. If concerned, lift the lid halfway during the cooking phase to lift pasta from the bottom to avoid this.
    • Know your audience! If someone in your crew really dislikes mushrooms, then finely dice them or omit them and add a veggie they love. There is no set rule on what you can or can’t add to this dish when it comes to the rainbow of produce available.

    Nutrition

    Calories: 293kcal | Carbohydrates: 29g | Protein: 15g | Fat: 13g | Saturated Fat: 6g | Polyunsaturated Fat: 1g | Monounsaturated Fat: 5g | Trans Fat: 0.2g | Cholesterol: 42mg | Sodium: 457mg | Potassium: 418mg | Fiber: 2g | Sugar: 4g | Vitamin A: 862IU | Vitamin C: 9mg | Calcium: 101mg | Iron: 2mg

    No Bake Brownie Protein Bar

    April 25, 2022

    Peanut Butter Brownie Protein Bar Recipe Single shot image on grey backdrop

    Fudgy and decadent, you’d never believe this healthy Brownie Protein Bar recipe will wow even the toughest critic! Sweetened with California Prunes and layered with creamy peanut butter, it’s a delight that you can feel good about enjoying! 

    Brownie Protein Bar Recipe with PB spoon

    Disclosure: This post is in collaboration with California Prunes! Thank you so much for supporting the brands that keep the Shaw Kitchen thriving!

    Why You Need This Brownie Protein Bar Recipe In Your Life

    • If you want to eat “healthier” but also have a sweet tooth, then this Brownie Protein Bar is just what the doctor ordered! Naturally sweetened with California Prunes, this bar hits all the right notes while providing your body a little extra bang for your nutritional buck!
    • It’s quick and easy to make! No need to turn on your oven, simply take out your favorite blender or food processor and in under 30 minutes you can enjoy this snack all week long!
    • It’s family friendly, meaning even those picky toddlers will love this too!
    • And last, but not least, it’s budget friendly! Meaning you don’t have to spend your hard earned cash on those pricey protein bars!

    What You Need to Make These Fudge-Like Healthy Protein Snacks

    Ingredients to make brownie bars
    • California Prunes: Select a pitted, California grown prune for best quality.
    • Protein Powder: To keep this gluten free and dairy free, I’ve used a plant-based protein powder blend. You can trial your favorite protein powder in here to see what you prefer. Also, a chocolate protein powder will make this even deeper in flavor, but may add additional sugar. Read the label first to decide what’s best for you.
    • Sugar: This is an optional addition, but for those used to really sweet protein bars (like most on the market), may want to add this as they trial these bars.
    • Peanut Flour: This is only if you need to make the dough a bit firmer, however you can also add in the protein powder too. The peanut flour will just allow for a richer peanut flavor to shine through (while adding in some additional protein too.)

    Step-By-Step Instructions

    Believe me when I say this is the easiest, full proof recipe to make! Here’s how to do it!

    1. Start by adding the California Prunes, peanut butter, and water to a high powered blender or food processor.

    California Prunes close up

    2. Process until smooth, scraping down the sides as needed while processing. Be sure to toss in the salt and additional sugar (if using) during this step as well.

    Creamed prunes and PB in a blender.

    3. Transfer the prune and peanut butter mixture to a medium mixing bowl, then combine with the protein powder and cocoa powder.

    Protein powder, cocoa powder, and pb and prunes mixed together.

    4. Mix until combined, noting that the dough should be hard to mix. If it’s too hard, then add a tablespoon more of water. If it’s to sticky, add in a tablespoon of the peanut flour or additional protein powder. You want it to be firm so it can be shaped into the bar.

    Brownie protein bar dough.

    5. Press into an 8×8-inch pan lined with parchment paper, using an additional piece of parchment paper on top to help even out the dough.

    Brownie protein bar in pan

    6. If adding chocolate and peanut butter topping, melt chocolate in microwave, then slather on top of the bars and sprinkle with crushed peanuts.

    Close up of chocolate and crushed peanuts.

    7. Set in the fridge and let harden for 30 minutes, or freezer for 15. When ready to enjoy, slice into 12 (or desired serving size) and enjoy!

    Protein bars with brownie flavor styled.

    Store in an air tight container in the refrigerator and use within 2 weeks, or in the freezer and use within 3 months. 

    Recipe Tips + Notes

    If you’re having a hard time knowing if the consistency of the bars is right, consider these quick troubleshooting tips!

    • The dough should be firm, yet moldable still. If there is still visible protein powder or cocoa powder when trying to mix the ingredients together, you need a little more water.
    • If the dough is too sticky, it will not harden and will fall apart when you cut it! You don’t want this (even though it’s still delicious and you can use the crumbles on top of yogurt!) If this is the case, add in a little peanut flour or additional protein powder to allow the bar to take shape.
    • You do not have to add the additional topping of chocolate and peanuts, however it does taste great and adds a little added flare.

    Other Swaps You May Consider

    • If you want to make this nut free, you can swap in your favorite seed butter and an oat flour. Oat flour is a bit denser, so note you may need a bit more liquid and the consistency will be a bit less chewy and fudge like.
    • Almond butter and almond flour also work well in this recipe.
    Cut brownie protein bars

    Nutrition Bonus: Why To Cook With Prunes

    California Prunes are a wonderful way to add natural sweetness to your recipes, both sweet and savory dishes, while adding a powerful boost of nutrition too! You may remember that Sweet Creamy Balsamic Dressing I paired with the Charcuterie Salad here that featured delicious California Prunes as beautiful blend of the sweet and savory aspects of incorporating prunes into your recipes.

    If you’re concerned about the sugar content of prunes, don’t be! Honestly, prunes contain a wonderful blend of both dietary fiber, antioxidants, and carbohydrates that help to stabilize blood sugars while providing your body quite a bit of nutritional bang for it’s buck!

    Checkout the plethora of nutrients found in just 4 pitted California Prunes!

    CA Prune Nutrition

    Plus, let’s not forget, they add a deep color (hello antioxidants) that make every bite delicious and nutritious!

    Grey backdrop with California Prunes and PB brownie protein bars cut.

    Other Protein Bars You May Enjoy

    If you like this protein bar style of recipe, then you will love these other Shaw Kitchen favorites!

    • Raw Peanut Butter Protein Bars
    • No Bake Almond Butter Protein Bars
    • Pistachio No Bake Snack Bars
    • Vegan Crunchy Granola Bar
    Peanut Butter Brownie Protein Bar Recipe Single shot image on grey backdrop

    Want more recipe inspiration? Be sure to checkout California Prunes and their arsenal!

    If you try this recipe, would you please do me a favor and leave a star rating in the recipe box and/or comment below! This helps immensely in Google to continue delivering high quality content to you. And please be sure to tag and share what you made with me on social, I love seeing your creations! You can find me here: Instagram – Facebook – Pinterest!

    Peanut Butter Brownie Protein Bar Recipe Single shot image on grey backdrop
    Print Recipe
    4.72 from 7 votes

    No Bake Brownie Protein Bar

    Fudgy and light, this healthy Brownie Protein Bar recipe will wow even the toughest critic! Sweetened with California Prunes and layered with creamy peanut butter, it's a delight that you can feel good about enjoying!
    Prep Time10 minutes mins
    30 minutes mins
    Total Time40 minutes mins
    Course: Snacks
    Cuisine: American
    Diet: Diabetic, Gluten Free, Vegan
    Servings: 12 servings
    Calories: 142kcal
    Author: Liz Shaw

    Equipment

    • Food Processor/High Powered Blender

    Ingredients

    • 12 each California Prunes pitted
    • 4 tablespoons water hot
    • 1/2 cup peanut butter natural
    • 1 teaspoon vanilla extract
    • 2 tablespoons turbinado sugar optional for extra sweetness
    • 1/4 teaspoon salt
    • 3/4 cup protein powder unsweetened plant protein/or whey
    • 1/3 cup cocoa powder
    • 1/4 cup chocolate chips dairy free
    • 1/4 cup salted peanuts chopped

    Instructions

    • Add the California Prunes to a high powered blender or food processor with the hot water and peanut butter, puree until smooth (scrapping down sides of the blender/processor as necessary.)
    • Add in the vanilla, sugar (if adding), and salt, puree until smooth.
    • Use a spatula to transfer the prune and peanut butter mixture to a medium mixing bowl. Add in the protein powder and cocoa powder, mixing together until uniformly combined.
      Note: If the dough is to thick, add in 1 tablespoon of water until all powder and cocoa is combined. If the dough is to sticky, add in 1 tablespoon of peanut flour (or additional protein powder) until dough is formed to a consistency it can be held and shaped.
    • Line an 8×8-inch pan with parchment paper. Firmly press the dough into the pan using an additional piece of parchment paper on top. This will help keep your hands clean as well as to even the dough in the pan.
    • Place chocolate chips in a microwave safe bowl, then microwave for 30 to 45 seconds until chocolate begins to melt. Use a spatula to mix it, then spread a thin layer evenly over the top of the protein bars in the pan.
      Top with the crushed peanuts, pressing them down with the spatula so they nestle into the melted chocolate.
    • Place in the refrigerator for at least 30 minutes, or in the freezer for 15 minutes. Remove when ready to enjoy and slice into 12 squares (or desired servings.)

    Notes

    Storage Tips:
    • Store in an air tight container in the refrigerator and use within 2 weeks. 
    • Store in an air tight container in the freezer and use within 3 months. 

    Nutrition

    Calories: 142kcal | Carbohydrates: 10g | Protein: 9g | Fat: 9g | Saturated Fat: 2g | Polyunsaturated Fat: 2g | Monounsaturated Fat: 4g | Trans Fat: 1g | Cholesterol: 1mg | Sodium: 134mg | Potassium: 128mg | Fiber: 2g | Sugar: 6g | Vitamin A: 16IU | Vitamin C: 1mg | Calcium: 21mg | Iron: 2mg

    Want more Shaw Kitchen recipes? Then sign up here for my 5 Day Stress-Free Meal Plan delivered straight to your inbox!

    Charcuterie Salad with Sweet Balsamic Dressing

    April 19, 2022

    Charcuterie Salad Photography

    This Charcuterie Salad pairs perfectly with a simple, homemade Sweet Balsamic Dressing to wow your guests this summer season. California grown fruits, vegetables, and nuts combine together with a creamy and sweet balsamic dressing that’s completely free of added sugar thanks to California Prunes!

    Charcuterie Salad on a plate with a honey comb stick and container of dressing.

    Disclosure: This post is in partnership with California Prunes. Thank you for supporting the brands that keep the Shaw Kitchen up and running!

    Why You Need To Add This Charcuterie Salad Trend To Your Life 

    • Charcuterie style recipes are the perfect way to please every diet type in your crowd! From gluten-free to vegan, you can prepare a spread that satisfies all lifestyles. 
    • Trying to eat healthier? Then this salad is for you. Filled with produce and healthy fats, it’s a great way to get more fruits and vegetables in your diet while increasing your fiber intakes.
    • It’s free of added sugars, thanks to California Prunes! Packed with fiber, vitamin K, and a blend of vitamins and minerals, this fruit adds body, texture, and flavor to the dressing and salad while showing you how to think outside of the box when it comes to utilizing prunes in your kitchen.

    Health Benefits of Cooking with Prunes

    Here’s the deal, prunes aren’t just for your grandparents anymore! Nope, not one bit. California Prunes are a wonderful way to add natural sweetness to your recipes, both sweet and savory dishes, while adding a powerful boost of nutrition too! 

    Here’s a few quick tips you’ll want to keep in your back pocket for that icebreaker at your next party! 

    • California Prunes have been found to offer benefits for bone health, gut health, weight management, and blood sugar control! 
    • New research has also shown that prunes prevent bone loss and protect against fracture risk in postmenopaursal women. But, don’t worry! Prior research has shown benefits in males too! 
    • Plus, they are a good source of fiber, coming in at 11% of your daily needs in just 4 prunes!
    Charcuterie Salad Photography

    Ingredients For The Sweet Balsamic Dressing Recipe 

    Ingredients on grey background for prune sweetened dressing.

    Dressing Ingredient Tips

    Mustard: Stone ground mustard works well in this recipe, but if you’re out you can also swap in Dijon. These varieties add a flavorful punch that work well with the other dressing ingredients. 

    California Prunes: Be sure to select California grown pitted prunes. 

    Olive Oil: Choose an unrefined extra-virgin olive oil to reap the antioxidant and anti-inflammatory benefits!

    Balsamic Vinegar: Commonly found in most kitchens, this works great to provide a robust flavor. However, champagne vinegar if you do have it pairs great with California Prunes sweetness too. 

    Ingredients For The Summer Charcuterie Salad 

    Charcuterie Salad Ingredients

    Charcuterie Salad Ingredient Tips

    The pairings for this salad are based around the flavor profile of California Prunes! Prunes offer a rich, sweet taste that pair wonderfully with the fruits, vegetables, nuts, cheese, and meats shown above. (Fore more flavor pairings, click here!) 

    If you want more variety, consider these other pairings as well! 

    • Cheese: Blue, Ricotta 
    • Fruit: Currants, Dates, Figs, Raisins
    • Meats: Game Birds, Pork, Turkey
    • Nuts: Almonds, Hazelnuts, Macadamia Nuts, Pecans
    • Other: Chocolate, Coffee

    Step-By-Step Instructions 

    How to Make the Creamy, Sweet Balsamic Dressing

    Prune sweetened dressing
    1. Start by tossing all the ingredients for the dressing in a high powered blender or food processor.
    2. Process until smooth and creamy, scraping down the sides with a spatula as needed. 
    3. Pour into a sealed container, like a mason jar, and set aside while assembling salad.
    Plated and styled balsamic dressing

    How to Build the Charcuterie Salad 

    Styled charcuterie salad
    1. Start by gathering all your ingredients on a large plate or tray. Then, build your Charcuterie Salad on a large platter or dish. 
    2. Place the salad greens in the center of the platter, then build Charcuterie around them! 
    3. Add the California Prunes, then build the layers of flavor and color around them, pairing with the sliced pears, apples, and specialty meats. Fill in empty gaps with the nuts and sliced bread or crackers.
    4. Pour the dressing into a shallow, small bowl, then carefully set it on the edge of the platter, or serve on the side with a spoon. Place crumbled cheese in the center, then top with a drizzle of honey.
    5. Be sure to set serving tongs on the side so people can enjoy this beauty!
    Plated and styled for food photography charcuterie salad.

    Recipe Notes

    • How to Re-Serve Extra Dressing: 
      • Since this is a thicker dressing, it may become semi-firm in the refrigerator if you have leftovers between uses. Don’t worry! Just add 1 tablespoon of water, a teaspoon of extra-virgin olive oil, and a teaspoon of balsamic vinegar and whisk it back into its smooth dressing consistency. 
    • How to Store Leftover Charcuterie Salad:
      • Lightly rub a little lemon juice over the sliced fruit, then cover the entire salad with a paper towel. Wrap tightly with preferred saran style wrap and refrigerate. Keep dressing separate and toss before serving. 
      • Be sure to eat leftover salad within a day or two max for optimum freshness.
    Charcuterie Salad with Sweet Balsamic Dressing

    Other Board Style Recipes You Will Love 

    If you like the grazing board style of meals, you will also love these!

    • Beef Burger Board 
    • Greek Style Shawarma Board

    And, for more delicious ways to cook with prunes, visit CaliforniaPrunes.org!

    Charcuterie Salad on a plate with a honey comb stick and container of dressing.
    Print Recipe
    5 from 7 votes

    Charcuterie Salad with Sweet Balsamic Dressing

    Wow your friends this summer with a delicious and nutritious simple Salad Charcuterie with Sweet Balsamic Dressing! California grown fruits, vegetables, and nuts combine together with a creamy and sweet balsamic dressing that’s completely free of added sugar thanks to California Prunes!
    Prep Time20 minutes mins
    Cook Time0 minutes mins
    0 minutes mins
    Total Time20 minutes mins
    Course: Appetizer
    Cuisine: American
    Diet: Diabetic, Gluten Free, Vegan
    Servings: 8 servings
    Calories: 434kcal
    Author: Liz Shaw

    Ingredients

    Sweet Balsamic Dressing

    • 2/3 cup extra-virgin olive oil
    • 1/3 cup balsamic vinegar
    • 4 each prunes pitted
    • 3 tablespoons filtered water
    • 1 clove garlic
    • 1 tablespoon stone ground mustard
    • 1/4 teaspoon black pepper
    • 1/4 teaspoon salt

    Charcuterie Salad

    • 6 cups baby greens rinsed
    • 3 ounces plain goat cheese crumbled
    • 2 ounces reduced sodium salami
    • 2 ounces prosciutto
    • 10 each prunes pitted
    • 1/2 cup dried apricots
    • 1/2 cup roasted walnuts maple optional
    • 1/2 cup roasted pistachios shells removed
    • 1/2 medium apple thinly sliced
    • 1/2 medium pear thinly sliced
    • 1/3 cup red onion thinly sliced (about 1 ounce)
    • 3 ounces thinly sliced baguette or crackers
    • 1/2 cup Sweet Balsamic Dressing see above recipe

    Instructions

    To Make The Sweet Balsamic Dressing

    • Add all ingredients to a high-powered blender or food processor. Blend or process until smooth.

    To Assemble the Charcuterie Salad

    • To a large serving platter, add the baby greens in the center. Begin to build the charcuterie around them.
    • Add the California Prunes, then layer the flavors and colors of the other fruits around the perimeter.
    • Fill the open gaps in with the nuts, bread or crackers.
    • Place the dressing in a container on the side with a spoon for guests to self serve.
    • Pair salad with serving tongs and desired wine or beverage.
    • Enjoy immediately!

    Notes

    For the Sweet Balsamic Dressing 
    • Store in a mason jar or sealed bottle in the refrigerator and use within 3 to 5 days for best quality. 
    • To bring the dressing back to its smooth consistency, add 1 tablespoon of water, a teaspoon of extra-virgin olive oil, a teaspoon of balsamic vinegar, and a half teaspoon of mustard, then whisk vigorously. Serve immediately.
    • Serving size is based on approximately 1.5 tablespoons. Recipe for dressing yields about 2/3 cup.
    For the Charcuterie Salad 
    • Lightly rub a little lemon juice over the sliced fruit, then cover the entire salad with a paper towel. Wrap tightly with preferred saran style wrap and refrigerate. Keep dressing separate and toss before serving. 
    • Be sure to eat leftover salad within a day or two max for optimum freshness. 
    *Nutrition analysis based on 8 servings. 
     

    Nutrition

    Calories: 434kcal | Carbohydrates: 24g | Protein: 10g | Fat: 35g | Saturated Fat: 7g | Polyunsaturated Fat: 7g | Monounsaturated Fat: 19g | Trans Fat: 1g | Cholesterol: 15mg | Sodium: 405mg | Potassium: 365mg | Fiber: 4g | Sugar: 11g | Vitamin A: 804IU | Vitamin C: 9mg | Calcium: 49mg | Iron: 2mg

    If you try this recipe, would you please do me a favor and leave a star rating in the recipe box and/or comment below! This helps immensely in Google to continue delivering high quality content to you. And please be sure to tag and share what you made with me on social, I love seeing your creations! You can find me here: Instagram – Facebook – Pinterest!

    Carrot Cake Smoothie Bowl

    April 10, 2022

    Looking to enjoy a healthy and delicious sweet treat? Then this Carrot Cake Smoothie Bowl is for you! Filled with wholesome ingredients, it contains no added sugar so you can serve this up to everyone in your crew! Toss in a blender and in under 5 minutes you can have this Carrot Cake Smoothie Bowl in your life.

    Carrot Cake Smoothie Bowl - @shawsimpleswaps #carrotcake #smoothiebowl #vegetarian #plantbased #noaddedsugar

    If you’re looking for a reason to embrace spring (whether the weather is screaming the change of seasons yet or not where you live), then this Carrot Cake Smoothie Bowl is just what you need!

    Easy to make in under 5 minutes, it’s packed with 4 servings of produce to fuel your body with healthy vitamins and minerals all day long!

    What You Need to Make This Carrot Cake Smoothie In A Bowl

    Here’s what you need to make this bowl come to life!

    • Frozen Bananas
    • Frozen Carrots
    • Frozen Clementine
    • Pitted Dates
    • Milk (oat and almond, unsweetened, work best)
    • Vanilla Extract
    • Ground Cinnamon
    • Unsweetened Shredded Coconut
    • Shredded Carrots
    • Chopped Walnuts
    • Raisins

    Recipes Tips – Carrot Cake Smoothie Bowl

    When picking out the ingredients, keep these tips in mind.

    • Frozen Carrots:
      • Choose an option that is either sliced, crinkled, or shredded.
    • Clementine:
      • If you can’t find these, you can use a small orange. Make sure it’s frozen to help with consistency. Before freezing, peel the fruit for ease!
    • Milk:
      • Whether you choose a plant-based option or dairy milk, be sure to look for an unsweetened to keep the added sugars to zero.
    • Shredded Coconut:
      • Look for an unsweetened option. My favorite is online from NOWFoods.com.

    When making the smoothie bowl, keep these tips in mind.

    • Fruit needs to be frozen.
      • In order to get the consistency to a smoothie bowl you can eat with a spoon versus drink from a straw, the fruit needs to be very frozen. If you take it out then get side tracked, you may need to add another frozen banana in to achieve the right consistency.
    • Toppings need to be proper sizing and texture!
      • For the shredded carrots, be sure to cook them in a little coconut oil before adding on top. This creates a better texture and flavor combo!
      • Chop the walnuts, finely.
      • Raisins and shredded coconut are good to go as is for adults and older kids. For younger eaters, omit the raisins and walnuts if not finely chopped.
    • Add in protein.
      • Boost the protein by adding in a collagen powder or plant protein powder of choice.

    Other Spring Recipes You May Enjoy

    If you liked this Carrot Cake Smoothie Bowl, you may enjoy these other vibrant, spring recipes too!

    • Carrot Cake Cookies
    • Crisp Lentil Salad
    • Vegan Coleslaw Recipe

    If you try this recipe, would you please do me a favor and leave a star rating in the recipe box and/or comment below! This helps immensely in Google to continue delivering high quality content to you. And please be sure to tag and share what you made with me on social, I love seeing your creations! You can find me here: Instagram – Facebook – Pinterest!

    Carrot Cake Smoothie Bowl - @shawsimpleswaps #carrotcake #smoothiebowl #vegetarian #plantbased #noaddedsugar
    Print Recipe
    5 from 8 votes

    Carrot Cake Smoothie Bowl

    A deliciously refreshing smoothie bowl made with seasonal flavors. No added sugars or artificial ingredients in this bowl, and 100% plant based!
    Prep Time5 minutes mins
    Cook Time0 minutes mins
    0 minutes mins
    Total Time5 minutes mins
    Course: Breakfast, Snack
    Cuisine: American
    Diet: Diabetic, Gluten Free, Vegan, Vegetarian
    Servings: 2 servings
    Calories: 351kcal
    Author: Liz Shaw

    Equipment

    • 1 blender

    Ingredients

    • 2 medium bananas frozen
    • 1/2 cup sliced carrots frozen
    • 1 each clementine frozen
    • 1 each pitted date
    • 1 cup milk almond, oat, or preferred choice
    • 1/2 teaspoon ground cinnamon
    • 1 teaspoon vanilla extract
    • 3 tablespoons unsweetened coconut divided
    • 1/4 cup grated carrots cooked in coconut oil
    • 1/4 cup raisins
    • 2 tablespoons finely chopped walnuts

    Instructions

    • Add frozen bananas, frozen carrots, frozen clementine, pitted date, milk, cinnamon, and vanilla into a blender. Reserve 1 tablespoon of the coconut for topping, then toss the other amount into the blender. Blend on smoothie setting (or medium speed) for 30 seconds to one minute (or until desired smoothie bowl consistency is achieved.)
    • Pour into a chilled bowl and top with shredded cooked carrots, chopped walnuts, raisins, and remaining shredded coconut. Enjoy!

    Nutrition

    Calories: 351kcal | Carbohydrates: 56g | Protein: 8g | Fat: 13g | Saturated Fat: 6g | Polyunsaturated Fat: 5g | Monounsaturated Fat: 1g | Cholesterol: 6mg | Sodium: 91mg | Potassium: 981mg | Fiber: 8g | Sugar: 24g | Vitamin A: 7396IU | Vitamin C: 14mg | Calcium: 193mg | Iron: 2mg

    Want more Shaw Kitchen recipes? Then sign up here for my 5 Day Stress-Free Meal Plan delivered straight to your inbox!

    Homemade Beef Shawarma Board

    February 9, 2022

    Beef Shawarma Board with fresh veggies.

    Looking for the perfect, family-friendly Mediterranean-inspired recipe to feed your little ones? Then look no further than this delicious, Homemade Beef Shawarma Board! Filled with authentic shawarma spices, nutrient-dense lean beef, and a bounty of produce, this beautiful board will become a weeknight staple in just 30 minutes.

    Beef Shawarma Board with fresh veggies.

    Disclosure: This post is a collaboration with Beef. It’s What’s for Dinner. on behalf of the Beef Checkoff. I received compensation, but all opinions are my own. Thanks for supporting the brands that keep the Shaw Kitchen running!

    Why You Need to Make Beef Shawarma from Scratch

    Whether you’ve committed to trying to embrace more of the Mediterranean way of eating this year or are looking for a delicious, family-friendly recipe you can serve to babies, teenagers, and adults alike, then you’re in the right place.

    Did you know that lean beef is a nutrient-dense addition to a balanced diet?  Research has shown that including lean, unprocessed red meat as part of a Mediterranean-style eating pattern may help with improving factors that affect heart health. Plus, it’s also a nutritional powerhouse and contains 10 essential nutrients needed for growth and development throughout the lifespan, but especially in crucial years like birth to 24 months. 

    Now, the best part – this Homemade Beef Shawarma Board takes under 30 minutes to cook, which means it’s easier than hurdling your entire crew together to grab take out! Trust me when I say I KNOW the struggle is real trying to get a toddler and a baby into their car seats when hanger hits.

    With a little forethought (i.e., a simple marinade that you can toss in the fridge, overnight), a beautiful Beef Flank Steak can be transformed into this!

    Homemade_Beef_Shawarma_Board-10

    What You Need to Make This Beef Shawarma Recipe

    Beef Shawarma Ingredients

    Beef Shawarma Ingredients

    Board Ingredients

    A produce packed sheet for shawarma.

    Ingredient Notes

    Beef Flank Steak: this is a naturally lean cut of beef that works wonderfully in this recipe. Plus, it’s readily available at most markets. Aim for one that is about a pound in weight. See notes below if you need to increase the yield of the recipe.

    Shawarma seasoning: this Middle Eastern inspired spice blend contains spices like cumin, cinnamon, black pepper and more and is so versatile and flavorful. You can find this at most chain supermarkets in the spice section. It’s also available online.

    Extra virgin olive oil: this robust flavor really helps lock in that Mediterranean shawarma taste!

    Produce: butter leaf lettuce, mini bell peppers, cucumbers, red onion, and tomatoes work well with the Mediterranean flavors in this dish, however, feel free to use what your family likes best.

    Hummus: garlic and sun-dried tomato add some flare, but plain ole’ traditional works fine too.

    Tzatziki: you can make your own very simply with plain yogurt, lemon juice, salt, dill, and cucumber, but for convenience and our current dairy allergy we like the Trader Joe’s vegan Tzatziki sauce.

    Ingredient Swaps

    Beef Flank Steak: a boneless, Strip Steak would be the closest swap if you can’t find the Beef Flank Steak, however I do suggest then you use a grilling method to cook (see below for variations). With a grilling method, you’ll want to avoid any extensive charring, or burning of the steak. It’s also important to ensure the meat is tender enough for early eaters. If you’re worried that the meat may be a bit dry for your child, you can always add some hummus or tzatziki to add moisture!

    Shawarma seasoning: if you prefer to make your own, I recommend following this do-it-yourself shawarma spice from All Recipes. It has a very similar flavor profile, albeit does cost more than ordering that individual shawarma spice mix offline or picking up at your local market. Plus, remember spices needed to be used within about 2 years for best quality, so be sure to remember to use cardamom and allspice more regularly in your kitchen.

    Note that while it is safe to add spices and herbs to your infant and/or toddler’s diet, it’s important to be mindful while seasoning. Start by adding small amounts of spices to ensure the flavor is not overwhelming or too spicy for your child.

    Extra virgin olive oil: avocado oil will also work in a bind; however it does not give the same exact flavor profile.

    Garlic cloves: fresh garlic works best, but if you have a jar of minced garlic, add about 1 1/2 tablespoons to the marinade.

    Lemon: fresh lemon really brings that vibrant, bold taste; however, you can sub lemon juice if you don’t have fresh. Use approximately 2 tablespoons of lemon juice.

    How to Make This Shawarma Recipe with Beef

    Note, the only part of this recipe that requires time is the 8-to-24-hour marinade, so if you can remember that, you’re good to go!

    Step 1: Place the Beef Flank Steak with the shawarma spice, crushed garlic, olive oil, and lemon juice in a resealable bag. Set on a plate or inside a bowl and place in the refrigerator. (The plate/bowl is a food safety barrier just in case the bag breaks!)

    Step 2 + 3: After the beef has marinated for 8- to 24- hours, preheat your oven to 425 degrees F. Remove steak from bag and sear each side for 90 seconds over high-heat on the stovetop in a cast iron skillet.

    Process shots to make beef shawarma.

    Steps 4 + 5: Once oven has come to temperature, place mini bell peppers on a rimmed baking sheet lined with parchment paper. Brush with a little olive oil, place on the top rack and cook for 10 minutes. Add the Beef Flank Steak to the pan, turn the peppers, and resume cooking on the top rack for 8 minutes.

    Process shots to make beef shawarma.

    Steps 6 + 7: When cooking completes, test the internal temperature of the Beef Flank Steak by inserting an instant-read thermometer horizontally from the side so that it penetrates the thickest part or the center of the steak. Temperature should read 155 to 160 degrees F for a medium-well steak.

    Note that the steak temperature will continue to rise after removing from the oven, and should reach at least 160 degrees F prior to eating. Let the steak rest for 10 minutes before slicing.

    Homemade_Beef_Shawarma_Board-10

    Assemble board with produce, sauces, pita, and sliced beef shawarma. Enjoy warm!

    Homemade_Beef_Shawarma_Board-10

    Recipe Notes + Tips 

    • Marinating your Beef.
      • Marinating beef is a great way of adding flavor and moisture to meat prior to cooking. This is especially helpful when using lean cuts or dry cooking methods, like grilling, to help keep meat tender and moist. This makes it easy and enjoyable to eat for infants and toddlers!
      • Once you buy your beef, be sure to marinate it within 3 days. I recommend cooking the marinated beef within 8- to -24 hours.
      • Add the Beef Flank Steak to the resealable bag, then the shawarma spice mix. Seal the bag then use your hands to evenly massage the steak (through the bag) to get the seasoning all over the steak. Then, add the garlic, olive oil, and lemon juice and shake! This creates an even seasoning throughout the marinating process.

    • Alternate way to cook your Beef Shawarma: the grill.
      • Flank Steak also cooks very well on the grill. Instead of the oven, use your grill over high heat (about 425 degrees F.) Add your bell peppers (and any other produce) on one side, and the Beef Flank Steak on the other. Grill each side of the steak for 3 minutes on high-heat to seal in the juices, then close the BBQ and grill remaining 5 minutes per side at 400 degrees F.
      • As above, the internal temperature should read 160 degrees F for a medium-well steak. Note, the temperature will continue to rise while steak is resting, so it’s okay to remove it when it’s 150-155 degrees F as well.  Let the steak rest for 10 minutes, and be sure to re-check the temperature to ensure the steak has reached an internal temperature of 160 degrees F before slicing.

    • Store your leftovers properly.
      • Cooked and cooled beef shawarma will keep in the refrigerator in a sealed container for 3-4 days. Or, feel freeze in an airtight container and use within 3 months.

    Family-Friendly Serving Tips

    Every bite your baby takes counts, especially in the first 1,000 days of life. Starting your baby with beef as one of their first complementary foods can ensure they get nutrients they need for healthy growth and development.

    To save your sanity while providing your baby with the nutrients they need to grow and develop, consider adding a slice of the tender Beef Flank Steak with the cooked and softened bell peppers, and sauces for your little one to explore with their taste buds.

    Demonstration of how to serve Beef shawarma to baby.

    Here are a few other tips to remember about serving beef in the early years!

    AROUND 6 MONTHS

    When your baby is 6-8 months, they may be ready to make the transition from watery purees to smooth, pureed, single-ingredients foods such as pureed beef with its juices, pureed hummus or Greek yogurt.

    6 – 8 MONTHS

    In this stage your baby may be ready to transition to mashed, lumpy texture foods and combinations of single-ingredient foods. Serve strips of tender beef shawarma and soft bell peppers the length of your index finger and width of your thumb.

    8 – 10 MONTHS

    During 8-10 months of age your baby can transition to chopped table foods such as shredded or chopped beef shawarma that they can pick up with their fingers and chew.Make sure beef is tender and moist to help prevent choking.

    And, always remember if you have questions about starting solid foods, consult a physician or health care provider.

    Other Toddler-Friendly Recipes with Beef You Will Love

    • Beef Meatballs
    • Air Fryer Beef Meatloaf
    • Beef Brisket Nachos

    If you try this recipe, would you please do me a favor and leave a star rating in the recipe box and/or comment below! This helps immensely in Google to continue delivering high quality content to you. And please be sure to tag and share what you made with me on social, I love seeing your creations! You can find me here: Instagram – Facebook – Pinterest!

    Beef Shawarma Board with fresh veggies.
    Print Recipe
    5 from 7 votes

    Homemade Beef Shawarma Board Recipe

    Filled with authentic shawarma spices, nutrient-dense lean beef, and a bounty of produce this beautiful Homemade BeefShawarma Board will become a weeknight staple in just 30 minutes.
    Prep Time10 minutes mins
    Cook Time20 minutes mins
    Marinate Time8 hours hrs
    Total Time30 minutes mins
    Course: Dinner
    Cuisine: American
    Diet: Diabetic, Gluten Free, Low Lactose
    Servings: 4 servings
    Calories: 574kcal
    Author: Liz Shaw

    Ingredients

    Shawarma Ingredients

    • 1 – 1 1/4 pound Beef Flank Steak
    • 1 tablespoon shawarma spice
    • 3 cloves garlic smashed
    • 1/4 cup extra virgin olive oil
    • 1/2 each lemon juice only

    Board Ingredients

    • 2 teaspoons extra virgin olive oil
    • 8-12 each mini bell peppers
    • 2 each whole wheat pitas quartered
    • 1/2 head butter leaf lettuce washed and cleaned
    • 1 medium tomato thinly sliced
    • 1 medium cucumber thinly sliced
    • 1/4 small red onion sliced
    • 1/4 cup parsley leaves chopped
    • 1/3 cup hummus
    • 1/3 cup tzatziki sauce

    Instructions

    • To a large, resealable bag add the Beef Flank Steak and shawarma seasoning. Use your hands and from the outside of the bag massage the seasoning all over the steak.
      Add the smashed garlic to the bag, then pour in the extra virgin olive oil and juice from ½ lemon. Reseal the bag and shake.
      Place on a plate or rimmed dish and set in the refrigerator to marinate for at least 8 hours (or up to a max of 24 hours.)
    • When ready to prepare, preheat oven to 425degrees F. Take the Beef Flank Steak out of the resealable bag. Sear each side of the steak in a cast iron skillet for about 90 seconds per side.
    • Place parchment paper down on a rimmed baking sheet and place the mini bell peppers on one side. Brush with olive oil and place in the oven on top rack. Set timer for 10 minutes. 
    • When oven timer goes off, place the steak on the opposite side of the baking sheet with the bell peppers. Return to oven at 425 degrees F and finish cooking the steak and bell peppers for 8 minutes on top rack.
    • Note, internal temperature of the steak should read 160 degrees F on an instant read thermometer for medium-well.
      Note, the temperature will continue to rise while steak is resting, so it’s okay to remove it when it’s 150-155 degrees F as well. Just make sure to check the internal temperature again before slices, to make sure it has reached 160 degrees F.
    • Remove from oven and let Beef Flank Steak rest for 10 minutes. Assemble the Beef Shawarma Board while the steak is resting. A large serving platter or cutting board works great.
      Add the washed produce around the steak and serve with cut and lightly toasted pita wedges. Place the sauces in containers and at to the board.
    • Thinly slice steak and add to the center of the board. Serve immediately.

    Notes

    Marinating your Beef.
      • Marinating beef is a great way of adding flavor and moisture to meat prior to cooking. This is especially helpful when using lean cuts or dry cooking methods, like grilling, to help keep meat tender and moist. This makes it easy and enjoyable to eat for infants and toddlers!
      • Once you buy your beef, be sure to marinate it within 3 days. I recommend cooking the marinated beef within 8- to -24 hours.
      • Add the Beef Flank Steak to the resealable bag, then the shawarma spice mix. Seal the bag then use your hands to evenly massage the steak (through the bag) to get the seasoning all over the steak. Then, add the garlic, olive oil, and lemon juice and shake! This creates an even seasoning throughout the marinating process.
    Alternate way to cook your Beef Shawarma: the grill.
        • Flank Steak also cooks very well on the grill. Instead of the oven, use your grill over high heat (about 425 degrees F.) Add your bell peppers (and any other produce) on one side, and the Beef Flank Steak on the other. Grill each side of the steak for 3 minutes on high-heat to seal in the juices, then close the BBQ and grill remaining 5 minutes per side at 400 degrees F.
        • As above, the internal temperature should read 160 degrees F for a medium-well steak. Note, the temperature will continue to rise while steak is resting, so it’s okay to remove it when it’s 150-155 degrees F as well. Let the steak rest for 10 minutes, and be sure to re-check the temperature to ensure the steak has reached an internal temperature of 160 degrees F before slicing.
    Store your leftovers properly.
      • Cooked and cooled beef shawarma will keep in the refrigerator in a sealed container for 3-4 days. Or, feel freeze in an airtight container and use within 3 months.

    Nutrition

    Calories: 574kcal | Carbohydrates: 9g | Protein: 58g | Fat: 33g | Saturated Fat: 8g | Polyunsaturated Fat: 3g | Monounsaturated Fat: 17g | Cholesterol: 156mg | Sodium: 320mg | Potassium: 1152mg | Fiber: 3g | Sugar: 3g | Vitamin A: 1418IU | Vitamin C: 15mg | Calcium: 116mg | Iron: 5mg

    Soy Allergy Prevalence – What Does the Current Research Say

    February 4, 2022

    Image of soybean pods and soy products.

    If you think you or someone you love might have a soy allergy, you’re in the right place. This post covers the prevalence of soy allergy and what the current research says for both adults and children. While we will discuss the current understanding of the science, it’s always important to speak with your medical team to address your specific conditions.

    Samples of soybeans and tofu on cutting board.
    Examples of Soy Based Food

    Disclosure: This post is in collaboration with the Soy Nutrition Institute (SNI) Global, an organization leading the way in soy and health research and education, and the United Soybean Board. All material addressed in this post is supported by science and hyperlinked for those looking for more information. As always, thanks for reading the science that keeps my corner of the web flowing!

    Table Of Contents

    • What Is Soy
    • Signs & Symptoms of Soy Food Allergy
    • How Common Are Soy Food Allergies
    • Insight From An Allergist
    • Do Soy Allergies Raise Concern For Other Food Allergies
    • Introducing Soy To Babies
    • Where To Get More Information

    If this is your first time here on Shaw Simple Swaps, welcome! I’m a registered dietitian and mom to two littles, one of which has a severe milk allergy (you can read more about that here.)

    Ever since his diagnosis at 6-months old, I’ve become fascinated with the research surrounding the early introduction of potential food allergens to prevent the development of allergy later in life and the importance of looking at the evolving science. While I may be a science geek at heart, I’m also an anxious mom who understands the everyday struggles of living with a child with a food allergy.

    Rest assured — I am here to present the scientific findings surrounding soy allergies and offer my practical advice on navigating food allergies.

    What is Soy?

    Let’s start by exploring what soy is. Soybeans are a nutrient-rich source of plant protein and are a member of the legume family, which also includes peanuts, beans, lentils, and peas. Soy provides all nine essential amino acids and contains B vitamins, fiber, and magnesium.

    Soybeans are typically harvested in the fall and can be found in a variety of different foods and forms. Some of the most common soy foods are tofu, edamame, tempeh, textured vegetable protein (TVP), soymilk, soy-based yogurts and burgers. Soy is also found in condiments, such as soy sauce, miso and tamari. Soy is also found in a variety of processed forms such as soy lecithin and highly refined soybean oil.  However,  soybean oil can be consumed by people allergic to soy because it does not contain sufficient protein to elicit an allergic reaction. As always, speak with your physician if you have any concerns.

    Fun fact, Mr.CEO actually grew up on a farm that harvested soybeans! The Shaw Family Farm is a centennial farm (meaning it has been in existence over 100 years) in the northern Illinois region. Here’s a picture of the last soybean harvest on the Shaw farm before his dad retired last year.

    Soybean harvest.
    Shaw Family Farm, Soybean Harvest 2020

    What Are the Signs and Symptoms of A Soy Food Allergy? 

    According to the American College of Allergy, Asthma, and Immunology, common signs and symptoms of a food allergy to soy include:

    • Vomiting
    • Stomach cramps
    • Diarrhea
    • Wheezing
    • Shortness of breath, difficulty breathing
    • Coughing
    • Tightness in throat, hoarse voice
    • Weak pulse
    • Pale or blue coloring of the skin
    • Hives
    • Swelling, can affect the tongue and/or lips

    Though you may recognize that you or your child may have some of these symptoms, be cautious of self-diagnosis; food intolerances and food allergies present similar signs and symptoms.

    The big difference between a soy intolerance and a soy food allergy is that a true food allergy affects the immune system as a result of the body interpreting the soy protein as a “foreign invader”. The body responds by creating immunoglobulin E (IgE) antibodies that disperse throughout the body causing the allergic symptoms to develop. Food allergies can be either IgE mediated, which means the onset of symptoms occur within 1 to 2 hours or non-IgE mediated meaning the onset of symptoms occur greater than two hours after consumption or exposure and can present for a longer period of time; however, both are equally concerning.

    While it’s unlikely that soy food allergies will lead to anaphylaxis (a life-threatening situation that causes restriction of the airways), it’s important to always proceed with caution and speak with your pediatrician or healthcare provider about seeing an allergist to diagnose a food allergy using the right tests.

    How Common Are Soy Food Allergies

    First and foremost, I want to say it again because it’s that important to remember— A true food allergy diagnosis requires repeated testing with an allergist, often concluding with an oral food challenge test. The problem though is that these tests are expensive and time intensive. Consequently, studies typically rely on self-reported data to identify food allergies. With this in mind, let’s take a look at the reported prevalence of soy food allergies in both kids and adults.

    According to the Food Allergy Research and Education (FARE) organization, 32 million Americans have a food allergy, with 5.6 million of those being under the age of 18. Based on data from studies conducted in 2018 and 2019, approximately 1.9 million Americans present symptoms related to a soy food allergy.

    Soy allergies have been found to be more common in infants and young children than adults. Approximately 0.4% to 1.5% of infants in the United States have a soy food allergy. However, research shows that most children diagnosed with a soy allergy will outgrow their allergy between by 10 years of age.

    Keep in mind the above statistics do not necessarily account for diagnosed soy food allergies or food allergies in general. Oftentimes individuals present similar symptoms with a food intolerance as an allergy, however as noted they are quite different.

    A  2020 review in Nutrition Today found that true soy food allergies are not as common as perceived. Scientists analyzed available data on food allergies in North America that had been published in the eight years prior to their review. The foods included in this review were labeled as soy, milk, egg, fish, shellfish, wheat, treenuts, and peanuts, collectively known as the “Big 8”, as well as sesame and a general category labeled “any foods”.

    In the United States, data from the National Health and Nutrition Examination Survey (NHANES), Food and Drug Administration (FDA), Food Safety Surveys (FSS), and National Institute of Allergy and Infectious Disease (NIAID) Survey were used, while from Canada, the Surveying Canadians to Assess the Prevalence of Food Allergies and Attitudes Towards Food labeling and Risk Survey was used. What these researchers found was pretty fascinating.

    A Closer Look at the “Big 8”

    The identification of major food allergens on food labels began in 2004 when Congress passed the Food Allergen Labeling and Consumer Protection Act (FALCPA). When this passed, the data used to identify the “Big 8” was primarily based on the pediatric population, not adults, and was limited in prevalence data, especially for soy and wheat. While a large-scale study to identify food allergy prevalence would be very challenging to conduct due to the multiple features it would need to involve (i.e. like demonstrating adverse reactions to a food through the use of a food challenge test), the evolving science is important to pay attention to, especially as more foods become labeled as allergens in the United States.

    Nutrition Today Review: Prevalence of Soy Food Allergy in Adults

    Based upon the available surveys of people 18 years and older, researchers found the following:

    • Soy protein allergy was the least prevalent food allergy among survey participants compared to seven of the other eight allergenic foods studied (sesame was the only food with a lower allergy prevalence than soy.)
    • Milk/dairy and shellfish were the most prevalent food allergies.
    • In the FSS study, the prevalence of pea protein allergy was similar to that of soy, despite pea not being a major allergen in the US. This may be because of lack of research, but is something to be aware of due to the number of plant-based products being made with pea protein.

    Nutrition Today Review: Prevalence of Soy Food Allergy in Kids

    Based on the four studies, researchers found that:

    • Soy protein allergies were slightly variable depending on the study being reviewed, however across all studies soy allergies were reported less than milk/dairy allergies.
    • Sesame allergies in all studies were reported less frequently than soy allergies.
    • Further analysis showed the highest prevalence rate (1.5%) for soy allergy at age one with a steady decline to 0.2% for ages 14 to 17. 

    While the information used for this analysis was self-reported data and thus is always subject to error, it does provide information to lead additional research on food allergies.

    New Research on the Horizon: The Start Eating Early Diet Initiative (SEED)

    The Food Allergy Research and Education (FARE) has initiated new research, entitled SEED (The Start Eating Early Diet Initiative), in collaboration with Dr. Ruchi Gupta and her team from Northwestern University Feinberg School of Medicine and Ann & Robert H. Lurie Children’s Hospital of Chicago.

    The study involves a three-year randomized controlled trial (RCT) comparing early introduction of several highly allergenic foods to the standard of care in a large and diverse sample of infants. The results of this research will be a great addition to the science and will help guide parents through the introduction of other allergenic foods, similar to the way it has been done for peanuts and eggs.

    Insight From An Allergist: What They See Regarding Soy Allergies In Practice

    To get the scoop on what allergists are seeing in their practice, I spoke to Dr. Kathleen Luskin, MD, an allergist and immunologist in San Diego, CA. Dr. Luskin says she has seen more IgE mediated versus non-IgE mediated reactions with soy food allergies in her practice.

    While she notes there is some cross reactivity of a true soy allergy and other food allergies, most allergists often empirically exclude soy in certain non-IgE mediated reactions, making it difficult to discern the exact prevalence.

    However, Dr. Luskin prefers to take a rather “aggressive approach” to early food introduction, sharing that in her opinion:

    The sooner the immune system can be exposed to a food and hopefully ‘learn’ that is it something that should be tolerated, the better.

    Do Soy Allergies Raise Concern for Other Food Allergies?

    According to the research, being medically diagnosed with a true soy food allergy does warrant consideration of other potential food allergies. While the sample size was small, past research has shown that soy allergic individuals may be sensitized or allergic to other legumes such as peanuts, as well as other top allergens such as tree nuts, milk, egg, and sesame. However, individuals allergic to peanuts were not likely to be allergic to soy or the other legumes, such as beans, peas, and lentils.

    Because food allergies are so individualized, it’s important to work directly with an allergist and medical team for your particular case. Research supports that one should never eliminate an entire food group without proper diagnosis, as that can lead to nutrient deficiencies without proper nutrient insight from an expert.

    How I Safely Introduce Soy To My Milk Allergy Son

    While my son has a diagnosed milk allergy, he also originally had a medically diagnosed peanut allergy, meaning he tested positive on both the skin prick and blood tests. However, as I go into more depth about here, these tests can present false positives 50% to 60% of the time.

    With the help of his allergist, we moved forward with an oral food challenge. He passed the challenge, demonstrating only some mild hives, and we left with the “homework” of introducing peanut protein three times a week in two-gram doses so it could help his body outgrow the allergy.

    Believe me when I say it was a little anxiety-provoking, even as a healthcare professional, but I’m so glad we proceeded with the help of our allergist (and had appropriate medication on hand should anything escalate beyond a few hives). I’m happy to say after four months of these two-gram doses, he now has no reaction to peanuts! This outcome shows why it is imperative to not eliminate an entire food group without proper diagnosis and treatment from a professional.

    When he tested positive on his oral food challenge for the milk allergy, the allergist did encourage us to go home and start introducing the other more common allergens like soy and tree nuts that we had not tried yet. Thankfully, at that time, he had already tried egg as well with no reactions.

    We started soy introduction with tofu cut into chunks, marinated in sesame oil, vinegar, and spices, and air fried briefly in a chickpea flour coating. Note, you can serve the tofu straight from the refrigerator after it’s been drained, but I highly encourage adding some low- to no-sodium spices, seasonings, vinegars, etc. either way; it will help open their taste buds to new flavors as well!

    Marinated and cubed tofu in a bowl.
    Cubed & Marinated Tofu

    My son did really well with this option, and he did not experience any reaction.

    Soy Food Exposure with 10 Month Old Baby
    Soy Food Exposure with 10 Month Old Baby

    We continue to incorporate soy by serving softened and age-appropriate sizes of tofu, tempeh, edamame (he loves hummus with this), and unsweetened soymilk and soy yogurt in fruit and veggie smoothies and popsicles.

    Green smoothie made into pops with soymilk.
    Green Smoothie Popsicles with Soy milk

    What You Need To Remember

    Diagnosing a true food allergy requires a team, including your primary healthcare provider, an allergist, and a registered dietitian. Work with these individuals to determine what you are truly allergic to and how to balance your nutrient needs. While soy food allergies are less prevalent than other allergenic foods, your medical team can help identify what is causing your symptoms and work with you to set up the dietary program right for you.

    Where to Get More Information On The Latest Research Regarding Soy Allergy

    To learn more about soy health and nutrition, visit Soy Nutrition Institute (SNI) Global: www.SNIGlobal.org. You can also follow SNI Global on Twitter, Facebook, and LinkedIn to stay up-to-date on all things soy!

    Easy Peppermint Oreos

    December 16, 2021

    Easy Peppermint Oreos staged cookie shot.

    Non-bakers unite! These Easy Peppermint Oreos are literally the easiest thing on your holiday agenda. With a few simple staples you’ll have everyone asking, “HOW DO YOU MAKE THESE!” Bonus, they’re naturally dairy-free too!

    Easy Peppermint Oreos staged cookie shot.

    Why You Need to Make these Peppermint Oreos This Season

    If you want to bring a touch of the homemade feel to your holiday gatherings but have no time nor energy to bake and measure precisely, then this is the recipe for you!

    These Peppermint Oreos come together literally in no time flat and make the perfect edible gift to share with your loved ones this season. Bonus points because they freezer really well, too!

    What You Need to Make Peppermint Oreo Cookies

    Easy Peppermint Oreos Ingredients Labeled
    • golden Oreo thins: buy the thins, seriously. It makes this taste like a cookie brittle and evenly distributes the sweetness! You can use the regular Oreos but I swear, the thins taste so much better in this!
    • mini marshmallows: buy the mini, not the regular or some obscure shape as the mini help cover the most surface area on the grahams while baking evenly too.
    • dairy-free white chocolate: I found this on Amazon after searching high and low everywhere for it at local markets. This is the brand I liked. However, in dairy-free recipe groups some note Walmart sells dairy-free white chocolate, but I could not find it!
    • grapeseed oil: this is a neutral oil and lends well to melting the chocolate quickly in the microwave.
    • peppermint candy: the peppermint discs (or starlights as they are frequently called) are the easiest to unwrap quickly, however you can always use candy canes too.

    INGREDIENT SWAPS

    To make this recipe fit your lifestyle, consider these swaps:

    • dairy-free: note, this recipe is made DF. But, to make sure, use dairy-free chocolate, graham crackers and marshmallows are usually dairy-free but always double check as manufacturers will vary as far as ingredients
    • gluten-free: swap for gluten-free graham crackers or pretzels
    • vegan: use cinnamon graham crackers made without honey and vegan marshmallows

    And, if you prefer the chocolate Oreos, feel free to swap the Golden for regular Oreo Thins and use dark dairy-free chocolate instead!

    How to Make Candy Cake Style Oreos

    Say it with me, “You cannot mess up this recipe!” It’s literally fool proof, let me show you how to make it!

    1. Line Oreo thins on a rimmed baking sheet lined with parchment paper.
    2. Place 3 mini marshmallows over the top of each Oreo.
    3. Bake for 3 to 5 minutes at 350 degrees F until marshmallows are slightly cooked and gooey.
    4. While baking, heat chocolate with grapeseed oil in microwave until melted in 30 second intervals. Remove baking sheet and drizzle white chocolate over Oreo thins.
    5. Sprinkle crushed peppermint over the top.
    Easy Holiday Oreos Process Shots

    And when I say sprinkle crushed peppermint on top… I mean a GENEROUS sprinkle!

    Single Oreo Thins with Peppermint on top in rows.

    Plate and enjoy!

    Easy Peppermint Oreos staged cookie shot.

    Recipe Tips

    To make this recipe work like a charm, every time, keep these tips in mind!

    • Do not stack your Oreos on top of one another! You want to make sure each thin gets a little chocolate on it!
    • Watch the oven time, you don’t want them to get that campfire burn taste! Once the tops start looking a bit soft and “gooey”, remove the baking sheet.
    • When melting chocolate, be sure to do so in the intervals mentioned above. Burning the chocolate will result in a bitter taste.
    • Once you have the peppermint unwrapped, use a metal ladle or your meat mallet to crush them in a ziplock bag (it makes the least amount of mess.)
    Easy Peppermint Oreos staged cookie shot.

    How to Store Your Holiday Peppermint Oreos

    If enjoying within a week, store in an airtight container and keep in the refrigerator to prevent melting.

    If making ahead to enjoy later in the season, then freeze in an airtight container. Note, you can also do this if you just enjoy the crunchier cookie straight out of the freezer like me!

    If making for a gift box, be sure to store the boxes in a cool area so the chocolate does not melt!

    Easy Peppermint Oreos staged cookie shot.

    Other Holiday Recipes You May Enjoy

    • Peppermint Graham Cracker Bark with Marshmallows
    • Gluten Free Gingerbread Cookies
    • The Best Sugar Cookie Cut-Outs
    • Vegan Snowball Cookies
    • Chocolate Walnut Rugelach Cookies
    Easy_Peppermint_Oreos-Close Up
    Print Recipe
    5 from 8 votes

    Easy Peppermint Oreos

    Non-bakers unite! These Easy Peppermint Oreos are literally the easiest thing on your holiday agenda. With a few simple staples you'll have everyone asking, "HOW DO YOU MAKE THESE!" Bonus, they're naturally dairy-free too!
    Prep Time5 minutes mins
    Cook Time5 minutes mins
    5 minutes mins
    Total Time15 minutes mins
    Course: Dessert
    Cuisine: American
    Servings: 52 servings
    Calories: 55kcal
    Author: Liz Shaw

    Ingredients

    • 52 each Golden Oreo Thins
    • 2 cups mini marshmallows
    • 1 1/4 cup white chocolate chips dairy free
    • 1 tbsp grapeseed oil
    • 1/2 cup peppermint candy crushed

    Instructions

    • Preheat oven to 350 degrees F. Then, line a rimmed baking sheet with parchment paper. Evenly place the Oreo thins on the sheet, then place 3 mini marshmallows on top of each Oreo.
    • Place baking sheet in the oven to bake for 3 to 5 minutes (or until marshmallows are soft and starting to cook.)Melt the chocolate while thins are melding with the marshmallows! Add the grapeseed oil to the chocolate in a glass bowl, then heat in 30 second intervals (about 90 seconds total), stirring in between until melted
    • Remove cookies from oven. Pour the white chocolate into a large ziplock bag then cut a small hole at the end to drizzle chocolate over the top. Then, liberally top with the crushed peppermint. Place in the freezer for 5 minutes to harden. Then, separate and enjoy!

    Notes

    How to Store Your Holiday Peppermint Oreos

    If enjoying within a week, store in an airtight container and keep in the refrigerator to prevent melting.

    If making ahead to enjoy later in the season, then freeze in an airtight container. Note, you can also do this if you just enjoy the crunchier cookie straight out of the freezer like me!

    If making for a gift box, be sure to store the boxes in a cool area so the chocolate does not melt!

    Recipe Tips

    To make this recipe work like a charm, every time, keep these tips in mind!
    • Do not stack your Oreos on top of one another! You want to make sure each thin gets a little chocolate on it!
    • Watch the oven time, you don’t want them to get that campfire burn taste! Once the tops start looking a bit soft and “gooey”, remove the baking sheet.
    • When melting chocolate, be sure to do so in the intervals mentioned above. Burning the chocolate will result in a bitter taste.
    • Once you have the peppermint unwrapped, use a metal ladle or your meat mallet to crush them in a ziplock bag (it makes the least amount of mess.)
     

    Nutrition

    Calories: 55kcal | Carbohydrates: 8g | Protein: 1g | Fat: 2g | Saturated Fat: 1g | Polyunsaturated Fat: 1g | Monounsaturated Fat: 1g | Cholesterol: 1mg | Sodium: 22mg | Potassium: 14mg | Fiber: 1g | Sugar: 6g | Vitamin A: 1IU | Vitamin C: 1mg | Calcium: 8mg | Iron: 1mg

    If you try this recipe, would you please do me a favor and leave a star rating in the recipe box and/or comment below! This helps immensely in Google to continue delivering high quality content to you. And please be sure to tag and share what you made with me on social, I love seeing your creations! You can find me here: Instagram – Facebook – Pinterest!

    Peppermint Graham Cracker Bark with Marshmallows

    December 15, 2021

    Up close photo of peppermint graham cracker bark.

    If your love for s’mores carries into the holiday season, then this Peppermint Graham Cracker Bark with Marshmallows is just the recipe for you. Layers of flavor build upon each other with the crunchy graham, soft and sticky marshmallows, rich chocolate, and seasonal peppermint! It’s perfect for gifting to neighbors and storing in the freezer when you need a little pick me up when the holiday stress gets to you!

    Up close photo of peppermint graham cracker bark.

    Why You Need This Peppermint Chocolate Bark In Your Life

    You have a holiday party to go to and you have zero desire to bake, but signed up for dessert. This is the perfect “I made something delicious” vibe to send the host when you walk in yet you didn’t have to precisely measure or get your kitchen dirty. The best part… you can over measure and it still turns out amazing!

    Or, you want something to gift your neighbors (and save for yourself) but don’t want to spend a fortune. With just a few market staples this Peppermint Graham Cracker Bark can be yours (errr.. theirs?!)

    Peppermint Graham Bark Plated.

    What You Need to Make Peppermint S’mores Bark

    Ingredients to make peppermint bark.
    • graham crackers: cinnamon is my preferred flavor since it adds a nice seasonal touch, but I’ve tried chocolate and plain ole’ honey and they both were delicious!
    • mini marshmallows: buy the mini, not the regular or some obscure shape as the mini help cover the most surface area on the grahams while baking evenly too.
    • chocolate: if you’re like us and need dairy-free, then purchase that! a semi-sweet chocolate works best in here.
    • grapeseed oil: this is a neutral oil and lends well to melting the chocolate quickly in the microwave.
    • peppermint candy: the peppermint discs (or starlights as they are frequently called) are the easiest to unwrap quickly, however you can always use candy canes too.

    Ingredient Swaps

    To make this recipe fit your lifestyle, consider these swaps:

    • dairy-free: make sure to use dairy-free chocolate, graham crackers and marshmallows are usually dairy-free but always double check as manufacturers will vary as far as ingredients
    • gluten-free: swap for gluten-free graham crackers or pretzels
    • vegan: use cinnamon graham crackers made without honey and vegan marshmallows
    Close up of chocolate peppermint bark.

    How to Make the Easiest Peppermint Graham Cracker Bark

    When I said this recipe was easy and no fuss, I really mean it.

    1. Break the graham crackers up on a rimmed baking sheet (or sheets depending on how much you’re making.)
    2. Cover with the mini marshmallows.
    3. Bake for 3 to 5 minutes, melting the chocolate and grapeseed oil together in the microwave while the grahams and marshmallows are baking.
    4. Remove baking sheet and cover grahams and marshmallows with melted chocolate, evenly spreading the chocolate around with a spatula.
    5. Sprinkle crushed peppermint on top and set in the freezer to harden.
    6. Remove and enjoy!
    Process shots to make peppermint bark.

    Once the bark is frozen, remove and break it into pieces. Enjoy immediately, or follow storing instructions below!

    Peppermint Graham Bark Plated.

    Recipe Notes + Tips

    This recipe is really hard to mess up, I promise! Keep these tips in mind to make it wonderful each time.

    • Watch the oven time, you don’t want them to get that campfire burn taste! Once the tops start looking a bit soft and “gooey”, remove the baking sheet.
    • When melting chocolate, be sure to do so in the intervals mentioned above. Burning the chocolate will result in a bitter taste.
    • Once you have the peppermint unwrapped, use a metal ladle or your meat mallet to crush them in a ziplock bag (it makes the least amount of mess.)

    How to Store Your Peppermint Chocolate Bark

    • If enjoying within a few days, keep it in the refrigerator in an airtight container.
    • If saving to enjoy 5 days or later, store in the airtight container in the freezer (however you can also store immediately in the freezer if you like the crunchier, cold chocolate taste.)
    • If gifting, I recommend putting in boxes versus bags as it will hold better. Keep in a cool area of your kitchen until delivering.
    Peppermint Graham Bark Plated.

    Other Easy Holiday Recipes You May Enjoy

    • Gluten Free Gingerbread Cookies
    • The Best Sugar Cookie Cut-Outs
    • Vegan Snowball Cookies
    • Chocolate Walnut Rugelach Cookies

    If you try this recipe, would you please do me a favor and leave a star rating in the recipe box and/or comment below! This helps immensely in Google to continue delivering high quality content to you. And please be sure to tag and share what you made with me on social, I love seeing your creations! You can find me here: Instagram – Facebook – Pinterest!

    Up close photo of peppermint graham cracker bark.
    Print Recipe
    5 from 6 votes

    Peppermint Graham Cracker Bark with Marshmallows

    If your love for s'mores carries into the holiday season, then this Peppermint Graham Cracker Bark with Marshmallows is just the recipe for you. Layers of flavor build upon each other with the crunchy graham, soft and sticky marshmallows, rich chocolate, and seasonal peppermint!
    Prep Time10 minutes mins
    Cook Time5 minutes mins
    Freezer Time10 minutes mins
    Total Time25 minutes mins
    Course: Desserts
    Cuisine: American
    Servings: 36 servings
    Calories: 156kcal
    Author: Liz Shaw

    Ingredients

    • 36 each cinnamon graham crackers 1 box (14.5 oz) or 3 sleeves
    • 10 oz mini marshmallows
    • 20 oz semi sweet chocolate dairy-free
    • 4 teaspoons avocado oil
    • 10 oz peppermint candy crushed

    Instructions

    • Preheat oven to 350 degrees F. Then, line two rimmed baking sheets with parchment paper. Break the graham crackers in half, then place them on the sheets close together.
    • Sprinkle the marshmallows evenly over the top, then place in the oven to bake for 3 to 5 minutes (or until marshmallows are soft and starting to cook.)
    • While the graham crackers are in the oven, melt the chocolate. Add the avocado oil to the chocolate in a glass bowl, then heat in 30 second intervals (about 90 seconds total), stirring in between until melted.
    • Remove graham crackers from oven and immediately pour the chocolate over the top. Use a spatula to evenly distribute the chocolate, then top with the crushed peppermint.
    • Place in the freezer for about 10 minutes (or more if necessary) to harden. Then, break up and enjoy!

    Notes

    Ingredient Swaps

    To make this recipe fit your lifestyle, consider these swaps:
    • dairy-free: make sure to use dairy-free chocolate, graham crackers and marshmallows are usually dairy-free but always double check as manufacturers will vary as far as ingredients
    • gluten-free: swap for gluten-free graham crackers or pretzels
    • vegan: use cinnamon graham crackers made without honey and vegan marshmallows

    Recipe Notes 

    This recipe is really hard to mess up, I promise! Keep these tips in mind to make it wonderful each time.
    • Watch the oven time, you don’t want them to get that campfire burn taste! Once the tops start looking a bit soft and “gooey”, remove the baking sheet.
    • When melting chocolate, be sure to do so in the intervals mentioned above. Burning the chocolate will result in a bitter taste.
    • Once you have the peppermint unwrapped, use a metal ladle or your meat mallet to crush them in a ziplock bag (it makes the least amount of mess.)

    How to Store Your Peppermint Chocolate Bark

    • If enjoying within a few days, keep it in the refrigerator in an airtight container.
    • If saving to enjoy 5 days or later, store in the airtight container in the freezer (however you can also store immediately in the freezer if you like the crunchier, cold chocolate taste.)
    • If gifting, I recommend putting in boxes versus bags as it will hold better. Keep in a cool area of your kitchen until delivering.

    Nutrition

    Calories: 156kcal | Carbohydrates: 23g | Protein: 1g | Fat: 7g | Saturated Fat: 4g | Polyunsaturated Fat: 1g | Monounsaturated Fat: 2g | Trans Fat: 1g | Cholesterol: 1mg | Sodium: 14mg | Potassium: 90mg | Fiber: 1g | Sugar: 16g | Vitamin A: 8IU | Calcium: 10mg | Iron: 1mg

    Want more Shaw Kitchen recipes? Then sign up here for my 5 Day Stress-Free Meal Plan delivered straight to your inbox!

    Healthy Turkey Pot Pie

    November 27, 2021

    Pot pie plated.

    Leftover turkey? Then this Healthy Turkey Pot Pie is the perfect recipe for you! Made with many staples from your Thanksgiving spread, it’s an easy (and healthy) way to enjoy them (or freeze) for a quick, hearty meal later on.

    Pot pie plated.

    Why You Need to Make this Healthy Pot Pie ASAP

    You have a pound of leftovers staring you in the face every time you open the fridge but you’re tired of the same ole’ turkey sammie. I feel you, and truthfully sometimes I even need a break from turkey for a few days! Yep, I said it.

    But, I’ll be the first to admit I HATE WASTING FOOD! So, this Healthy Turkey Pot Pie came to life because not only does it freeze oh so well, but it uses up many of those Thanksgiving staples you have on hand and doubles as meal prep for a few weeks from now when you have zero energy to cook!

    Whether you enjoy it tonight with a side salad with my miso dressing or freeze for later, I promise your entire crew will love this!

    What You Need to Make this Leftover Turkey Pot Pie

    Ingredients to make turkey pot pie healthy with text overlay.

    Keep these ingredient tips in mind to make this with what you have on hand!

    • chopped cooked turkey: swap in chicken or alternative protein of choice. If you’ve a vegetarian, ground crumbles work well in here too.
    • carrots, celery, onion: while these are staples in my kitchen this time of the year, if you’ve got green beans, Brussels sprouts, etc., toss in whatever else you have on hand. the more veggies, the merrier.
    • chicken stock: use turkey stock, broth, or whatever stock or broth you have on hand. I prefer the low to no sodium options.
    • spices: dried sage, thyme, rosemary, and parsley are some of my favs, but feel free to use traditional garlic and pepper too.
    • veg oil: you can swap for canola oil or use olive oil, just note the potent olive flavor will be a bit stronger.
    • wheat flour: I like the white whole wheat flour for the extra nutrition wheat flour provides, but feel free to use your flour of choice. Gluten-free also works well in here too.
    • gravy: I used the dairy free gravy we had made for our turkey that had dairy free butter, chicken stock, spices, and flour, but feel free to use whatever type you have on hand or prefer to buy. You can also use my recipe for rosemary gravy here!

    How To Make Turkey Pot Pie

    It’s so easy, I swear!

    First, preheat the oven to 350 degrees F and sauté a tablespoon of oil with your veggies and spices.

    Then, stir in your cooked turkey, gravy, and 1/3 cup of broth. Set aside.

    Prepare the pot pie dough by mixing the baking powder with the flour, then adding in the oil and broth.

    Evenly spread the turkey mixture on the bottom of a pan, then add the dough for the pot pie on top. Use the back of a spoon or a spatula to make it evenly distributed on top.

    Place in oven and bake for 28 to 30 minutes.

    Prep for how to make leftover turkey pot pie

    When your Healthy Turkey Pot Pie is finished, the top should be golden brown the vegetables tender to the bite!

    White backdrop with square turkey pot pie.

    If serving immediately, portion onto plates and serve with a little extra gravy!

    I love the flavor of rosemary so tossed a few sprigs on top, but that is completely optional! Regardless, dive into this pillowy soft biscuit on top with the creamy comfort of your Thanksgiving classics underneath!

    Plated up close healthy turkey pot pie.

    Recipe Tips + Notes

    Here are a few quick tips to keep in mind as you make this recipe!

    • If you have a pretty dry turkey, it’s best to add an additional 1/2 cup of broth to the gravy before you mix into the sautéd veggies. This will allow the bottom layer to be a bite more creamy.
    • To increase the recipe, simply double the portions of ingredients to yield 12 servings.
    • To store in the refrigerator, let it cool and place in an airtight container. Best when eaten within 3 to 4 days. To reheat, place desired portion on a microwave safe plate or bowl and microwave in 35 second intervals until internal temperature is 165 degrees F.
    • To freeze, let Turkey Pot Pie cool completely, then store in an airtight container. Label and date, then use within 3 months.
    Healthy turkey pot pie.

    Other Leftover Recipes To Make With Leftover Thanksgiving Food

    If you liked this recipe, then you will love these with your leftover Thanksgiving food!

    Turkey

    • Healthy Turkey Tetrazzini

    Sweet Potatoes

    • Sweet Potato Pie Parfaits
    • Sweet Potato Pancakes

    Cranberry Sauce

    • Chia Cranberry Jam

    If you try this recipe, would you please do me a favor and leave a star rating in the recipe box and/or comment below! This helps immensely in Google to continue delivering high quality content to you. And please be sure to tag and share what you made with me on social, I love seeing your creations! You can find me here: Instagram – Facebook – Pinterest!

    Pot pie plated.
    Print Recipe
    5 from 4 votes

    Healthy Turkey Pot Pie

    Leftover turkey? Then this Healthy Turkey Pot Pie is the perfect recipe for you! Made with many staples from your Thanksgiving spread, it's an easy (and healthy) way to enjoy them (or freeze) for a quick, hearty meal later on.
    Prep Time10 minutes mins
    Cook Time30 minutes mins
    0 minutes mins
    Total Time40 minutes mins
    Course: Dinner
    Cuisine: American
    Diet: Diabetic, Low Fat
    Servings: 6 servings
    Calories: 350kcal
    Author: Liz Shaw

    Equipment

    • Recipe Inspired by Lori Zanini's Diabetes Cookbook

    Ingredients

    • 1/3 cup canola oil
    • 1/4 small white onion diced
    • 3 each celery stalks diced
    • 2 each carrots diced
    • 1/2 teaspoon dried sage
    • 1/2 teaspoon dried thyme
    • 1/2 teaspon dried parsley
    • 2 cups cooked turkey breast meat chopped
    • 1 1/4 cups turkey gravy
    • 1 cup low sodium chicken stock divided
    • 1 cup white whole wheat flour
    • 2 teaspoons baking soda
    • 1/8 teaspoon salt

    Instructions

    • Preheat oven to 350 degrees F.
      In a large skillet, heat 1 tablespoon of oil over medium-high heat. Add the onion, celery, and carrot. Cook for about 5 minutes, or until soft. Add in the spices and stir.
    • Stir the turkey, gravy, and 1/3 cup of broth into the skillet. Set aside.
    • Mix the baking powder and salt into the flour, then add remaining oil and broth until a thick dough is formed.
    • Fill an 8×8-inch square pan with the turkey and gravy mixture.
    • Spread the flour dough over the top to create an even layer.
    • Bake until crust is lightly golden, about 30 minutes.
    • Let sit 10 minutes before serving.
    • Enjoy warm or store in the refrigerator for 3 days, or freeze once cooled to enjoy within 3 months.

    Notes

    Here are a few quick tips to keep in mind as you make this recipe!
    • If you have a pretty dry turkey, it’s best to add an additional 1/2 cup of broth to the gravy before you mix into the sautéd veggies. This will allow the bottom layer to be a bite more creamy.
    • To increase the recipe, simply double the portions of ingredients to yield 12 servings.
    • To store in the refrigerator, let it cool and place in an airtight container. Best when eaten within 3 to 4 days. To reheat, place desired portion on a microwave safe plate or bowl and microwave in 35 second intervals until internal temperature is 165 degrees F.
    • To freeze, let Turkey Pot Pie cool completely, then store in an airtight container. Label and date, then use within 3 months.

    Nutrition

    Calories: 350kcal | Carbohydrates: 17g | Protein: 9g | Fat: 24g | Saturated Fat: 6g | Cholesterol: 14mg | Sodium: 550mg | Fiber: 4g | Sugar: 3g

    Want more Shaw Kitchen recipes? Then sign up here for my 5 Day Stress-Free Meal Plan delivered straight to your inbox!

    Air Fryer Frozen Brussel Sprouts with Miso Dressing (i.e. Brussels Sprouts)

    November 17, 2021

    White plate and backdrop with green roasted brussel sprouts and red miso dressing in bowl.

    Fellow frozen food fans, this is for you! Take those frozen Brussels sprouts and turn them into a tasty, air fried masterpiece in under 20 minutes! This Air Fryer Frozen Brussel Sprouts (Brussels Sprouts) recipe is so silly easy to make and pairs perfectly with this super simple miso dressing.

    White plate and backdrop with green roasted brussel sprouts and red miso dressing in bowl.

    Let me start by saying, yes, I know it’s “Brussels Sprouts”, but, you wouldn’t believe the number of people searching “Brussel Sprouts”. To help them (or you lol) out and give you a little history on this veg, I’m using the popular spelling searched here in the states. Forgive me all you English majors!

    Now, if you still are nervous about using your air fryer, then this recipe is for you. It’s a simple one to jump right into and fairly fool proof! But first, visit my post here on 5 Tips for the New Air Fryer User to get a few quick tips on the appliance that’s about to change your life in the kitchen!

    Why You Need to Make Brussels Sprouts from the Freezer In Your Air Fryer

    The dietitian in me would say because we all need to eat more fruits and veggies, which is true, but the mom and busy lady in me says it’s because it’s so easy and tasty!

    Seriously, you haven’t lived until you’ve made your Brussels sprouts from a freezer bag! Not only are the Brussels sprouts already cleaned and trimmed for you when you buy them in the frozen food section, but they’re also very affordable at just $1.99 for a one-pound bag at many markets!

    What You Need to Make Frozen Brussels Sprouts in the Air Fryer

    Ingredients to make frozen air fried brussel sprouts labeled.

    Here are a few things to keep in mind about the ingredients!

    Brussels sprouts: this recipe calls for frozen. If you use fresh, you may need to adjust cooking time.

    Soy sauce: if you have a gluten or soy allergy, swap this out with a coconut aminos or other alternate to soy sauce.

    Red miso: while I’ve only tested this recipe with red miso, a follower tried white miso and she said it turned out great! So use what you can find.

    Sesame oil: I would recommend not swapping the entire oil needs in here for straight sesame oil. While this gives a flavorful burst to the sprouts and prevents them from sticking to the air fryer basket, I do not recommend using it fully in the miso dressing. It becomes to powerful.

    Vegetable oil: you can use the vegetable oil or canola oil for a neutral taste that helps make the dressing.

    How to Make Frozen Brussels Sprouts Air Fryer Perfection

    Steps 1-4

    I swear this is the easiest recipe, ever! You will want to start by rinsing, drying, and then slicing the Brussels sprouts in half. This helps ensure they air fryer evenly!

    Then toss them with the sesame oil and air fry for 10 minutes at 370 degrees F, then bump up the temp to 400 degrees F and finish for 5 to 7 minutes, shaking the basket halfway through. This will give a nice, even char.

    Process steps in 4 images to make brussel sprouts in air fryer.

    Step 5

    Process steps in 2 photos to make miso dressing for air fryer brussel sprouts.

    Step 5

    Prepare the miso dressing by whisking remaining ingredients together while the Brussel sprouts are in the air fryer.

    Process shot of whisking miso dressing together.

    Steps 6-8

    When cooking completes, remove Brussels sprouts from air fryer basket and serve as a side or fun appetizer with the miso dressing!

    3 image collage of making brussel sprouts in air fryer and dipping in dressing.

    Pairing with the fun mini serving sticks is a great way to get the entire family excited to try a new vegetable too if this is new to them!

    That tiny hand above is my toddler who “doesn’t like Brussels sprouts” yet was the first one to dive in when I set this out for dinner!

    White plate and backdrop with green roasted brussel sprouts and red miso dressing in bowl.

    Recipe Tips + Notes

    Keep these tips in mind as you make this recipe!

    • Place the frozen Brussels sprouts in a colander to help rinse then first. This helps “wake them up” from being in the freezer and get off any ice debris that could potentially make a soggy end product if placed in the air fryer.
    Brussel sprouts in colander.
    • Then, take the 2 to 4 minutes and slice them in half! It’s totally worth it for helping them cook evenly in a shorter amount of time.
    • Note, if you like a more crispy texture, simply extend their time in the air fryer. I recommend not bumping up the air fryer temp until at least 10 minutes of cooking has happened to prevent burning or over-charring.
    • When making the miso dressing, if you crew is not big on spice, reserve the red pepper flakes for an optional topping.
    Brussel sprouts in air fryer basket.
    • Remember air fryer temperatures vary slightly based on the model and basket type. So, until you get to know your own air fryer, keep an eye on the recipe you’re trying out to prevent burning until you know how to modify the time for each specific recipe you’re making! Don’t worry, it’s usually just a minute or two!

    What To Pair These Air Fryer Frozen Brussels Sprouts With

    These sprouts pair perfectly with my Instant Pot Round Roast, Pressure Cooked Brisket, and Boneless Turkey Breast!

    But honestly, you could add a can of beans and toss with a little sunflower seeds and cranberries for a plant-based salad as well!

    Other Air Fryer Recipes You Will Love

    If you enjoyed these Air Fryer Frozen Brussels sprouts, you’ll probably love these air fryer recipes too!

    • Air fryer meatloaf on brown parchment paper with veggies.
      Air Fryer Meatloaf Recipe
    • Image of plated falafel with peppers.
      Air Fryer Falafel
    • 4 bratwursts in a white pan with mustard.
      Air Fryer Bratwurst
    • Picture of air fryer potato wedges.
      Air Fryer Potato Wedges

    If you try this recipe, would you please do me a favor and leave a star rating in the recipe box and/or comment below! This helps immensely in Google to continue delivering high quality content to you. And please be sure to tag and share what you made with me on social, I love seeing your creations! You can find me here: Instagram – Facebook – Pinterest!

    White plate and backdrop with green roasted brussel sprouts and red miso dressing in bowl.
    Print Recipe
    5 from 7 votes

    Air Fryer Frozen Brussel Sprouts (Brussels Sprouts) with Miso Dressing

    Take those frozen Brussels and turn them into a tasty, air fried frozen Brussels sprouts masterpiece in under 20 minutes!
    Prep Time5 minutes mins
    Cook Time15 minutes mins
    0 minutes mins
    Total Time20 minutes mins
    Course: Dinner
    Cuisine: American
    Diet: Diabetic, Gluten Free, Low Lactose, Vegan, Vegetarian
    Servings: 4 servings
    Calories: 133kcal
    Author: Liz Shaw

    Equipment

    • Air Fryer

    Ingredients

    • 16 oz frozen Brussels sprouts
    • 2 tsp sesame oil
    • 1.5 tbsp rice vinegar
    • 1 tsp low sodium soy sauce or GF alternative
    • 1 tbsp maple syrup
    • 1 tbsp vegetable oil
    • 2 tsp red miso
    • 1/2 tsp garlic
    • 1/2 tsp red pepper flakes

    Instructions

    • Rinse Brussels sprouts under cool, running water in a colander and pat dry. Slice in half and toss with 2 teaspoons of sesame oil. Place in air fryer basket and cook for 10 minutes at 370 degrees F. Bump temperature up after 10 minutes to 400 degrees F and finish cooking for 5 to 7 minutes, shaking the basket halfway.
    • While air fryer is cooking the sprouts, make the dressing by whisking the remaining ingredients together. Optional to leave out red pepper flakes if you would like to decrease spice. Set aside.
    • When cooking completes, toss the dressing over the sprouts and serve immediately.
    • If you have a larger batch and know you will have leftovers, portion out the dressing by tossing a teaspoon or two over desired Brussels sprout amount, then reserve the rest for later.
    • Store leftovers in an airtight container in the fridge and consume within 3 days for best quality. Reheat in the air fryer at 370 degrees F for 3 to 5 minutes.

    Notes

    • Place the frozen Brussels sprouts in a colander to help rinse then first. This helps “wake them up” from being in the freezer and get off any ice debris that could potentially make a soggy end product if placed in the air fryer.
    • Then, take the 2 to 4 minutes and slice them in half! It’s totally worth it for helping them cook evenly in a shorter amount of time.
    • Note, if you like a more crispy texture, simply extend their time in the air fryer. I recommend not bumping up the air fryer temp until at least 10 minutes of cooking has happened to prevent burning or over-charring.
    • When making the miso dressing, if you crew is not big on spice, reserve the red pepper flakes for an optional topping.
    • Remember air fryer temperatures vary slightly based on the model and basket type. So, until you get to know your own air fryer, keep an eye on the recipe you’re trying out to prevent burning until you know how to modify the time for each specific recipe you’re making! Don’t worry, it’s usually just a minute or two!

    Nutrition

    Calories: 133kcal | Carbohydrates: 15g | Protein: 4g | Fat: 8g | Saturated Fat: 1g | Polyunsaturated Fat: 3g | Monounsaturated Fat: 3g | Sodium: 187mg | Potassium: 467mg | Fiber: 5g | Sugar: 6g | Vitamin A: 932IU | Vitamin C: 97mg | Calcium: 57mg | Iron: 2mg

    Want more Shaw Kitchen recipes? Then sign up here for my 5 Day Stress-Free Meal Plan delivered straight to your inbox!

    The Easiest Sun-Dried Tomato Hummus

    November 6, 2021

    Looking for the perfect recipe that can work as an appetizer, snack, or main meal? Then this Sun-Dried Tomato Hummus is just what you need in your life! Made with a few simple ingredients, like canned beans, this is hands down the easiest Sun-Dried Tomato Hummus you’ll ever make.

    Image of red dip in bowl with cucumbers and pita around.

    Disclosure: This post was in collaboration with Bush’s Best to help raise awareness around canned beans. As always, all opinions expressed are my own. Thank you for supporting the work that keeps the Shaw Kitchen thriving!

    If you’re tired of spending a ton of money on expensive pre-made dips, spreads, and hummus, then you’re in the right place. I’m going to show you how to turn an affordable can of beans into a gourmet hummus that will appease your entire crew!

    Trust me, I’ve done it before in this Sweet Hummus Recipe and I’m about to show you how I did it again!

    Why You Need to Make This Hummus

    If you don’t remember from my 5 Benefits of Canned Beans post here, let me refresh your memory! Canned beans are not only a convenient addition to a plant-based diet, but they’re also extremely versatile.

    Need a quick protein source that doesn’t break the bank? Choose canned beans.

    Want to add more plants to your diet? Canned beans count as a vegetable!

    Have a guest coming over with food allergies and not sure what to serve? Hello, make a meal starring canned beans!

    Needless to say, canned beans are like your best friend that happens to your neighbor… they are there for you no matter what life throws your way!

    Case in point, you can whip up this Sun-Dried Tomato Hummus for a snack tray or serve it as a sauce on top of a flatbread or pasta. You have endless opportunities when you #OpenThePossibilities with canned beans!

    Sun-Dried Tomato Hummus and appetizer tray.

    What You Need to Make this Hummus with Sun-Dried Tomatoes

    White backdrop with black text overlay labeling ingredients to make hummus.

    Ingredient Notes + Swaps

    Canned Chickpeas: A standard 15.5-ounce can of garbanzo beans, or chickpeas, is perfect for this recipe. If you have an alternative white bean, you can also use that in here, just note the flavor will be slightly different (yet still delicious!) You can use a no added salt or low sodium option if you prefer, but rinsing your canned beans before using regardless of labeling on the can will help to further reduce the salt content by up to 41%.

    Sun-Dried Tomatoes in Oil: You won’t regret adding a can or two of sun-dried tomatoes in oil to your pantry staples. For a standard size recipe yield, you’ll use about ¾ of a 7-ounce container. However, if you can’t find them and want to make this using sun-dried tomatoes and olive oil separately, you certainly can do so! See below for my recipe tips on that.

    Cucumbers: Vary your veggies! I love the crisp taste of thinly sliced cucumbers with this dip, but the more vegetables, the merrier! Create a seasonal snack tray with the fruits and vegetables that are in season, and consider adding in a few nuts, seeds, and dried fruits to add texture and unique flavors as well.

    Whole-Grain Pita: I love the taste (and nutrition) that a soft, pillowy whole-grain pita provides, but you can also serve this with fresh bread, crackers, or whatever salty crunch suits your fancy!

    Cooked Pasta: I love keeping a chickpea-based cooked pasta on hand for the added fiber and protein. Get creative with your shapes, like the fun cavatappi pasta I have here! It’s a great way to get younger eaters excited about trying a new food, like this hummus with sun-dried tomatoes.

    White bowl with spiral pasta covered in red sun-dried tomato hummus sauce.

    How to Make This Sun-Dried Tomato Hummus Recipe

    If you have got 5 minutes and the two staple ingredients you need, then you have enough time to make this no tahini hummus recipe!

    To show you seriously how this is the easiest recipe you’ll ever make, I took pictures of the steps along the way!

    Simply toss the canned chickpeas, sun-dried tomatoes, and oil into your food processor or high-powered blender. Process until desired consistency is reached, scrapping down the sides as needed. After about 2 to 3 minutes, the hummus is usually done!

    Process shots to make hummus.

    Serve it in your favorite dish alongside a variety of veggies, whole-grain breads or crackers, and heart-healthy nuts!

    Image of red dip in bowl with cucumbers and pita around.

    Or, if you have a pizza obsessed house like I do, you can easily take the hummus as is and spread it on a flatbread of choice, top with your favorite veggies, and bake for a few minutes in your oven or air fryer at 400 degrees F.

    Viola, crispy flatbread perfection!

    Hummus used on pita to make a pizza sauce with artichokes on top.

    Now, if you’d like to take the Sun-Dried Tomato Hummus Recipe and turn it into a creamy sauce for that pasta, then simply add 2 to 3 tablespoons of a plant-based milk (or preferred milk) of choice.

    Process shot with hummus being mixed with milk to make a sauce.

    In just a matter of seconds, it’ll turn that delicious hummus into a creamy sauce that coats pasta perfectly!

    White bowl with spiral pasta covered in red sun-dried tomato hummus sauce.

    Recipe Tips

    I created this recipe for all my fellow busy people who want a delicious and nutritious option in no time. Keep these tips in mind as you prepare this recipe to ensure it’s a sure-fire success every time!

    • Spend the time to really drain the water from the canned garbanzo beans after you rinse them. This helps to ensure you don’t have an excess amount of liquid going into the recipe! If needed, gently pat them dry with a paper towel or clean kitchen towel.
    • Don’t have time to measure out the sun-dried tomatoes and oil? No problem! It’s pretty hard to mess this recipe up, so feel free to pour about ¾ of the 7-ounce container of the sun-dried tomatoes and almost all the oil into your blender. The flavor will be there but you’ll save yourself a few dishes! Store the remaining sun-dried tomatoes from the jar in the refrigerator and use as an extra topping on the flatbread or pasta you whip up!
    • On the same note, if you can’t find the sun-dried tomatoes in oil, but found sun-dried tomatoes and have olive oil on hand, you can still make this recipe. Simply use about ½ cup of the sun-dried tomatoes and soak them in roughly 4 tablespoons of extra-virgin olive oil overnight (this helps them have the time to really soak up the oil) with 1 teaspoon of Italian seasoning. Toss this mixture into the blender with your canned garbanzo beans, adding 1 tablespoon or so more of oil and 1 tablespoon of water to reach desired consistency.
    Image of red dip in bowl with cucumbers and pita around.

    FAQs: Canned Beans

    Does the nutrition vary in canned beans versus dried beans cooked immediately for use?

    No! Whether you pick up a can and pop the top to enjoy a serving of canned black beans or pressure cook your dry beans and do the same, the nutrition will not differ.

    The only slight variation will be in the sodium and seasoning content, depending on what you add to your own cooked beans versus what is in the can of beans you have on hand.

    I have a hard time eating vegetables. Do canned beans really count as a vegetable?

    Yes, they certainly do! The United States Department of Agriculture (USDA) actually classifies beans as a subgroup of the vegetable group as well as a part of the protein foods group. This means canned beans actually deliver two times the nutritional punch!

    Plus, because there is no standard definition of what a “plant-based diet” entails, this way of eating doesn’t require my fellow carnivore loving friends to nix their meat all together. Rather, it embraces allowing all foods that fit into a healthy dietary pattern to be enjoyed based on individual preferences and budgets, as well as dietary needs.

    I know this can seem confusing, so the way I always paint this picture for my clients is using the “center of the plate” analogy. You want your plant-forward menu items, like canned beans, to be in the center of your plate while adding your favorite animal proteins, like meats, as a fun side or topping. Just checkout the variety of easy and delicious recipes below with canned beans to get your creative juices flowing!

    Is BPA (bisphenol A) still used in can linings?

    No! According to the Can Manufacturers Institute, the industry has transitioned away from BPA, and today 95% of canned food manufacturers use linings made from acrylic, polyester, non-BPA epoxies or olefin polymers.

    These new, innovative linings were developed to respond to consumer preferences and have proven to be safe and effective. They are approved by regulatory authorities.

    Other Easy Recipes Featuring Canned Beans

    • Sweet Hummus Recipe
    • Sweet Potato Black Bean Burgers
    • Instant Pot Pumpkin Chili
    • Chickpea Cookie Dough

    For more information and delicious recipes featuring canned beans, be sure to visit CannedBeans.org!

    If you try this recipe, would you please do me a favor and leave a star rating in the recipe box and/or comment below! This helps immensely in Google to continue delivering high quality content to you. And please be sure to tag and share what you made with me on social, I love seeing your creations! You can find me here: Instagram – Facebook – Pinterest!

    Image of red dip in bowl with cucumbers and pita around.
    Print Recipe
    5 from 2 votes

    Sun-Dried Tomato Hummus

    Looking for the perfect recipe that can work as an appetizer, snack, or main meal? Then this Sun-Dried Tomato Hummus is just what you need in your life! Made with a few simple ingredients, like canned beans, this is hands down the easiest Sun-Dried Tomato Hummus you’ll ever make.
    Prep Time5 minutes mins
    Cook Time0 minutes mins
    0 minutes mins
    Total Time5 minutes mins
    Course: Appetizer
    Cuisine: American
    Diet: Diabetic, Gluten Free, Low Fat, Low Lactose, Vegan, Vegetarian
    Servings: 10 servings
    Calories: 121kcal
    Author: Liz Shaw

    Equipment

    • Food processor, blender

    Ingredients

    • 15.5 ounce can of chickpeas rinsed and drained
    • 1/2 cup sun-dried tomatoes in oil drained
    • 3 tablespoons extra virgin olive oil or sun-dried tomato oil from jar
    • 1 tablespoon water optional
    • 1 teaspoon lemon juice optional
    • cucumbers sliced, optional
    • whole-grain pita optional
    • plant-based milk optional
    • cooked pasta optional

    Instructions

    • Toss all ingredients into a high-powered blender or food processor. Process until smooth, about two to three minutes, scrapping down the sides as needed.
      Serve immediately as a dip, and/or store in an airtight container in the refrigerator and use within 3 to 5 days.
    • To make a pasta sauce: Add 2-3 tablespoons of milk of choice and toss with your preferred cooked pasta.

    Notes

    • Spend the time to really drain the water from the canned garbanzo beans after you rinse them. This helps to ensure you don’t have an excess amount of liquid going into the recipe! If needed, gently pat them dry with a paper towel or clean kitchen towel.
    • Don’t have time to measure out the sun-dried tomatoes and oil? No problem! It’s pretty hard to mess this recipe up, so feel free to pour about ¾ of the 7-ounce container of the sun-dried tomatoes and almost all the oil into your blender. The flavor will be there but you’ll save yourself a few dishes! Store the remaining sun-dried tomatoes from the jar in the refrigerator and use as an extra topping on the flatbread or pasta you whip up!
    • On the same note, if you can’t find the sun-dried tomatoes in oil, but found sun-dried tomatoes and have olive oil on hand, you can still make this recipe. Simply use about ½ cup of the sun-dried tomatoes and soak them in roughly 4 tablespoons of extra-virgin olive oil overnight (this helps them have the time to really soak up the oil) with 1 teaspoon of Italian seasoning. Toss this mixture into the blender with your canned garbanzo beans, adding 1 tablespoon or so more of oil and 1 tablespoon of water to reach desired consistency.

    Nutrition

    Calories: 121kcal | Carbohydrates: 13g | Protein: 4g | Fat: 6g | Saturated Fat: 1g | Polyunsaturated Fat: 1g | Monounsaturated Fat: 4g | Sodium: 18mg | Potassium: 215mg | Fiber: 4g | Sugar: 2g | Vitamin A: 83IU | Vitamin C: 6mg | Calcium: 24mg | Iron: 1mg

    Want more Shaw Kitchen recipes? Then sign up here for my 5 Day Stress-Free Meal Plan delivered straight to your inbox!

    Instant Pot Jam with Cranberries

    November 3, 2021

    White backdrop with instant pot cranberry jam styled.

    Grab your berries and hit the kitchen with your pressure cooker to make the easiest Instant Pot Jam ever! Filled with fresh cranberries and chia seeds, this simple jam recipe is a wonderful addition to your breakfast bowl or sweet treats! Switch it up with whatever seasonal berry you have on hand and make it year round. Trust me, if you’ve got 10 minutes, you’ve got time to make this jam!

    White backdrop with instant pot cranberry jam styled.

    You’ve tried cranberry sauce, but how about cranberry jam?

    It’s got a bit more ZING than my Homemade Fig Jam, making it a perfect addition to your morning bowl of oats, slathered on Mini Bagels, or nestled in between pie crust for a simple holiday cookie!

    Why You’ll Love this Instant Pot Jam Recipe

    • It’s SO silly easy to make!
    • It’s versatile, swap in your seasonal berry of choice!
    • It’s time efficient (and uses minimal dishes!)
    • Can easily be canned and stored if you decide to make a larger batch!

    What You Need to Make This Cranberry Chia Jam

    White marble backdrop with cranberry jam ingredients in tiny bowls.

    Cranberries: While this recipe uses fresh cranberries, you can also use frozen cranberries. To account for the extra moisture in the frozen, simply adjust your fruit juice portion by 1-2 TBSP.

    Chia Seeds: This is a heart-healthy addition thanks to the omega-3s it contains! But, it’s also a wonderful natural thickener, helping create that thick, spreadable jam!

    100% Fruit Juice: I like to use a 100% pomegranate juice in this, but you could also use a 100% apple juice too! Personally, I prefer to use an alternative berry other than the cranberry since they offer a little more of a natural sweet taste. Just be sure you choose a juice that is 100% fruit to avoid additional added sugar.

    Sugar: Date sugar is my favorite (and what I usually use in this recipe!) But, you can also try cane sugar or maple syrup.

    Vanilla Extract: Pure or the imitation, it really doesn’t matter!

    Salt: I like to use table salt (hello iodine addition), but use whatever you have on hand.

    How To Make this Recipe for Instant Pot Cranberry Jam

    Literally, making delicious, homemade jam has never been so easy!

    Three image collage of cranberries for Instant pot jam.

    I recommend to release pressure naturally for 5 minutes before using the quick release function on the Instant Pot to really ensure a tougher berry, like cranberries, are cooked down. For a softer berry, like strawberries or blueberries, you could do a quick release right away to save time!

    Three image collage for how to make instant pot jam.

    Once you add those chia seeds, be sure to store it in an airtight container in your fridge and use within 10 days! Trust me, with about 20 servings in this batch, you’ll easily go through it when you have your entire family enjoying this beauty!

    White backdrop with instant pot cranberry jam styled.

    Recipes Notes + Tips

    If you’re still fairly new to using your Instant Pot, keep these tips in mind!

    • Use a spatula to mix the berries and liquid, sugar, salt, and vanilla together before pressure cooking. This will help prevent the burn message from appearing, especially if you are using frozen berries.
    • Secure the vent to sealing and make sure the inner seals on the lid are tight. If they are loose, the pressure will escape and take longer to heat potentially causing a burn message to appear.
    • The metal pot will be hot when you begin to mash the berries after heating. If you feel more comfortable (and/or making this with kids), transfer to an alternative bowl to mash.

    Don’t forget, I’ve got an entire arsenal of tips too on how to cook with your Instant Pot in my book!

    Now, keep these general recipe tips in mind too as you prepare this jam!

    • Fresh Berries: If using fresh berries, pat dry the berries to make sure there is not extra moisture going into the pot!
    • Frozen Fruit: If using frozen, reduce the 100% fruit juice addition by about 1-2 TBSP.
    • Storage: Boil a mason jar and let air dry. Pour jam into mason jar and keep in the refrigerator and use within 3 weeks.
    Instant_Pot_Jam_with_Cranberries_and_Chia_Seeds

    How to Serve this Instant Pot Jam For a Fun Holiday Spread

    This recipe is SO pretty and festive, you can simply put it out in a serving bowl and top with some rosemary sprigs and fresh cranberries to serve alongside a goat cheese log on a charcuterie board!

    And, of course, you can top your breakfast toast but I prefer to take it up a notch for holiday guests and top your yogurt of choice with a nice dollop! Then, of course, add some texture and toss with pumpkin and sunflower seeds, and more dried cranberries! YUM!

    Instant_Pot_Jam_with_Cranberries_and_Chia_Seeds-On_Yogurt

    Recipes That Taste Great with This Cranberry Jam

    Branch out of your traditional toast or yogurt and grab a spoon of this Instant Pot Jam with Cranberries to enjoy with one of these Shaw Kitchen favorites! My favorite combo is the slight tartness from the jam paired with the sweetness of sweet potato, like in my vegan pancakes!

    • Image of sweet potato pancakes.
      Vegan Sweet Potato Pancakes
    • Microwave Cornbread Muffin
      Microwave Cornbread Muffin
    • Picture of white plate with stack of brown sugar pancakes with two slabs of butter on top and a gold fork with syrup on the side.
      Brown Sugar Pancakes
    • Image of 3 sweet potato breakfast parfaits lined up in a row.
      Sweet Potato Breakfast Parfait

    If you try this recipe, would you please do me a favor and leave a star rating in the recipe box and/or comment below! This helps immensely in Google to continue delivering high quality content to you. And please be sure to tag and share what you made with me on social, I love seeing your creations! You can find me here: Instagram – Facebook – Pinterest!

    White backdrop with instant pot cranberry jam styled.
    Print Recipe
    5 from 3 votes

    Instant Pot Jam with Cranberries

    A little tart, a little sweet, and a whole lotta yum goes into this Instant Pot Jam with Cranberries! Thickened with omega-3 bursting chia seeds, you won't regret slathering this on toast or topping your yogurt with it this season!
    Prep Time2 minutes mins
    Cook Time5 minutes mins
    5 minutes mins
    Total Time12 minutes mins
    Course: Breakfast
    Cuisine: American
    Diet: Diabetic, Vegan
    Servings: 20 servings
    Calories: 26kcal
    Author: Liz Shaw

    Equipment

    • Instant Pot

    Ingredients

    • 3 cups fresh cranberries
    • 1/2 cup 100% fruit juice
    • 1 tbsp vanilla extract
    • 4 tbsp date sugar 3 tbsp cane sugar
    • 1/4 tsp salt
    • 2 tbsp chia seeds

    Instructions

    • Add the cranberries, juice, vanilla, sugar, and salt to the metal pot of the Instant Pot. Mix together, then secure lid and pressure cook for 5 minutes.
    • When cooking completes, allow pressure to naturally release for 5 minutes, then flip the knob to venting to release remaining pressure.
    • Remove lid. Carefully use a pastry blender to mash the cranberries. Continue until all are mashed and desired consistency is reached. If you prefer a thinner, smoother jam, you can toss this portion in a blender as well.
    • Mix in the chia seeds until evenly combined.
    • Boil a mason jar and let air dry. Pour jam into mason jar(s) and keep in the refrigerator for at least 30 minutes to allow chia seeds to absorb some of the jam. Use within 3 weeks.

    Notes

    If you’re still fairly new to using your Instant Pot, keep these tips in mind!
    • Use a spatula to mix the berries and liquid, sugar, salt, and vanilla together before pressure cooking. This will help prevent the burn message from appearing, especially if you are using frozen berries.
    • Secure the vent to sealing and make sure the inner seals on the lid are tight. If they are loose, the pressure will escape and take longer to heat potentially causing a burn message to appear.
    • The metal pot will be hot when you begin to mash the berries after heating. If you feel more comfortable (and/or making this with kids), transfer to an alternative bowl to mash.
    Don’t forget, I’ve got an entire arsenal of tips too on how to cook with your Instant Pot in my book!
    Now, keep these general recipe tips in mind too as you prepare this jam!
    • Fresh Berries: If using fresh berries, pat dry the berries to make sure there is not extra moisture going into the pot!
    • Frozen Fruit: If using frozen, reduce the 100% fruit juice addition by about 1-2 TBSP.
    • Storage: Boil a mason jar and let air dry. Pour jam into mason jar and keep in the refrigerator and use within 3 weeks.

    Nutrition

    Calories: 26kcal | Carbohydrates: 5g | Protein: 1g | Fat: 1g | Saturated Fat: 1g | Polyunsaturated Fat: 1g | Monounsaturated Fat: 1g | Trans Fat: 1g | Sodium: 35mg | Potassium: 25mg | Fiber: 1g | Sugar: 3g | Vitamin A: 10IU | Vitamin C: 2mg | Calcium: 9mg | Iron: 1mg

    Want more Shaw Kitchen recipes? Then sign up here for my 5 Day Stress-Free Meal Plan delivered straight to your inbox!

    Baby Allergy Testing: What to Expect When You Test For Food Allergies

    September 29, 2021

    White backdrop with allergen foods on it.

    If you’re little one is experiencing reactions to foods after introduction of solids, I am so sorry. I know the real fear and anxiety you’re likely feeling as a parent, but rest assured you’re in the right place. This article covers the topic of Baby Allergy Testing highlighting two common allergenic foods, peanuts and cow’s milk, for babies. It covers not only what the science says, but also a registered dietitian mother’s firsthand experience going through the food allergy testing process with her 6 and a half month old baby boy.

    White backdrop with allergen foods on it.

    If you’ve landed on this page, I’m truly sending you the biggest warm hug. I know as a parent how nerve wrecking infant food allergies are. But, rest assured, you’re in good hands because I’m about to walk you through the available science wearing my dietitian hat while showing your first hand as a mother how this process went for my son.

    If you’re tight on time, use this table of contents to select the portion of this post you’d like to jump too. Sending you lot’s of patience and grace as you go through this journey.

    [feast_advanced_jump_to]

    What is a Food Allergy

    A food allergy is when an individual has an immune response after eating a specific food.

    While there are considered now 9 allergenic foods, sesame, the newest addition, soy, wheat, eggs, milk, peanuts, treenuts, fish, and shellfish, there are a few that seem to be more allergenic for babies.

    The top allergens that infants usually react to include:

    • Peanuts
    • Milk (cow’s)
    • Egg
    • Treenuts
    • Soy

    Now, the type of immune system’s response can have a wide range of symptoms, from mild to severe.

    Mild symptoms of a food allergy reaction can include:

    • Itching, skin rashes and hives, swelling of the lips, face, tongue, wheezing, congestion, nausea, vomiting, and/or diarrhea.

    More severe symptoms that involve anaphylaxis, a life-threatening condition, include:

    • Construction of the airways, difficulty breathing, increased heart-rate, low blood pressure, and/or dizziness or light headedness.

    While these symptoms aren’t exhaustive and can be more intense in one individual over another, they are common when it comes to food allergies and important to pay attention too.

    Risk Factors for Infant Food Allergies

    Research shows that there are three situations in particular that can actually increase the potential for an infant developing a food allergy

    Skin Conditions: Eczema or Dermatitis

    While having a skin condition like eczema or dermatitis doesn’t automatically mean your child will have a food allergy, research does show kids with these conditions are more likely to have a food allergy. Approximately 27% of children with food allergy had reported eczema or skin allergy, compared with 8% of children without food allergy.

    Family History of Siblings with Food Allergies

    Research shows that infants who have a sibling with a food allergy may be at a higher risk for developing a food allergy. According to the results of this study, 13.6% of infants born to a family with a sibling that has a food allergy also were clinically reactive to a food.

    These results found that milk allergy was the most common allergy among siblings (5.9%), followed by egg allergy (4.4%) and peanut allergy (3.7%).

    Gender and Ethnicity

    Research has found food allergies tend to be higher in children, non-Hispanic blacks, and males.

    Indications for Testing a Baby For Food Allergies

    If you’re child has any of the risk factors listed above coupled with any signs or symptoms of experiencing an allergic reaction after consuming foods, then it’s a good idea to speak with your pediatrician about food allergy testing.

    In my personal experience, my son, other than being male, had no risk factors setting him at higher risk for developing a food allergy.

    However, after introducing him to solids at around 5 months with no signs or symptoms of an allergy developing, he began to break out in hives. It was approximately 4 weeks into his solid journey that we noticed the below rash develop after he ate Greek yogurt (made from cow’s milk) and peanuts.

    Image of baby with hives from an allergic reaction.

    This reaction occurred twice over the weekend and thankfully we were already scheduled for his 6-month appointment early Monday morning, so I took these photos into the doctor to see what she recommended we do.

    The below photo is another skin reaction he experienced after his sister, my three year old toddler, had a cow’s milk smoothie then kissed him.

    Section separator discussing hives or rashes for food allergies with baby face.

    While both of these reactions were baffling to me, especially after he had tolerated both foods for over a month with at least a dozen introductions without problems, I’ve quickly learned that the dosing and frequency with allergenic foods is very important, even when your child may not necessarily be at higher risk for developing a food allergy.

    Don’t worry if you’re a little confused here as well, I’ll dive into this a bit more below.

    How Allergy Testing in Babies is Done

    After you consult with your pediatrician, they will more often than not send you to an allergist trained in pediatrics to begin the evaluation period.

    There are a few different options for testing for food allergies, including the skin prick test, a blood test, an oral food challenge test, and an elimination diet.

    The skin prick test (SPT) and blood test help identify if your body has an immune mediated reaction to the protein found in a specific food and an antibody known as Ig-E (immunoglobulin-E).

    However, just because your child may experience a reaction to the skin prick test when exposed to the potentially allergenic food or tests positive for the Ig-E antibody in their blood, this does not necessarily mean they have a food allergy. Skin prick tests and blood tests both experience a 50-60% false positive result. Let’s jump into now what each different test looks like.

    Skin Prick Testing

    The skin prick test involves using a small amount of the suspected allergenic food (or environmental allergen) and applying that to the skin to evaluate how the body responds to its presence. The SPT is minimally invasive (it’s sort of like a small fingernail scratch on the skin), inexpensive, and yields immediate results.

    Depending on your allergist protocol, they will often have a control known as a histamine placed at the top of the back to use as a benchmark for the other suspects under question.

    The photo below of my son when he underwent his first skin prick test with the 8 foods he had been exposed to over the weekend when he had his first reaction (which included the cow’s milk and peanut allergens.)

    Skin prick test image with a child reacting positive for food allergies.

    After the allergenic food is applied, the patient needs to still still for 15 minutes before results can be read to evaluate the Ig-E reaction.

    Parents who are trying to get this test done solo while having your baby sit still, you deserve a giant latte after this!

    Having gone through this myself for my own environmental allergies and experiencing the constant itching I felt in the course of that time span I was very worried with how my son would respond.

    While it wasn’t easy keeping him still in a tiny 6×6-ft mini room, we prevailed by bouncing him on my knee to prevent his back from rubbing against anything and playing with the stroller ball covered in ribbons. I highly encourage you to have a toy or something attached to your stroller that you can use for entertainment during this test!

    Our Results: SPT

    The results of the SPT are immediate as I mentioned. When you leave your doctors office, not only will you visibly be able to see what your child reacted too, but you will have access to test results like these.

    Skin Test Results for Baby Food Allergies

    Blood Test for IG-E Antibodies

    The blood test for food allergies is “simply” a blood test that takes a few days to get results. I say “simply” in a sarcastic tone, because while this is a standard blood draw for an adult, for an infant, it’s very traumatic (or maybe more for the mom, TBD.)

    Nonetheless, you have to pin your infant down while the phlebotomist takes two tubes of blood for testing. Given my track record of rolling veins, my son too had his “disappear” which resulted in the lab tech having to prick him in each arm and “dig around” with the needle until they finally located a vein to get the blood out of.

    While the photo below is clearly before this experience happened, I will say he did sleep very well after this (likely due to the trauma of it for us all!)

    Page separator with title for blood test for food allergy testing.

    Results: Blood Test

    It took approximately 6 business days to get the results (included below) for the blood test to identify which foods he also was experiencing the Ig-E antibody production too. Since there are a few different options available for the blood tests, it’s best to discuss them with your doctor (as with anything) before consulting Dr. Google!

    Baby Food Allergy Testing Information -Blood Test Results

    It’s important to note that while these results indicated my son was allergic to both peanuts and milk, the higher result for the milk in comparison to the peanut does not necessarily mean he is “more severely” allergic to milk.

    Rather, this just means he is in fact experiencing an Ig-E mediated reaction that should warrant a discussion about scheduling an OFC.

    False-Positive Food Allergy Results – What This Means

    As I mentioned above, there is a 50-60% change that the SPT and blood test can yield a positive result when in fact the individual is not allergic to that food. This usually occurs for two reasons:

    1. The individual’s digestive system acts on breaking down the protein enough from the food that it is no longer consider a threat and thus the body does not react to it.
    2. The individual is allergic to a similar food in the same family but the true allergenic food has yet to be identified. For instance, if the test indicates an allergy to cashews but you child is able to tolerate them, they may be allergic another tree nut in the family, such as almonds.

    Depending on the results and the professional opinion of your allergist, they will typically move forward with recommending proceeding with another test option.

    Oral Food Challenge Test

    The oral food challenge (OFC) test is the most time intensive of all tests. Under the supervision of your allergist, your child will receive increasing doses of an allergenic food while be closely monitored for signs and symptoms.

    You will be given specific instructions on the type of food to bring for testing depending on the allergen they are going to be evaluating. Some facilities will even have a specific recipe you will need to prepare to bring in for baked egg or milk challenges.

    Page separator with title for oral challenge test for food allergy testing.

    After your child consumes the food in increasing increments (usually 15 to 20 minutes) over an hour, the medical team will evaluate them for any signs or symptoms of an allergic reaction. If they experience anything significant, you medical team will be there to provide assistance and stop the test if needed.

    Depending on the allergenic food, the OFC is used to help figure out if a a level of “safe exposure” can be offered at home to help the child outgrow a food allergy.

    A standard OFC will generally yield accurate results, but the symptoms can also be delayed. For this reason, the OFC regulations require patients stay at least 2-3 hours minimum after the last food is tested to monitor for reactions.

    For a deeper dive into the OFC research, I recommend taking a look at this 2019 study.

    Results of OFC

    While the method and record keeping may differ slightly amongst providers, here is a sample of both the peanut and baked milk OFC’s my son underwent.

    Peanut OFC

    For this challenge, we brought in powdered peanut butter and an unsweetened applesauce and breastmilk to serve it with. This was very easily tolerated with my 6.5 month old and easy to serve him. If I had brought in Bamba, the peanut puff snack, he would have had to eat 21 sticks to receive the level of protein exposure to perform the test which would have been very challenging for his age and size.

    Baby Food Allergy Testing Information -Oral Food Test

    While my son did not react in the doctors office to the peanut powder, he has since reacted with a few mild rashes at home upon giving him other forms of peanuts. We are discussing now with our doctor how to proceed, but it appears to only be topical and non-irritating.

    Though this is alarming as a parent, I do want to continue with the safe level of oral food protein exposure at home so we can hopefully fully outgrow his reactions one day. We do have an epipen now and are in communication with our allergist to ensure we continue to do exposure safely.

    Baked Milk OFC

    For this challenge, we modified the facility preferred baked milk muffin recipe we were given by swapping out the added sugar since technically babies under 2 years of age should not be given added sugar.

    I used about 70% less of a date sugar in the recipe to provide a small amount of sweetness, and then brought with me breastmilk to soften the muffin with so he could actually eat it with a spoon in a more appropriate texture for his age.

    Baby Food Allergy Testing Information -Oral Food Test (1)

    About an hour or so after my son had three exposures to the muffin, he began to develop hives on his body and then had a bout of diarrhea. This was indicative he has a confirmed allergic reaction to cow’s milk.

    For now, we are refraining from offering any form of cow’s milk, baked or in it’s natural state, in his diet. Since he is breastfed, I have also modified my own diet to refrain from dairy at this time due to the allergists recommendations. Though my son was not in pain nor experiencing any diarrhea or hives after nursing when I was still eating cow’s milk dairy items, I did notice the amount of vomit after his feeds goes down when I do not have dairy in my diet. This is still not confirmed if it was the dairy in my diet, or my strong letdown reflux.

    Nothing can be that black-and-white I’m finding when it comes to your kids, right?!

    Now, there may be ways to safely incorporate milk into a nursing mothers’ diet through working with a trained dietitian in food allergies. The research is continually evolving on the intersection of what amount is passed from mother to baby through breastmilk, but of course there are multiple factors at play that effect this (i.e. genetics, digestion, etc.)

    You should always consult with your child’s allergist and follow their recommendations.

    Elimination Diets

    An elimination diet is just what it sounds like! You would eliminate the food in question for 2 to 4 weeks under the guidance of your doctor (and hopefully dietitian!)

    While elimination diets offer an opportunity to see if a particular food is causing the symptoms your child is experiencing, professionally I do not find that these sorts of diets work well with the younger population as far as truly understanding the food(s) causing the reaction.

    This is largely in part of that fact that if the reaction is in the gut and causing symptoms that the person would need to communicate (i.e. an upset stomach, pain, etc.) the infant or small child may not be able to.

    Personally, this is also not something I’d want to pursue with my infant until I knew for certain the results of some of the other forms of testing mentioned above because I would want to ensure I knew for certain if the reaction was Ig-E mediated and the true response to consumption of the food. This data would help one understand if they needed to have an epipen prescription.

    As always, discuss with your child’s team the best plan for their particular situation.

    Understanding Pediatric Food Allergy Prevention Recommendations

    Current recommendations are vastly different from what our parents likely were taught when most of us started solids (i.e. refrain from introducing the top food allergens to infants until they are at least one year of age).

    Instead, the recent studies that indicate early introduction is powerful in helping to prevent food allergy development.

    It’s important to work with your pediatrician if your child has any of the risk factors mentioned above when introducing the top food allergens in their diet.

    If your child (like mine) does not have any of the risk factors placing them at a higher risk for a food allergy, it’s important to follow the research recommendations that suggest introducing foods, like peanuts and egg, early and often can help prevent the development of a food allergy later in life.

    There is a wonderful website, BabysFirst.org, produced by the Food Allergy Research and Education Organization (FARE) that helps parents with starting solids with the allergenic foods.

    Solid Food Introduction Recommendations

    For peanuts specifically, there is research that shows introducing peanuts at least 3 times a week in 2 gram doses (about 1.5 teaspoons of peanut powder or 21 Bamba) can reduce the risk of your child developing a peanut food allergy.

    While there are no specific amounts for the other allergenic foods, it’s important to remember continual, gradual exposure is key.

    However, remember, this is for low risk infants. Consider the following tips regardless of your child’s risk factor as you explore introducing the 9 top allergenic foods into their diets.

    Tips to Remember with Food Allergen Solids Introduction

    • Serve at home where you can be present and aware of your child’s response.
    • Only offer one new food at once until you can monitor their response. Then you can offer combination foods after you’ve ruled out an allergen.
    • Monitor your child closely.
    • Start small and slow, gradually increasing dosage to meet recommendations.

    Where to Get More Information on Pediatric Food Allergies

    • Sign up for the Food Allergy Research and Education newsletter and consult their website! It’s filled with wonderful information.
    • If you’re a healthcare professional, consider watching this great webinar, “Food Allergy vs Food Intolerance”, by a fellow RDN!
    • Consider working with a dietitian trained in food allergies. Three wonderful colleagues I have are Sherry Coleman Collins, The Lifestyle Dietitian, and Healthy Mom Healthy Kids!

    Thanks so much for stopping by! If you enjoyed this post, please consider sharing it with a friend and tagging me on social: Facebook, Instagram, or Pinterest.

    Intermittent Fasting 101 Guide

    September 21, 2021

    Image of clock with fork and spoon for a blog discussing intermittent fasting.

    Finding the right nutrition plan can be a win to improve your mood, your energy levels and many facets of your health. Intermittent fasting is a tool that many individuals are finding to be a winning strategy. If you are considering trying an intermittent fasting schedule, find out more about its benefits and who it might be especially great for in this Intermittent Fasting 101 Guide.

    Image of clock with fork and spoon for a blog discussing intermittent fasting.

    Many of us may think of fasting as a strict limit on food and/or drink related to holiday rituals, weight loss, or “gut cleanses”. These examples often involve many days of limitation that result in intense responses in our body. There are ways to fast without it being so intense that can have positive effects on health. In fact, intermittent fasting can be a way of helping us manage blood sugars, improve our sleep and boost the immune system. While we’ve chatted before about  intermittent fasting for athletes in this post, today we’re going to dive into this topic a bit further for the general public.

    What is Intermittent Fasting?

    Intermittent fasting (IF) is an eating pattern that relies on limiting the times during which one eats as opposed to limiting the amount that one eats. There are many different versions of this style of diet which you can read more about here. Consider these along with your diet goals if you are looking to try IF; one style may work better with your natural eating patterns or your work/home schedule.

    • Complete alternate day fasting utilizes one day of normal food intake followed by one day of no food intake.
    • 5:2 Regimen has normal eating for 5 days with 2 days (up to 48 hours) of fasting
    • Time restricted feeding, or circadian rhythm fasting, limits food consumption to a period of 4 to 8 hours every day.

    There are variations on each method and others not listed here, but these are the general structures that have been utilized in the studies that we talk about in this post.

    What are the benefits of fasting?

    The switch to ketone utilization and change in hunger signals that result from IF can aid with managing blood sugars, improving sleep and supporting the immune system. This fasting schedule can be an alternative to food restriction. Depending on the type of food eaten with the fasting schedule, it can shorten periods of high blood glucose levels or eliminate them altogether. With these short fasts, the type of fuel used by many cells in your body changes as well, so not as much glucose is needed for energy. Besides being better for our cells, it can make losing weight easier, minimize food cravings and improve food choices. Curious how IF can do all of this? Keep reading!

    What happens in our bodies during IF?

    When we fast, we rely on our body’s own energy stores: fat. As we pull from this reserve, our liver starts producing a fuel source called ketones, which is usable by almost all of the cells in our body. Ketones do not impact blood sugar levels and also do not have many of the same consequences that high blood glucose levels can. To some degree, relying more on ketones for energy may be healthier.

    During fasts, we may initially feel hungry, but that is simply a signal from our stomach saying, “Hey! I’m empty!” As the fast continues and ketones start to fuel our cells, that signal is replaced by different signals that tell our brain we have a fuel supply available. The more that we stick to a routine with our eating habits, the more our brain’s signals become regular as well. It may seem counter-intuitive, but as we get used to an IF schedule, our bodies start to expect food only during certain hours and we have fewer feelings of hunger outside those hours.

    How does IF help manage blood glucose levels?

    Maintaining a healthy weight and healthy blood markers is a struggle for many of us. When we consume food, the different nutrients enter our blood and circulate to our cells to provide fuel. Having a sufficient supply of this fuel is important but having too much in the blood can cause stress on certain organs, especially the pancreas, liver and heart. The pancreas and liver both help to supply and regulate the right fuel for all our different cells. When they have more fuel to manage from the diet, they work harder. Over time, this hard work can cause wear and tear on these organs and they may start to fail. This is one cause of Diabetes – damage or failure of the pancreatic cells. Our pancreas is especially important in managing a fuel called glucose that comes from carbohydrates in our diet.

    Blood glucose levels, often referred to as blood sugar, are a common marker of how well our cells are using and storing this fuel. When high amounts of glucose stay in the blood, rather than enter the cells, it can affect how much oxygen our blood carries from the lungs. Sometimes this means the heart works harder to get oxygen to all the tissues in the body. High blood glucose can also prevent our cells from having protection against unwanted entry of invaders and toxins. When there is too much glucose in the blood, it also causes an increase in fat storage and which usually goes alongside weight gain. All of these are downsides to having too much glucose in the blood and can lead to more complicated diseases including diabetes, hypertension and heart disease.

    Blood glucose levels are impacted most by carbohydrates in foods: breads, grains, fruits and added sugars. There are a few different popular diets that help manage carbohydrate intake including low carb and ketogenic. If you are curious about these diets, take a look at our previous post to see if they might be right for you. For many, these restrictions can be challenging! IF can support utilization of ketones and serve as an alternative to restricting foods. Any of the IF schedules mentioned have evidence supporting their benefits in helping to maintain steady blood glucose levels in different individuals.

    How does IF supporting Immune System?

    When blood glucose levels are high on a regular basis, there is an increase in inflammation in cells, tissues and organs across the body. Inflammation refers to a part of the immune system that helps to protect us from invaders and toxins. When alot inflammation is present, these same protective forces start to work against our cells and immune system and damage our own tissues. It is important than we eat nutrients (antioxidants) and maintain a diet that helps to manage inflammation.

    Not only does IF help with keeping blood glucose levels more steady, it also produces ketones that can help to reduce inflammation! Ketones (beta-hydroxybutyrate) seem to help with turning off some of the cells’ inflammatory response and with calming the immune system. This is especially helpful for those who already have inflammatory diseases and who are sensitive to allergies. There are even studies starting to look at the benefits of IF for those with Type II Diabetes. While all of the methods of IF seem to help lessen inflammation, longer fasts have greater benefit; the 5:2 method may be the best to choose if this is the top reason you are considering IF.

    How does IF Improve Sleep?

    Maintaining more steady blood glucose levels during fasting can also help with maintaining mental focus during waking hours. Limiting the ups and downs in blood sugar can also mean we can settle into a deeper sleep at night. Following an eating schedule also helps keep the hormones that control sleep. In addition, it can help us stick to a routine which is especially good for the hormones and signals that control our daily activities. The circadian rhythm method of IF may be most recommended if this is your main focus.

    Who should not consider fasting?

    Despite the varied benefits of IF, it may not be a healthy option for certain individuals. More information about this is shared in a previous post.  The Academy of Nutrition and Dietetics does not recommend energy restriction in children and pregnant or breastfeeding mothers so it does not interfere with growth and development needs. Elderly, individuals with an eating disorders and individuals with body dysmorphic disorders should also be cautious with starting a fasting schedule. These populations may struggle with nutrient deficiencies or hypoglycemia and not enough evidence is available to demonstrate a benefit for these groups.

    What can I eat while Fasting?

    IF mainly refers to the eating schedule; however, some foods may be helpful with fasts to help reduce hunger, maintain feelings of fullness, and provide adequate vitamins and minerals. While it is not necessary to reduce carbohydrates to gain the effects of IF, eating your carbs toward the middle of your eating window can help to prolong the effects of the fast. For example, breaking your fast with an egg and vegetable omelet or frittata instead of a bagel means your blood glucose levels will stay lower longer. Also, including vegetables with your snacks and meals is also a great way to ensure that you are consuming adequate vitamins and minerals. Here are is a mushroom bruschetta, beet salad and a vegan coleslaw that are tasty choices.

    Consuming healthy fats (avocado, vegetable oils, nuts and seeds) can help with feeling full and also help maintain the production of ketones. Many of these fats, especially Omega 3 fatty acids found in nuts, seeds and fish, also seem to also help in reducing inflammation. So many great reasons to make these fats part of your daily intake! Try consuming nut and seed bars or spiced nut mix as snacks, adding some cheese to your omelet or mixing some healthy oil into your veggie dishes. This link has some additional yummy snack options including avocados. And for a sweeter treat, try these almond butter protein bars.

    One other eating strategy with IF is having smaller meals and snacks more frequently during your eating window. Maintaining a lower glycemic index, with smaller meals and higher fiber content, will have a smaller impact on blood sugar levels than fewer larger meals will. There are lots of great suggestions for salads, snacks and lighter meals in the recipe section of this site.

    Where do I begin with IF?

    Any time that you change diets, it is ideal to consult with a Registered Dietitian (RDN) for help with your bodies specific needs and to ensure you are getting all your proper nutrients. The first steps will be to record your current eating habits and schedule and decide what type of IF and what timeline works best for your body and your habits. Then you can discuss any modifications to foods to ensure you are getting all your calories during your eating window.

    It will take your body anywhere from a few days to a week to fully adjust to the new routine, so be patient. Try to stick with your plan for at least a week before considering changes. Make small changes and only one or two at a time until you can find the right foods and schedule that feel great. If one version of IF doesn’t work for you, there are so many variations available to try.


    Thanks so much for stopping by! If you enjoyed this post, please consider sharing it with a friend and tagging me on social: Facebook, Instagram, or Pinterest.

    This post was written by Dr. Melissa A Murphy, PhD, a dietetic intern in rotation with Shaw Simple Swaps.

    Dr. Murphy has a PhD in Nutritional Science, is an AFAA certified personal trainer and is currently completing her dietetic licensing requirements. She teaches nutrition and basic sciences at Bastyr University and has a background in community nutrition, food service and clinical nutrition research. Her nutrition practice is supported by science-based research, naturopathic medicine ideals and ayurvedic/eastern medicine.

    Want more Shaw Kitchen recipes? Then sign up here for my 5 Day Stress-Free Meal Plan delivered straight to your inbox!


    Healthy Pumpkin Bread with Chocolate Chunks

    September 20, 2021

    Three slices of pumpkin bread stacked on a piece of brown paper.

    Healthy Pumpkin Bread with Chocolate Chunks is a delicious, nutritious, and SUPER easy recipe to make for your entire family to enjoy. Low in sugar and high in fiber,  it’s a sweet treat you’ll feel great after eating!

    Three slices of pumpkin bread stacked on a piece of brown paper.
    Healthy Pumpkin Bread with Chocolate Chunks

    Why Should You make pumpkin bread?

    • It screams comfort! There’s no question that pumpkin bread can be enjoyed year round, though it’s especially delicious in the fall when you’re ready to cozy up with a blanket.
    • It’s nutritious and delicious! This recipe is packed with canned pumpkin (you’d be surprised how many baked pumpkin products actually contain little to no pumpkin) and has less than 10 grams of added sugar per serving!
    • It’s dairy-free! Yep, this beauty is perfect for those who can’t do dairy to enjoy!

    What You Need to Make This Healthy Pumpkin Spice Bread

    Ingredients to make pumpkin bread laid out.
    Healthy Pumpkin Bread with Chocolate Chunks is a delicious, nutritious, and SUPER easy recipe to make for your entire family to enjoy. Low in sugar and high in fiber,  it’s a sweet treat you’ll feel great after eating!
    • Applesauce + Pumpkin Puree: Use no added sugar varieties for both of these. This helps keep the total added sugar down for the bread and frankly just tastes better.
    • Brown Sugar: You can use dark or light brown sugar in here, but I actually prefer to use date sugar! I’ve made it a few different ways and this was my favorite. Other readers have said coconut sugar worked well but gave it a fun coconut-ty taste!
    • Chocolate Chunks: You don’t need to necessarily purchase a higher priced vegan chocolate chunk to keep this dairy free. Store bought brands if you check the ingredients often have no milk in the ingredient if you purchase the darker (or semi-sweet) varieties.
    Three slices of pumpkin bread stacked on a piece of brown paper.

    How to Make This Pumpkin Bread

    Process shots to make pumpkin bread.
    Process shots to make pumpkin bread.

    Let cool 10 minutes then use a serrated knife to slice!

    Sliced pumpkin bread on cutting board.

    Recipes Notes

    Ever since I made those Whole Wheat Chocolate Chip Muffins and many of you asked for modifications, I knew I had to make sure to include some options here!

    • Gluten Free: I’ve tried this recipe using an all purpose gluten free baking mix (like Bob’s Red Mill) and it turned out great. If you like these cookies, you’ll like this bread made similarly!
    • Egg Free: You can also use a flax egg to sub in for the large eggs, however the taste is modified slightly.
    • Dairy Free: This recipe is naturally dairy free when you use a dark chocolate chunk made without milk, however if you don’t typically look at the ingredients just double check to make sure no milk is listed!
    Close up of stacked chocolate bread with pumpkin.

    Is this considered a healthy breakfast bread?

    Absolutely! You’ll notice below when you checkout the recipe this healthy pumpkin bread, even with the chocolate chunks, is very low in added sugar.

    Natural sources of sugar pack more nutrients that added sugar and make a great addition to baked goods.

    My favorites are applesauce and pumpkin puree (okay and bananas and prunes) that work wonderfully in a variety of recipes like this healthy pumpkin bread!

    And, of course, dark chocolate is packed with flavonoids and pumpkin seeds pack a punch of vitamin E plus a lovely crunch (and color!)

    Close up of stacked chocolate bread with pumpkin.

    Other Healthy Pumpkin Recipes You May Enjoy

    • Image of pumpkin breakfast cookies with milk.
      Pumpkin Breakfast Cookies
    • Image of muffins in the tin.
      Gluten Free Pumpkin Muffins
    • Pumpkin Pie Spiced Nuts - The perfect taste of Turkey Day and Pie that's filled with fiber, protein and love! #ad @shawsimpleswaps
      Pumpkin Pie Spiced Nuts
    • Chocolate Chip Pumpkin Cookies

    If you try this recipe, would you please do me a favor and leave a star rating in the recipe box and/or comment below! This helps immensely in Google to continue delivering high quality content to you. And please be sure to tag and share what you made with me on social, I love seeing your creations! You can find me here: Instagram – Facebook – Pinterest!

    Three slices of pumpkin bread stacked on a piece of brown paper.
    Print Recipe
    4.79 from 14 votes

    Healthy Pumpkin Bread with Chocolate Chunks

    A taste of fall that can be enjoyed morning, noon or night! Healthy Pumpkin Bread is sure to please all guests this holiday season!
    Prep Time10 minutes mins
    Cook Time55 minutes mins
    Total Time1 hour hr 5 minutes mins
    Course: Breakfast
    Cuisine: American
    Diet: Vegetarian
    Servings: 8 slices
    Calories: 239kcal
    Author: Liz Shaw

    Ingredients

    • 1 1/2 cups white whole wheat flour
    • 1 tsp cinnamon
    • 2 tsp pumpkin pie spice
    • 1 tsp baking powder
    • 1/2 tsp baking soda
    • 1/8 teaspoon kosher salt
    • 1/4 cup packed brown sugar or date sugar
    • 1/2 cup applesauce no added sugar
    • 3/4 cup pure pumpkin puree
    • 3 tablespoons canola oil
    • 1 1/2 teaspoons vanilla extract
    • 2 large eggs
    • 1/3 cup dark chocolate chunks
    • 2 tablespoons pumpkin seeds

    Instructions

    • Preheat oven to 375 degrees F.
    • In a medium bowl, combine flour, cinnamon, pumpkin pie spice, baking powder, baking soda and salt. Set aside.
    • In a large bowl, combine sugar, applesauce, pumpkin puree, oil, vanilla extract, and eggs.
    • Fold the dry ingredients into the wet ingredients and stir in the chocolate chunks.
    • Line a 8-inch x 4-inch x 2-inch (or loaf pan on hand) with parchment paper. Spray lightly with cooking spray.
    • Pour batter into pan and sprinkle pumpkin seeds over the top. Set pan on middle rack in oven.
    • Bake for 40 minutes depending on oven, check for doneness by inserting a wooden pick. Top will be lightly browned.
    • Remove from oven and let cool 10 minutes on a wired rack. Slice and enjoy!
    • Store in an airtight container on the counter for 3-5 days, in the fridge for 10 and freeze for up to 3 months.

    Notes

    Ever since I made those Whole Wheat Chocolate Chip Muffins and many of you asked for modifications, I knew I had to make sure to include some options here!
    • Gluten Free: I’ve tried this recipe using an all purpose gluten free baking mix (like Bob’s Red Mill) and it turned out great.
    • Egg Free: You can also use a flax egg to sub in for the large eggs, however the taste is modified slightly.
    • Dairy Free: This recipe is naturally dairy free when you use a dark chocolate chunk made without milk, however if you don’t typically look at the ingredients just double check to make sure no milk is listed!

    Nutrition

    Calories: 239kcal | Carbohydrates: 32g | Protein: 6g | Fat: 11g | Saturated Fat: 3g | Polyunsaturated Fat: 2g | Monounsaturated Fat: 4g | Trans Fat: 1g | Cholesterol: 47mg | Sodium: 135mg | Potassium: 233mg | Fiber: 4g | Sugar: 12g | Vitamin A: 3650IU | Vitamin C: 1mg | Calcium: 86mg | Iron: 2mg

    Want more Shaw Kitchen recipes? Then sign up here for my 5 Day Stress-Free Meal Plan delivered straight to your inbox!

    Do Vaccines Protect Against the Delta Variant?

    August 22, 2021

    A picture of two gloved hands and a vile to dose out a vaccine.

    If you’re looking for an unbiased, science-based review of the evidence, then you’ve come to the right place. This post covers the current (as of August 2021) evidence available regarding the common question, “Do Vaccines Protect Against the Delta Variant?”, while diving into ways to support your immune system through nutrition. To stay abreast on the current information, always refer to the Center for Disease Control and World Health Organization.

    A picture of two gloved hands and a vile to dose out a vaccine.

    This post was written by Dietetic Intern and Masters candidate, Taylor Stein. All information was reviewed by Elizabeth Shaw, MS RDN CPT. This post is for informational purposes only, not to be misconstrued as medical advice.

    Why I’m Writing This Piece as a Registered Dietitian

    Truthfully, this post was written out of our own desires to really understand what is going on when it comes to the science right now concerning the delta variant. With so much misinformation out there, Taylor and I decided we’d like to have a one-stop shop with the latest evidence available as of August 2021 when this post was published.

    Plus, good health and nutrition are intimately tied with immunity and one’s ability to fight off infections.

    Since the pandemic first began, there has been information swirling regarding which supplements or nutraceuticals may be helpful in helping one improve their immune response if infected.

    Our hope as two professionals based in science is that we can help provide you the facts and some solid nutrition tips when it comes to incorporating a wide variety of foods in your diet to support your immune system.

    COVID-19 Mutations and Variants: WYNTK

    During the past 20 months since the pandemic began, there has been concern about how quickly the COVID-19 virus would adapt to its environment.

    These mutations occur with the common cold, influenza, and many other communicable viruses. For example, vaccines for the flu are updated on a yearly basis to provide the best protection from severe illness.

    While we are still learning about the COVID-19 virus, it has quickly become clear that the vaccines available are effective against all variants in circulation.

    More recently, the delta variant has been deemed amongst the media as being the most dangerous. It’s important to note however that being vaccinated still increases the probability of avoiding severe illness, as long as one is vaccinated before being exposed.

    Vaccine Effectiveness: What Statistics Show

    Firstly, let’s quickly review the stats on vaccine effectiveness (how the vaccine performs in real-world observational studies) across the globe, age groups, general population, and healthcare workers or those living in communal settings 11-14 days after second doses:

    • Against SARS-CoV-2 infection, Pfizer-BioNTech & Moderna are 86-99% effective

    • Against hospitalizations, Pfizer-BioNTech & Moderna are 94% effective

    • Against symptomatic disease, Pfizer-BioNTech & Moderna are 85-90% effective

    • Against SARS-CoV-2 infection, Johnson & Johnson/Janssen is 77% effective

    Vaccine effectiveness of against asymptomatic infection 7-11 days after second dose:

    • 65-92% effective, with lower effectiveness for those who work in healthcare settings

    Ultimately, what we can learn from the above information is that the vaccines that have been developed and are available to those over 12 years of age are effective in the real world against infection, hospitalization, and symptomatic disease.

    Some vaccines have higher effectiveness than others, however, any vaccine safeguards one better than no vaccine at all!

    If one has no contraindications, is eligible to be vaccinated, and does so, as discussed, the chances of catching the virus are very low.

    However, breakthrough cases will occur as no vaccine available is 100% effective at ensuring there is no infection (no vaccines have ever been able to achieve 100%).

    What we do know is that:

    • Evidence indicates that vaccination makes illness less severe and fully vaccinated people are much less likely to be hospitalized or die than people with similar risk factors who are not vaccinated. No unusual patterns of breakthrough cases have been determined yet, i.e., no age, gender, ethnicity, etc. groups are at higher or lower risk.

    • If infected, despite vaccination, the virus can still be transmitted to others.

    Known Side Effects of the Vaccines

    Side effects of the vaccine include pain, redness, and swelling at the injection site, as well as tiredness, headache, muscle pain, chills fever, and/or nausea.

    • To reduce injection site symptoms, apply a clean, cool, wet washcloth over the area and utilize your arm to improve circulation. If experiencing fever, drink sufficient fluids and dress lightly to avoid overheating.

    • In a study of healthcare workers who had breakthrough cases (39 infected of 1497 workers tested), most had mild symptoms or were asymptomatic although 19% had symptoms that lasted longer than 6 weeks. Most common symptoms included respiratory congestion, muscle pain, and loss of taste or smell. Fewer breakthrough cases experienced fever. For those who experienced “long COVID,” they experienced a prolonged loss of smell, persistent cough, fatigue, weakness, labored breathing, or muscle pain.

    • Among those in the study who advised on household transmission, no secondary infections were detected.

    What Does Science Say A Vaccinated Person Will Experience If Exposed to Other Variants?

    As mentioned previously, the delta variant has been the most contagious of the mutations thus far, and could cause more severe illness than other variants.

    However, if one is vaccinated, here is what the research tells us so far:

    • Fully vaccinated people who catch the delta variant are at lower risk for severe COVID-19 symptoms which would result in hospitalization and death.

    • Most common symptoms are fever, headache, sore throat, and runny nose.

    • The delta variant is currently the predominant strain in the US. While studies are ongoing to determine transmission rates among vaccinated people, it has been determined that vaccinated people appear to be infectious for a shorter period of time.

    Luckily, it is not news to the scientific community that good nutrition has a significant impact on how well one is able to fight off infection.

    Let’s take a deeper dive into the research behind immune health, where nutrition comes into play, and if supplements are really worthwhile.

    How Nutrition Plays a Role in COVID and Its Variants

    Research is clear that poor nutrition and an unhealthy diet significantly weakens the immune system and increases susceptibility to infectious disease.

    A July 2021 study showed diets with a high consumption of saturated fatty acids (SFA), sugars, refined carbohydrates, and low levels of fiber and antioxidants modulate the balance between the adaptive and innate immune responses leading to an impaired host defense against viruses.

    With this knowledge, scientists were able to determine which macro- and micronutrients are most important to one’s body under threat of COVID-19 infection.

    Firstly, protein, vitamins A, B complex, C, D and E, and trace elements have an important role in the prolonged and effective stimulation of the immune system, as well as repair and regeneration of tissues that have been damaged.

    Thus, deficiencies in vitamin and trace element levels could result in a more detrimental fate after being infected.

    One can support their immune system by ensuring proper nutrition, keeping the below foods in mind as the best sources of nourishment.

    If there are any concerns about if one is doing the very best they can, reach out to a dietitian near you for a helpful hand obviously, but let’s cover some of the basics here first!

    What Foods Support Immune Health?

    This list is not exhaustive, however is extensive! Use this as a guide to help fuel your immune health!

    • Protein:
      • Adequate protein from lean animal sources and plant-based sources, particularly arginine (despite being semi-essential i.e., the body can produce adequate amounts normally, however, it may become essential when the body is under stress): turkey, pork loin, chicken, pumpkin seeds, soybeans, peanuts, and spirulina.
      • Methionine also plays a role, and can be found in foods like ground turkey, beef, tuna, lean pork, tofu, milk, Brazil nuts, and large white beans.
        • Note, these lists are in order from highest contents to significant contents, but less.
    • Vitamin A:
      • Found in foods like milk, meats, eggs, orange and yellow vegetables.
    • B Vitamins:
      • Most can be found in enriched or fortified grain products; naturally found forms, if available in plants and animal sources, have higher bioavailability from animal sources.
      • Thiamin:
        • Whole wheat flour, rice (rice bran is particularly high), peas, legumes, pork
      • Niacin:
        • Liver, chicken, tuna, turkey breast, salmon
      • Riboflavin:
        • Meats, whole grain, green leafy vegetables
      • Pantothenic acid:
        • Beef, poultry, seafood, and organ meats, dairy products, nuts and legumes, mushrooms, avocados, potatoes, and broccoli.
      • Biotin:
        • Egg yolks, cereal grains, human milk, rapeseed oil, royal jelly (also found in low amounts across many foods)
      • Folate:
        • Milk, fortified cereal, bread, and grain products
      • B12:
        • Animal products (meat, poultry, fish, eggs)
      • B6 (pryoxidine):
        • Animal products, whole grains, vegetables, and nuts
    • Vitamin C:
      • Found in fruits, particularly citrus fruits and those eaten raw (since C is sensitive to temperature), vegetables (same as fruits), and organ meats.
    • Vitamin D:
      • Found in the skin and flesh of oily fish (e.g. salmon, mackerel, herring), cod liver oil, and fortified dairy products.
      • High dose of vitamin D3 intervention appears not to be useful for moderate to severe COVID-19.
    • Vitamin E:
      • Found in wheat germ (whole wheat), sunflower oil, safflower oil, olive oil, and canola oil.
    • Zinc:
      • Found in protein rich foods, particularly liver and seafood; also beans and grains (and enriched grains).
      • Note that zinc supplements (more than Recommended Daily Intake) might shorten smell recovery, without influencing the complete recovery duration from COVID-19.
    • Selenium:
      • Found in Brazil nuts, seafoods, organ meats and muscle meats, dairy, and whole grains.
    • Copper:
      • Found in seafood (oysters, crab and lobster), beef liver, rice and pasta, legumes, nuts, and potatoes.
    • Magnesium:
      • Found in greens, nuts, seeds, dry beans, whole grains, wheat germ, wheat and oat bran.

    Be sure to try these delicious recipes out in your meal plan to help support your immune health!

    Hearty Main Meals to help support your immune system:

    • Boneless Turkey Roast Recipe
      Boneless Turkey Roast Recipe
    • Image of air fryer turkey burgers plated.
      Air Fryer Turkey Burgers
    • Healthy Tuna Noodle Casserole is a simple, low-carb main meal the entire family will enjoy! Relive the homemade classic, made healthier! Can easily be made gluten-free as well. #tunanoodlecasserole #healthycasserole #seafood2xweek #tunarecipes
      Healthy Tuna Noodle Casserole
    • PLATED MEATBALLS WITH POTATOES.
      Pistachio Turkey Meatballs

    Simple and Satisfying Smoothies to Support Immune Health

    • Green Smoothie For Kids - Tired of making green juices that end up in the trash! Then this recipe is for you! As a newly converted green smoothie fan, I promise you this Green Smoothie For Kids is one that the entire family will enjoy... pink promise! #greensmoothie #greensmoothieforkids #spinachsmoothieforkids #greensmoothierecipes
      Green Smoothie For Kids
    • Carrot Cake Smoothie Bowl
    • Pomegranate Apple Smoothie with Butternut Squash @shawsimpleswaps
      Pomegranate Apple Smoothie with Butternut Squash

    Where Do Supplements Come Into Play For Immune Health

    If any of the above vitamins, minerals, or protein are proving difficult to obtain in adequate amounts, especially while experiencing symptoms of COVID-19 infection that suppress appetite or ability to eat, supplementation with a multivitamin and/or nutrition drinks may be warranted.

    For more information about supplements, check out my supplement safety net post!

    Now, let’s dive into the potential supplements that have been studied when it comes to COVID-19. Please note this is not our recommendation to try them, but merely sharing what the science has available right now. Always be sure to speak with your own physician before implementing a supplement routine.

    Probiotics:

    SARS-CoV-2 exacerbates gut inflammation and those with COVID-19 have been found to have altered gut microbiomes; it’s been suggested that probiotic supplementation (with beneficial bacteria that have been depleted) can lessen the potential for opportunistic bacteria to multiply. Ultimately, it is proposed, with indirect evidence, that there is potential for probiotic supplementation to help restore gut diversity during or after COVID-19 illness and lessen damage inflicted.

    Other dietary supplements:

    Herbal formulations:

    Lianhua Qinwen, which is made of Forsythia suspensa, Lonicera japonica, Ephedra sinica, Isatis indigotica, Pogostemon cablin, Rheum palmatum, Glycyrrhiza uralensis, Dryopteris crassirhizoma, Rhodiola crenulata, Houttuynia cordata, Prunus sibirica, gypsum and 1-menthol, were found to shorten recovery time and have been deemed safe for consumption when taken as indicated.

    Elderberry:

    Trials are ongoing. It’s safe to consume as directed, but there’s not enough evidence to date that supplementation helps to treat viral respiratory illness.

    Melatonin:

    Trials are ongoing as well; however, studies indicate that increased melatonin levels in the body are correlated with a decrease in catching COVID-19. Also, small studies have shown that melatonin exposure when ill with COVID-19 in hospital correlated with higher survival rates. 

    While not a supplement, data also suggests you need to get adequate sleep!

    Thanks so much for stopping by! If you enjoyed this post, please consider sharing it with a friend and tagging me on social: Facebook, Instagram, or Pinterest.

    Air Fryer Meatloaf Recipe

    August 15, 2021

    Air fryer meatloaf on brown parchment paper with veggies.

    Take your meatloaf up a notch! Packed with Greek inspired flavors, this juicy Air Fryer Meatloaf Recipe is a crowd pleaser for all. Made in under 40 minutes, this air fried meatloaf freezes wonderfully and is a great recipe to simplify family mealtimes for the busy back-to-school season! Plus, it’s packed with nutrient-rich beef, a foundational source of nourishment that supports a healthy diet and active lifestyle. 

    Air fryer meatloaf on brown parchment paper with veggies.

    Disclosure: This post is in collaboration with Beef. It’s What’s for Dinner. managed by NCBA, a contractor to the Beef Checkoff. I received compensation, but all opinions are my own. Thanks for supporting the brands that keep the Shaw Kitchen running!

    If the stress of going back-to-school and the return to a “new” sense of normalcy is weighing on you, then trust me when I say you aren’t alone! This recipe was inspired due to my kindred spirit (or anxiety, TBD), to ensure you and I both have a solid recipe to fall back on when those crazy evenings leave you wondering, “What am I going to serve the crew for dinner tonight?!”

    Why You Need to Make this Meatloaf in an Air Fryer Using Ground Beef

    You’re hot, it’s hot, we’re all hot. DYK that using your air fryer versus a convection or conventional oven actually keeps your house cooler? Yep! The compact air fryer allows you to cook your food thoroughly and tastefully but with less heat thanks to its smaller heating unit!

    If that hasn’t sold you, using your air fryer also keeps your electricity bill down in comparison to a larger oven, especially during peak hours! Air fryers cook your food in approximately 25% less time than an oven, resulting in less electricity being used! While I’m still waiting for a .gov resource to come out with a study to back this up, I promise you I am an air fryer expert! After all, I did write the book, The Air Fryer Cookbook For Dummies!

    Now, the most important part of this recipe, you need to use Ground Beef. Yes, Ground Beef. Why?

    Because Ground Beef has a stellar nutrient profile that provides your crew with not only a high-quality protein source, but also nine essential vitamins and minerals, like iron, zinc, and other B-vitamins. These nutrients help your entire family stay strong and healthy, physically, emotionally, and mentally!

    Plus, nutrients like zinc found in beef also play an important role in your immune health, something I know many are eager to learn more about as we enter back into face-to-face learning!

    Ingredients You Need to Make Meatloaf In the Air Fryer

    White marble tile with ground beef and ingredients to make meatloaf separated out.

    Ingredient Notes:

    • Ground Beef: Choose the desired level of leanness your family prefers. I opted for 90% lean/10% fat as that’s what my market had on sale this week! But I did trial this recipe with an 85% lean/15% fat and that worked wonderfully too; so seriously, you do what works best for you (and your wallet!)
    • Breadcrumbs: I like to use a whole wheat breadcrumb in this recipe to boost the nutrition, but you can absolutely use what you have on hand. If you follow a gluten-free diet, be sure to purchase a gluten-free breadcrumb for this.
    • Roasted Red Bell Pepper: If you’re tight on time, make sure to pick up a jar of roasted red bell peppers in water and keep it in your pantry. This is a great time saving hack! But, if you’re making this during meal prep, roast up a big tray of mini bell peppers and save extra to serve as a side with the meatloaf.
    • Spices: I’ve experimented with a few staples I keep in my pantry to come up with this Greek inspired blend. There is nutmeg in this spice blend recipe (not mentioned above), however it is optional as I know it may not be a common spice in your cabinet (except maybe during the holiday season!)

    Ingredient Swaps:

    • Breadcrumbs: You can sub in rice (like I’ve done in this recipe), but please note the texture and taste will be slightly different. This is really a suggestion if you need to keep this gluten-free and don’t have gluten-free breadcrumbs on hand.
    • Egg: If you’re allergic to egg, you can substitute an egg alternative in here, like a flax egg. To make a flax egg, combine 1 tablespoon of ground flaxseed with 2.5 tablespoons of water, mix, let sit 5 minutes, then combine in the recipe.
    • Spices: Purchase a Greek seasoning blend and add 3 teaspoons into the recipe, omit other spices.
    Air fryer meatloaf sliced thin with gyro toppings.

    How to Make Air Fried Meatloaf with a Greek Twist

    If you’ve got 15 minutes, you’ve got time to prep this meatloaf. And, the preparation could actually be done in 10 minutes if you pick up some of the suggested time saving swaps (see recipes tips and tricks below). Stick it in the air fryer for 35 minutes and viola, dinner is served!

    Let me show you how easy it is!

    Step 1:

    Take the thawed, lean Ground Beef and add the spices to it.

    Step 2:

    Mix in the chopped red peppers, eggs, and breadcrumbs.

    Step 3:

    Liberally spray the 1-pound mini meatloaf aluminum pans (or silicon if you have them) with cooking spray.

    Step 4:

    Evenly portion the Ground Beef meatloaf mixture amongst the two loaf pans.

    Process shots to make meatloaf in air fryer basket.

    Step 5:

    At this point, wrap the meatloaf pans in tin foil and place in the air fryer to begin cooking.

    Step 6:

    Set the air fryer temperature to 350 degrees F and place the two trays into the air fryer basket. Close the basket and set timer for 35 minutes.

    Step 7:

    When cooking is completed, remove the tin foil covers and place a thermometer into the meatloaf’s center to test internal temperature. It should read 160 degrees when done. If it’s not quite there, add 3 minutes back to the air fryer time and cook until 160 degrees F is reached.

    Step 8:

    Remove and let rest 10 minutes before slicing. Enjoy with desired sides!

    Process shots to make meatloaf in air fryer basket.

    The Shaw Kitchen crew loves making this into mini meatloaf pita sandwiches. The mini pita sammies are a great build-your-own style meal that helps increase everyone’s intake of veggies too! Plus, it looks pretty with all the color, right?!  

    Air fryer meatloaf made into pita sandwiches.

    Recipe Tips to Make Meatloaf in the Air Fryer a Breeze

    Keep these tips in mind as you add this recipe to your meal prep!

    • Stock up on mini loaf pans.  
      • This allows for a no mess clean up and fits in almost every size air fryer!
      • You can purchase these at most major markets on the baking aisle or online. They do make silicon loaf pans as well that will work in your air fryer, so for a more sustainable option you can consider those!
    • Keep an eye on cooking time.
      • DYK every air fryer model actually “heats” differently? It may sound strange, but ask any air fryer owner and they’ll tell you their air fryer gets “hotter” faster or slower than their friends and thus cooks a recipe either faster or slower than a recipe says. Get to know your air fryer and if you recognize it cooks “quicker,” temp the meatloaf at 30 minutes to avoid overcooking.
    • Don’t “over mix” the Ground Beef!
      • Use a gentle touch to maintain a tender and juicy texture.
    • Keep these food safety tips in mind when choosing your Ground Beef.
      • When selecting fresh beef, look for product with a bright cherry-red color and firm to the touch. Beef in a vacuum-sealed bag typically has a darker purplish-red color; when exposed to the air, it will turn bright red.
      • Always purchase beef on or before the sell-by date.
      • Ensure raw beef is safely and thoroughly refrigerated. Avoid temperature abuse of product.
    • Store your leftovers properly.
      • If you prep the meatloaf ahead of time to cook later in the week, be sure to refrigerate it and cook within 1-2 days for food safety reasons.
      • If you cook the meatloaf in the air fryer, you can store the leftovers in an airtight container in the refrigerator once cooled for up to 5 days, or in the freezer for up to 3 months.
    Air fryer meatloaf sliced thin with gyro toppings.

    Ask the RDN FAQs: Nutrition & Beef

    This section covers the most common questions I get from clients and followers about beef and the nutrition it provides, especially during the growing years!

    I’ve heard a lot about beef being a “fundamental first food”? What does that mean?


    Given beef contains 10 essential nutrients that are crucial in the first 24 months of life, it has been referred to as a “fundamental first food” by the Dietary Guidelines for Americans in their most recent edition. Incorporating beef in age-appropriate forms throughout a child’s first 24 months allows them to receive the nutrients that will help support healthy growth and development.

    Wait, should I only offer beef to my kids? Or is the nutrition found in beef important throughout the lifespan?

    While it’s important to offer beef to kids since it provides many important nutrients, like iron and choline, that support growth and development, it’s also a wonderful, nutrient-rich source of high-quality protein that can serve as a great addition to one’s diet throughout their life.

    Do the nutrients found in beef vary depending on the type/cut?


    Yes and no! But, let’s make it very simple! All beef contains 10 essential nutrients, including protein, iron, zinc, choline, selenium, vitamin B6, niacin, riboflavin, vitamin B12, and phosphorus.
     
    The main “nutrient” that varies will be the amount of fat the beef contains, with the leaner cuts being lower in total fat, as well as saturated fat, in comparison to other cuts.

    Other Simple Beef Recipes to Prep Ahead for Back-To-School Season 

    • Two plates of beef taquitos on a white and checkerboard black backdrop.
      Air Fryer Taquitos
    • Instant Pot Round Roast
    • White plate with hoagie roll in center stuffed with baby meatballs, lettuce greens, and white sauce.
      Baby Meatballs Recipe
    • Beef Brisket Nachos

    If you try this recipe, would you please do me a favor and leave a star rating in the recipe box and/or comment below! This helps immensely in Google to continue delivering high quality content to you. And please be sure to tag and share what you made with me on social, I love seeing your creations! You can find me here: Instagram – Facebook – Pinterest!

    Air fryer meatloaf on brown parchment paper with veggies.
    Print Recipe
    5 from 1 vote

    Air Fryer Meatloaf Recipe

    Packed with Greek flavors, this juicy Air Fryer Meatloaf Recipe isa crowd pleaser for all. Made in under 40 minutes during your weekend meal prep, it freezes wonderfully and is a great recipe to pull out of the freezer to put dinner on the table in no time!
    Prep Time10 minutes mins
    Cook Time35 minutes mins
    Total Time45 minutes mins
    Course: Dinner
    Cuisine: American
    Diet: Diabetic
    Servings: 8 servings
    Calories: 171kcal
    Author: Liz Shaw

    Ingredients

    • 24 ounces 90% lean/10% fat Ground Beef
    • 2 teaspoons Greek oregano
    • 1 teaspoon dried parsley
    • 1/2 teaspoon dried dill
    • 1/2 teaspoon garlic powder
    • 1/4 teaspoon dried nutmeg optional
    • 1/4 teaspoon ground black pepper
    • 1/4 teaspoon salt
    • 1 each finely chopped roasted red bell pepper
    • 1 each large egg
    • 1/2 cup whole wheat breadcrumbs

    Instructions

    • In a large bowl, mix together the Ground Beef and spices (Greek oregano, parsley, dill, garlic, nutmeg, black pepper, and salt.)
    • Mix in the chopped red bell pepper, large egg, and breadcrumbs until combined.
      Liberally spray loaf pans with cooking spray or an olive oil mist, then evenly divide the meatloaf mixture amongst two mini (1-pound) loaf pans. Cover with aluminum foil.
    • Preheat air fryer to 350 degrees F and set the timer for 35 minutes.Place the two mini loaf pans into the air fryer basket, then close. Check the temperature of the meatloaves when timer stops to ensure they read 160 degreesF. Remove and let rest 10 minutes before slicing, or cool completely before storing.
    • Serve with desired sides like sliced cucumbers, tomatoes, onion, pita bread, and my Creamy Herbed Feta Dip.

    Notes

    Recipe Notes:
    • Recipe yields 2 mini loaves; or 8, 3-ounce servings 
    • To make this recipe gluten-free, use a gluten-free breadcrumb or cooked rice in place of the whole wheat breadcrumbs.
    • If you need to sub out the egg, use a flax egg. Make this by using 1 tablespoon of ground flaxseed and mixing it with 2.5 tablespoons of water. Let it sit for 5 minutes before adding as the egg in the recipe.
    • Don’t forget to spray your loaf pans with cooking spray or olive oil before putting the meatloaf inside. It makes a great difference in being able to easily get the meatloaves out of the pans!
    • Serve with my Creamy Herbed Feta Dip.
    Storage:
    • If you prep the meatloaves ahead of time to cook later in the week, be sure to refrigerate them and cook within 1-2 days for food safety reasons.
    • If you cook the meatloaves in the air fryer, you can store the leftovers in an airtight container in the refrigerator once cooled for up to 5 days, or in the freezer for up to 3 months.

    Nutrition

    Calories: 171kcal | Carbohydrates: 6g | Protein: 18g | Fat: 9g | Saturated Fat: 3g | Polyunsaturated Fat: 1g | Monounsaturated Fat: 4g | Trans Fat: 1g | Cholesterol: 56mg | Sodium: 165mg | Potassium: 279mg | Fiber: 1g | Sugar: 1g | Vitamin A: 9IU | Vitamin C: 2mg | Calcium: 12mg | Iron: 2mg

    Creamy Herbed Feta Dip

    August 9, 2021

    Creamy, tangy, delicious, and made in less than 5 minutes, this Creamy Herbed Feta Dip is the go-to cheese dip recipe you’ve been searching for! Simply gather your favorite light cream cheese, feta cheese, herbs, and spices, and you’re all set to snack. This whipped feta dip keeps things light and can be paired with your favorite veggies, crackers, and crostini!

    Feta dip on a serving platter with veggies.
    [feast_advanced_jump_to]

    Why you need to make this Whipped Feta Dip

    When prepping for a gathering, sometimes less is more! While you can always go store bought for your appetizer spread, this quick, homemade dip makes it super simple to prepare a fresh dish from scratch.

    This Creamy Herbed Feta Dip recipe can be doctored up in MANY ways to suit anyone’s palate and will certainly come in handy when on a time crunch or when your brain’s energy is simply devoted elsewhere (see: party decorations, dinner menu, getting the family washed, dressed, and together!)

    While there are millions of dip recipes with cream cheese out there, I think this is one you will keep coming back to!

    What you need to make this Herbed Cream Cheese Dip Recipe

    Ingredients for creamy feta dip dip on a platter.

    Ingredient Tips

    • Cheeses: To make your dip blend together well, leave your cheese out on the counter for 15 minutes before blending (if this tip came a bit too late, just be sure to blend for a little longer than you think so that the blender can warm the cheeses up)!
      • For the feta, I’d recommend full fat here but if you’d like to use fat free, go ahead!
    • Lemon: Use fresh lemon juice if you can.
    • Variations: For some other fun flavor variations, blend in roasted red peppers, sun dried tomatoes, or spinach!

    Ingredient Swaps

    • Dairy free/vegan: Swap out the cream cheese for a plant based cream cheese (tofu blends tend to be very neutral) and find yourself a dairy free feta! It’s amazing what’s become available these days! If it’s in your grocery or fine foods store, give it a try!
      • For those with lactose sensitivity/intolerance, note that feta is naturally low in lactose. So, if you’re able to tolerate feta, maybe just swap out the cream cheese for a plant based version!
    • Herbs: I’ve used parsley and dill but if one or the other is not to your preference, try fresh basil, oregano, and/or fennel fronds.
      • While fresh herbs are best for this recipe, if you need to use dried, use 1/3 of the amount called for fresh. (I.e., 1 Tbsp fresh = 1 tsp dried, or 1/4 cup fresh = 1 rounded Tbsp dried)
    • Garlic powder: I like using garlic powder in this recipe because I think it blends better. However, if you prefer fresh, use one or two cloves depending on how garlicky you’d like the dip to be!

    How to make this Homemade Cheese Dip

    Directions for how to make the dip recipe.

    Recipe Notes + Expert Tips

    • I suggest using a blender for this dip but a small food processor would work too!
    • If you like your Creamy Herbed Feta Dip extra lemony, consider stirring in some lemon zest after blending. Start with the zest from half your lemon and go from there!
    • Pair with sliced veggies and/or crostini for an appetizer. You can also try making your own pita chips; instead of using the chili spices, simply add salt and pepper (or your favorite spice mix) and bake as directed!
    Creamy Herbed Feta Dip in a bowl with pita and vegetables.

    FAQ for this…

    How does cheese fit into a healthy diet?

    Cheese falls into the dairy group of foods and it is recommended by the USDA to have 3 servings of dairy per day. Dairy foods provide calcium, potassium, vitamin D, and protein, and not to mention, they’re very satisfying and delicious!

    For most cheeses, the serving amount varies, but for a cheese like feta, the serving is one ounce (also note feta is a bit higher in sodium so take care if this applies to you). For cream cheese, which is a processed cheese, the serving is two ounces.

    So, add a few ounces of cheese to your daily intake of delicious foods to keep your health on track! (PS. If you are vegan or choose not to eat cheese, don’t forget that fortified soy products, like soy milk, also count towards the dairy intake!)

    Are there any other ways to enjoy this whipped feta recipe other than as a dip?

    Yes, this recipe is super versatile! To add to meal, served it up with my Air Fryer Falafel, Beet Falafel Tacos or on top of a Deluxe Veggie Sandwich! It can also be served on burgers and with veggie fries! Lastly, if you have leftovers (unlikely, but possible!), stir in a bit of milk to make a creamy salad dressing!

    Feta and cream cheese dip paired with veggies and breads.

    Other Dip Recipes You May Enjoy

    • vegan cheese fondue sharon palmer- shaws simple swaps
      Vegan Cheese Fondue
    • Roasted Beet Toast Shaws Simple Swaps2
      Roasted Beet Toast
    • Chili Cheese Pita Wedges + BBQ Hummus Dip @shawsimpleswaps
      Chili Cheese Pita Wedges + BBQ Hummus Dip
    • Image of plated spinach dip with chips and cauliflower around it.
      Cottage Cheese Spinach Dip

    If you try this recipe, would you please do me a favor and leave a star rating in the recipe box and/or comment below! This helps immensely in Google to continue delivering high quality content to you. And please be sure to tag and share what you made with me on social, I love seeing your creations! You can find me here: Instagram – Facebook – Pinterest!

    Print Recipe
    5 from 3 votes

    Creamy Herbed Feta Dip Recipe

    Fresh flavors combine with creamy cheese in this one-of-a-kind Mediterranean inspired dip! Serve with fresh veggies or bread for a delicious appetizer.
    Prep Time5 minutes mins
    Cook Time0 minutes mins
    Total Time5 minutes mins
    Course: Spread
    Cuisine: American
    Diet: Vegetarian
    Servings: 16 servings
    Calories: 67kcal
    Author: Liz Shaw

    Ingredients

    • 8 ounces light cream cheese
    • 8 ounces feta
    • 1 each juice of 1 lemon
    • 1/4 cup fresh dill
    • 1 teaspoon dried parsley
    • 1/2 teaspoon garlic powder
    • 1/4 teaspoon black pepper
    • 1/8 teaspoon salt optional

    Instructions

    • Toss all ingredients into a high powered blender or food processor. Blend until smooth, wiping down the sides as necessary.
    • Enjoy immediately on fresh bread or store in the refrigerator in an air tight container for up to 5 days.

    Notes

    • I suggest using a blender for this dip but a small food processor would work too!
    • If you like your Creamy Herbed Feta Dip extra lemony, consider stirring in some lemon zest. Start with the zest from half your lemon and go from there!
    • Pair with sliced veggies and/or crostini for an appetizer. You can also try making your own pita chips; instead of using the chili spices, simply add salt and pepper (or your favorite spice mix) and bake as directed!
    • To add to meal, this dip can also be served with my Air Fryer Falafel, Beet Falafel Tacos or on top of a Deluxe Veggie Sandwich!
    • If you have leftovers (unlikely, but possible!), stir in a bit of milk to make a creamy salad dressing!

    Nutrition

    Calories: 67kcal | Carbohydrates: 2g | Protein: 3g | Fat: 5g | Saturated Fat: 3g | Polyunsaturated Fat: 1g | Monounsaturated Fat: 1g | Cholesterol: 20mg | Sodium: 243mg | Potassium: 51mg | Fiber: 1g | Sugar: 1g | Vitamin A: 195IU | Vitamin C: 1mg | Calcium: 93mg | Iron: 1mg

    Want more Shaw Kitchen recipes? Then sign up here for my 5 Day Stress-Free Meal Plan delivered straight to your inbox!

    • Page 1
    • Page 2
    • Page 3
    • Interim pages omitted …
    • Page 14
    • Go to Next Page »

    Primary Sidebar

    Hi, I'm Liz!

    Registered Dietitian, Personal Trainer & Author. Join me in making healthy living fun with quick recipes and fitness tips!

    Learn more about me >

    Search

    Heart-Healthy Sweets

    Sweet Potato Pie Cake - A no added sugar delight to satisfy a sweet tooth morning, noon & night! Sweetened with prunes and sweet potatoes! @shawsimpleswaps

    Sweet Potato Pie with PB Frosting

    Mango Banana Sorbet - No Added Sugar @shawsimpleswaps

    Mango Banana Sorbet – No Added Sugar

    Maple Sunflower Seed Dessert Dip - Tree Nut, Peanut & Gluten Free @shawsimpleswaps

    Maple Sunflower Seed Dessert Dip

    No Added Sugar Chocolate Pudding - a simple recipe to satisfy a sweet tooth with no added sugar! #noaddedsugardessert #sugarfreedessert #healthypudding #chocolatepuddingrecipe

    No Added Sugar Chocolate Pudding

    Sugar Free Chocolate Spread

    Sugar Free Chocolate Spread

    A rich, creamy chocolate dessert dip made with the essential ingredients you likely have on hand! This Sweet Hummus Recipe is the perfect snack or party dip! The beauty of this baby is you can make it all in the blender, aka, no mess clean up! #desserthummus #desserthummusrecipe #healthydesserthummus #desserthummushealthyrecipe #desserthummuschocolate

    Sweet Hummus Recipe

    20 Low Sugar Dessert Recipes

    Picture of white pan with strawberry nice cream inside with crushed golden cake cones and a brown and silver ice cream scoop peaking out the side.

    Strawberry Nice Cream

    More Recipes

    Air Fryer Recipes

    Air fryer meatloaf on brown parchment paper with veggies.

    Air Fryer Meatloaf Recipe

    White plate and backdrop with green roasted brussel sprouts and red miso dressing in bowl.

    Air Fryer Frozen Brussel Sprouts with Miso Dressing (i.e. Brussels Sprouts)

    5 Air Fryer Tips for the New User

    Image of air fryer turkey burgers plated.

    Air Fryer Turkey Burgers

    Image of plated falafel with peppers.

    Air Fryer Falafel

    Plated orange chicken.

    Air Fryer Orange Chicken

    More IP Favorites

    Footer

    ↑ back to top

    Collage of publication logos.

    About

    • Publications + Press
    • Books
    • Shop

    Newsletter

    Subscribe to my Substack.

    Contact

    • Disclosure
    • Privacy Policy
    • Accessibility

    Copyright © 2025 Shaw Simple Swaps

    Rate This Recipe

    Your vote:


    A rating is required
    A name is required
    An email is required